Olympus 750-GP1 Stylus 750 Instruction Manual (English) - Page 28
Sel. Album, Playback Menu
 |
UPC - 659096711439
View all Olympus 750-GP1 manuals
Add to My Manuals
Save this manual to your list of manuals |
Page 28 highlights
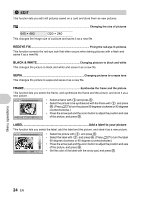
ALL ERASE Erase all the pictures in the internal memory and the card • Select [YES], and press o. Menu operations Album playback menus • A card registered with an album is required. g "ALBUM ENTRY Adding pictures to an album" (P. 27) When the still picture is selected 2 SLIDESHOW EDIT PP RINT ORDER 1 SEL. PLAYBACK ALBUM MENU SETUP 3 CLOSE ALBUM EXIT MENU ERASE SILENT MODE SET OK When a movie is selected 2 MOVIE PLAY EDIT PP RINT ORDER 1 SEL. PLAYBACK ALBUM MENU SETUP 3 CLOSE ALBUM SILENT ERASE MODE EXIT MENU SET OK 2 PLAYBACK MENU 0 y*1 R*1*2 UNDO ENTRY LABEL IMAGE *1This is not displayed when the movie is selected. *2This feature is not available during album playback. g "SLIDESHOW Playing back pictures automatically" (P. 22) "MOVIE PLAY Playing back movies" (P. 23) "Print settings (DPOF)" (P. 38) "SETUP menus" (P. 29) "ERASE Erase selected pictures/Erase all pictures (P. 27) "SILENT MODE Setting to turn off operational sounds" (P. 21) 1 SEL. ALBUM To switch albums, select the desired album from [SEL. ALBUM]. g "ALBUM See the pictures registered in the album" (P. 23) 2 PLAYBACK MENU See other album UNDO ENTRY Undoing album entries Even if a picture is removed from an album, the picture remains in the card. SEL. IMAGE Select one frame at a time to undo. SEL. IMAGE 1 2 3 4 5 6 7 8 9 10 11 12 SET OK EXIT OK HOLD • Press the add R. arrow pad to select a picture, and press o to • Press o again to cancel the selection. • When the selection is completed, press o for a while. UNDO ALL Undo all pictures in the album 28 EN
-
 1
1 -
2
-
3
-
4
-
5
-
6
-
7
-
8
-
9
-
10
-
11
-
12
-
13
-
14
-
15
-
16
-
17
-
18
-
19
-
20
-
21
-
22
-
 23
23 -
 24
24 -
 25
25 -
 26
26 -
 27
27 -
 28
28 -
 29
29 -
 30
30 -
 31
31 -
 32
32 -
 33
33 -
34
-
35
-
36
-
37
-
38
-
39
-
40
-
41
-
42
-
43
-
44
-
45
-
46
-
47
-
48
-
49
-
50
-
51
-
52
-
53
-
54
-
55
-
56
-
57
-
58
-
59
-
60
-
61
-
62
-
63
-
64
-
65
-
66
-
67
-
68
-
69
-
70
-
71
-
72
-
73
-
74
-
75
-
76
-
77
-
78
-
79
-
80
 |
 |
