Olympus C-2000 C-2000 Zoom Instruction manual (5.5 MB) - Page 130
Panorama Mode
 |
UPC - 050332128231
View all Olympus C-2000 manuals
Add to My Manuals
Save this manual to your list of manuals |
Page 130 highlights
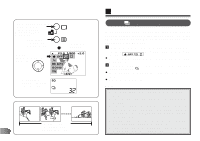
LCD Monitor Écran ACL Monitor LCD Function card mode Mode Fonction carte Modo de tarjeta de función Control panel Écran de commande Panel de control Overlap the left end of the picture with the right end of the previous picture (when shooting to the right). Faire se chevaucher le bord gauche de la photo et le bord droit de la vue précédente (chronologie de prise de vues vers la droite). Superponga el extremo izquierdo de la imagen con el extremo derecho de la imagen anterior (cuando fotografíe hacia la derecha). 130 E PANORAMA MODE ● The Function card indicator appears on the control panel. ● See the Note on page 98. ● The connecting direction (right, left, up, down) can be selected with the Jog dial. When the LCD monitor is on: 1 Set the Mode dial to "P", turn on the LCD monitor and press the Menu button. Press the bottom arrow on the Jog dial to select . 2 Press the right arrow on the Jog dial to select the Function card mode . 3 Press the OK button. When the LCD monitor is off: 1 Set the Mode dial to "P", press the Menu button, then press the bottom arrow on the Jog dial until appears on the control panel. Press the right arrow on the Jog dial to select the Function card mode . 2 Press the OK button. ● The LCD monitor turns on automatically.
-
 1
1 -
2
-
3
-
4
-
5
-
6
-
7
-
8
-
9
-
10
-
11
-
12
-
13
-
14
-
15
-
16
-
17
-
18
-
19
-
20
-
21
-
22
-
23
-
24
-
25
-
26
-
27
-
28
-
29
-
30
-
31
-
32
-
33
-
34
-
35
-
36
-
37
-
38
-
39
-
40
-
41
-
42
-
43
-
44
-
45
-
46
-
47
-
48
-
49
-
50
-
51
-
52
-
53
-
54
-
55
-
56
-
57
-
58
-
59
-
60
-
61
-
62
-
63
-
64
-
65
-
66
-
67
-
68
-
69
-
70
-
71
-
72
-
73
-
74
-
75
-
76
-
77
-
78
-
79
-
80
-
81
-
82
-
83
-
84
-
85
-
86
-
87
-
88
-
89
-
90
-
91
-
92
-
93
-
94
-
95
-
96
-
97
-
98
-
99
-
100
-
101
-
102
-
103
-
104
-
105
-
106
-
107
-
108
-
109
-
110
-
111
-
112
-
113
-
114
-
115
-
116
-
117
-
118
-
119
-
120
-
121
-
122
-
123
-
124
-
 125
125 -
 126
126 -
 127
127 -
 128
128 -
 129
129 -
 130
130 -
 131
131 -
 132
132 -
 133
133 -
 134
134 -
 135
135 -
136
-
137
-
138
-
139
-
140
-
141
-
142
-
143
-
144
-
145
-
146
-
147
-
148
-
149
-
150
-
151
-
152
-
153
-
154
-
155
-
156
-
157
-
158
-
159
-
160
-
161
-
162
-
163
-
164
-
165
-
166
-
167
-
168
-
169
-
170
-
171
-
172
-
173
-
174
-
175
-
176
-
177
-
178
-
179
-
180
-
181
-
182
-
183
-
184
-
185
-
186
-
187
-
188
-
189
-
190
-
191
-
192
-
193
-
194
-
195
-
196
-
197
-
198
-
199
-
200
-
201
-
202
-
203
-
204
-
205
-
206
-
207
-
208
-
209
-
210
-
211
-
212
-
213
-
214
-
215
-
216
-
217
-
218
-
219
-
220
-
221
-
222
-
223
-
224
-
225
-
226
-
227
-
228
-
229
-
230
-
231
-
232
-
233
-
234
-
235
-
236
-
237
-
238
-
239
-
240
-
241
-
242
-
243
-
244
-
245
-
246
-
247
-
248
 |
 |
