Olympus E520 E-520 Instruction Manual (English) - Page 94
LIVE VIEW BOOST, FACE DETECT, FRAME ASSIST (Ruled lines display), EXP/Metering/ISO, EV STEP
 |
UPC - 050332163997
View all Olympus E520 manuals
Add to My Manuals
Save this manual to your list of manuals |
Page 94 highlights
[CONTROL] Allows you to control the camera from a PC using the optional OLYMPUS Studio. [
-
 1
1 -
2
-
3
-
4
-
5
-
6
-
7
-
8
-
9
-
10
-
11
-
12
-
13
-
14
-
15
-
16
-
17
-
18
-
19
-
20
-
21
-
22
-
23
-
24
-
25
-
26
-
27
-
28
-
29
-
30
-
31
-
32
-
33
-
34
-
35
-
36
-
37
-
38
-
39
-
40
-
41
-
42
-
43
-
44
-
45
-
46
-
47
-
48
-
49
-
50
-
51
-
52
-
53
-
54
-
55
-
56
-
57
-
58
-
59
-
60
-
61
-
62
-
63
-
64
-
65
-
66
-
67
-
68
-
69
-
70
-
71
-
72
-
73
-
74
-
75
-
76
-
77
-
78
-
79
-
80
-
81
-
82
-
83
-
84
-
85
-
86
-
87
-
88
-
 89
89 -
 90
90 -
 91
91 -
 92
92 -
 93
93 -
 94
94 -
 95
95 -
 96
96 -
 97
97 -
 98
98 -
 99
99 -
100
-
101
-
102
-
103
-
104
-
105
-
106
-
107
-
108
-
109
-
110
-
111
-
112
-
113
-
114
-
115
-
116
-
117
-
118
-
119
-
120
-
121
-
122
-
123
-
124
-
125
-
126
-
127
-
128
-
129
-
130
-
131
-
132
-
133
-
134
-
135
-
136
-
137
-
138
-
139
-
140
-
141
-
142
-
143
-
144
-
145
-
146
-
147
-
148
 |
 |

94
EN
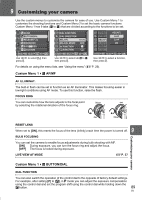
Customizing your camera
9
[CONTROL]
Allows you to control the camera from a PC using the optional OLYMPUS Studio.
[
<
EASY]
Can be set when connecting the camera to a PictBridge-compatible printer. Pictures
can be printed directly without using a PC.
g
“Connecting the camera to a
printer” (P. 103)
[
<
CUSTOM]
Can be set when connecting the camera to a PictBridge-compatible printer. You can
print out pictures with set number of prints, print paper and other settings.
g
“Connecting the camera to a printer” (P. 103)
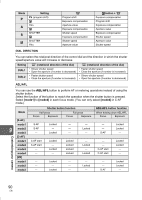
LIVE VIEW BOOST
During live view shooting, you can brighten the monitor for easier confirmation on the subject.
[OFF]
The subject is displayed on the monitor with the brightness level that is adjusted
according to the exposure being set. You can shoot while confirming through the
monitor in advance to get a picture that is to your liking.
[ON]
The camera automatically adjusts the brightness level and displays the subject on the
monitor for easier confirmation. The effect of the exposure compensation adjustments
will not be reflected on the monitor.
g
FACE DETECT
When set to
[ON]
, the camera will detect people’s faces and automatically adjust the focus there.
g
“Using the face detection function” (P. 39)
You can play back close-up images focusing on the subject’s face.
g
“Single-frame/Close-
up playback” (P. 79)
FRAME ASSIST (Ruled lines display)
During live view, you can display the ruled lines on the LCD monitor as a guide when
confirming the composition. Press the
INFO
button repeatedly to display the ruled lines.
g
“Switching the information display” (P. 40)
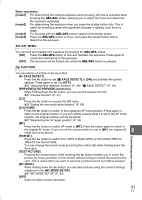
Custom Menu 1
e
EXP/
e
/ISO
EV STEP
You can select the EV step for exposure parameter setting, such as shutter speed, aperture
value, or exposure compensation value, from
[1/3EV]
,
[1/2EV]
, or
[1EV]
.
ISO-AUTO SET
You can set the upper limit when ISO is set to
[AUTO].
This sets the upper limit of the ISO value that automatically changes. The upper limit can be
set from 100 to 1600.
ISO-AUTO
You can set the shooting mode in which the ISO
[AUTO]
setting is activated.
[
P
/
A
/
S
]
The
[AUTO]
setting is activated in all shooting modes except
M
mode. When
[AUTO]
is selected in
M
mode, ISO 100 is set.
[ALL]
The
[AUTO]
setting is activated for all shooting modes. The ISO is automatically
selected to obtain the optimal ISO even in
M
mode.