Olympus SP590UZ SP-590UZ Instruction Manual (English) - Page 48
Protecting images, Rotating images, Adding sound to still pictures, Selecting a position
 |
UPC - 675995801996
View all Olympus SP590UZ manuals
Add to My Manuals
Save this manual to your list of manuals |
Page 48 highlights
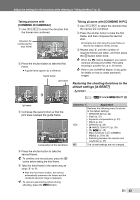
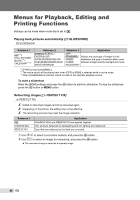
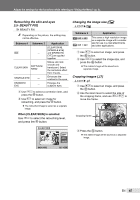
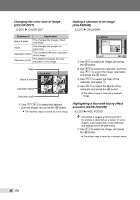
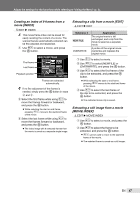
Protecting images [0] J PLAYBACK MENU 0 Protected images cannot be erased by [ERASE] (p. 16), [SEL. IMAGE] or [ALL ERASE] (p. 49), but all images will be erased by [MEMORY FORMAT]/[FORMAT] (p. 50). Submenu 2 OFF ON Application Images can be erased. Images are protected so that they cannot be erased except by formatting of the internal memory/card. 1 Use 9: to select an image. 2 Use 78 to select [ON]. 3 If necessary, repeat steps 1 and 2 to protect other images, and then press the button. Rotating images [y] J PLAYBACK MENU y Submenu 2 U +90° V 0° t -90° Application The image is rotated 90° clockwise. The image is not rotated. The image is rotated 90° counter-clockwise. 1 Use 9: to select an image. 2 Use 78 to select the rotation direction. 3 If necessary, repeat steps 1 and 2 to make settings for other images and press the o button. The new picture orientations will be saved even after the power is turned off. Adding sound to still pictures [R] J PLAYBACK MENU R Submenu 2 YES NO Application The camera adds (records) sound for approx. 4 seconds while playing back the image. This is useful for recording notes or comments about the image. No sound is recorded. 1 Use 9: to select an image. 2 Aim the microphone towards the sound source. Microphone 3 Use 78 to select [YES], and press the o button. ● Recording starts. Selecting a position for starting playback [INDEX PLAY] J PLAYBACK MENU INDEX PLAY 1 Use 9: to select a movie, and press the o button. 2 Use the zoom lever to select the position division. ● One movie can be divided into 4, 9, 16 or 25 chapters. 3 Use 789: to select a position, and press the o button. ● Playback starts from the selected position. 48 EN
-
 1
1 -
2
-
3
-
4
-
5
-
6
-
7
-
8
-
9
-
10
-
11
-
12
-
13
-
14
-
15
-
16
-
17
-
18
-
19
-
20
-
21
-
22
-
23
-
24
-
25
-
26
-
27
-
28
-
29
-
30
-
31
-
32
-
33
-
34
-
35
-
36
-
37
-
38
-
39
-
40
-
41
-
42
-
 43
43 -
 44
44 -
 45
45 -
 46
46 -
 47
47 -
 48
48 -
 49
49 -
 50
50 -
 51
51 -
 52
52 -
 53
53 -
54
-
55
-
56
-
57
-
58
-
59
-
60
-
61
-
62
-
63
-
64
-
65
-
66
-
67
-
68
-
69
-
70
-
71
-
72
-
73
-
74
-
75
-
76
-
77
-
78
-
79
-
80
-
81
-
82
-
83
-
84
-
85
-
86
 |
 |
