Olympus VN-7600PC VN-7600PC Instructions (English) - Page 3
Power Supply, Setting Time and Date - recorder
 |
UPC - 050332404373
View all Olympus VN-7600PC manuals
Add to My Manuals
Save this manual to your list of manuals |
Page 3 highlights
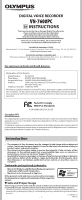
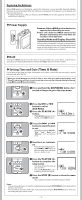
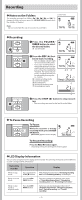
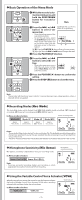
Replacing the Batteries: When [N] appears on the display, replace the batteries as soon as possible. Size-AAA alkaline batteries are recommended. When the batteries are depleted, [O] appears on the display, and the recor-der shuts off. • To replace the battery, make sure that you set the HOLD switch to the opposite direction of the arrow before replacing. h Power Supply Power on: Slide the HOLD switch in the direction opposite that indicated by the arrow. Power off: Slide the HOLD switch in the direction indicated by the arrow while the recorder is not in operation. Standby Mode and Display Shut Off: If the recorder is stopped for 5 minutes or longer during recording or playing, it goes into Standby (power-save) mode, and the display shuts off. To exit Standby mode and turn on the display, press any button. hHold Setting the HOLD switch to the direction of the arrow holds the current status, and all button operations are disabled. Remember to release the HOLD switch to use the recorder. h Setting Time and Date [Time & Date] If you have set the time and date, information as to when a sound file was recorded is stored automatically with that file. When you install batteries for the first time or each time you replace the batteries, the "Month" indication will flash. In such a case, be sure to set the time and date by following steps 4 through 6 described below. 1 Press and hold the DISP/MENU button for 1 second or longer to go to the main menu. 2 Press the 9 or 0 button to select [Sub Menu]. 3 Press the PLAY/OK (`) button. • [Time & Date] appears on the display, and [\ ^ ]] flashes. 4 Press the 9 or 0 button to select the item to set. • Select the item from "Month", "Day", "Year", "Hour" and "Minute" with a flashing point. Time & Date 1. 1'08 12:00AM 5 Press the + or - button to set. • Follow the same steps by pressing the 9 or 0 button to elect the next item, and press the + or - button to set. 1. 1'08 12:00AM 6 Press the PLAY/OK ( `) button to complete the setup screen. • The clock will start from the set date and time. • Press the PLAY/OK (`) button according to the time signal. 7.25'08 3:00 PM 7 Press the STOP (4) button to close the menu mode. • This completes the time and date setup procedure. Notes: • You can choose between 12 and 24 hour display by pressing the DISP/MENU button while setting the hour and minute. • You can change the order of the date indication by pressing the DISP/MENU button while you are setting the year, month, or day. -3-
-
 1
1 -
 2
2 -
 3
3 -
 4
4 -
 5
5 -
 6
6 -
 7
7 -
 8
8 -
 9
9 -
10
-
11
-
12
 |
 |