Olympus VP-1 VP-1 Quick Reference Guide (English) - Page 1
Olympus VP-1 - Data Projector - DLP Manual
 |
UPC - 050332147072
View all Olympus VP-1 manuals
Add to My Manuals
Save this manual to your list of manuals |
Page 1 highlights
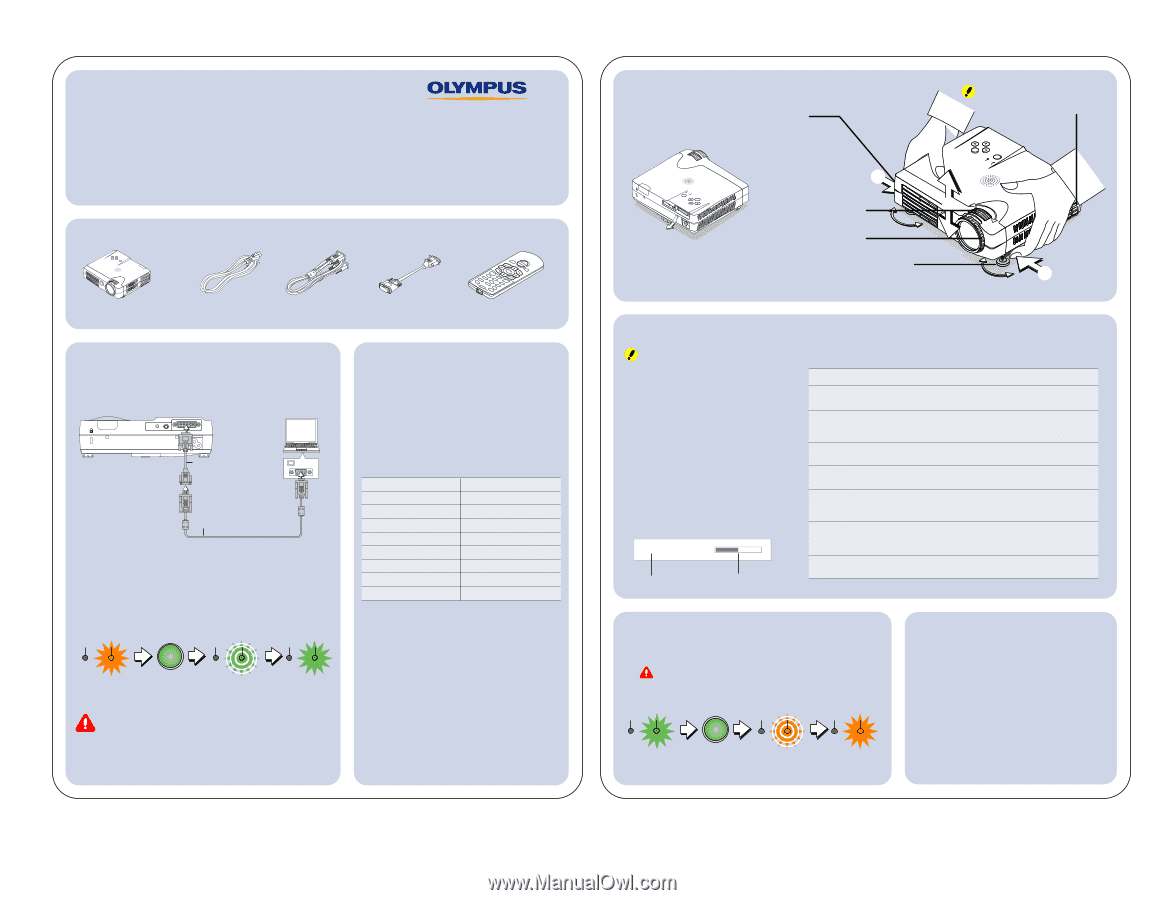
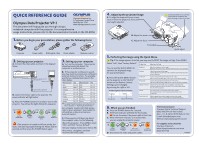
QUICK REFERENCE GUIDE Olympus America Inc. 2 Corporate Center Drive Olympus Data Projector VP-1 Melville, NY 11747 www.olympusamerica.com This document will help guide you through using a notebook computer with the projector. For comprehensive usage instructions, please refer to the documentation located on the CD-ROM. 1. Before you begin your presentation, please gather the following items: MEQNUIUCK AUTO POWER VKSTN VOL STATUS POWER SOURCE MENU CANCEL HKSTN ZOOM ENTER MENU QUICK VIDEOASDIPGEITCTAS-LFVIRDEEEZOAEURTGOOBNYCMbUCTrEYPPObWPrER PIP OFF Projector Power cable RGB signal cable 15-pin adapter Remote control 2. Setting up your projector. A. Connect the video cables as shown in the diagram below: Personal computer AUDIO VIDEO PC DVD mini D-sub 15-pin converson cable (Supplied item) Monitor output RGB signal cable (Supplied item) B. Connect the Power cable to the projector. The power indicator will light amber. C. Press the POWER button for 1 second to turn on the projector. You will see the lights follow this sequence: STATUS POWER STATUS POWER STATUS POWER Lit amber Standby mode POWER (Press button for 1 second) Blinks green (Approximately 60 seconds) Lit green Power is on If the projector is turned on/off too quickly, the status indicator may begin blinking red. Please wait 60 seconds and then press the POWER button again. 3. Setting up your computer. A. Turn on the computer. The projector should automatically detect the computer as a video source. B. If the projector continues to search, you may need to activate your computer's external monitor function. For example, use the key combinations listed in the chart below: Manufacturer Key Manufacturer Key Akia Fn + F2 IBM Fn + F7 Apple See ** NEC Fn + F3 Compaq Fn + F4 Panasonic Fn + F3 Dell Fn + F8 Sharp Fn + F5 Epson Fn + F8 Sony Fn + F7 Fujitsu Fn + F10 Sotec Fn + F3 Gateway Fn + F3 Toshiba Fn + F5 Iiyama Fn + F3 Victor Fn + F10 **For Apple PowerBook, please see instructions on "Mirror Display" or "Make Duplicate Monitors" For computer models not listed, please refer to your computer's User Guide for information on how to activate an external monitor. C. If the projector still does not detect the computer video, try the following: •Reset the projector. Press MENU, select "Info", and then "Factory Default". •Set your display resolution to 1024 x 768. •Disconnect, straighten, and then reconnect the video cable. 4. Adjusting the projected image. A. To align the image with your screen, raise or lower the projectors front and rear height adjusters. Care must be taken not to come into contact with the ventilation slots which discharge the heat of the lamp. MEQNUIUCK AUTO POWER STATUS POWER SOURCE MENU AUDIO VIDEO POWER STATUS POWER SOURCE MENU MEQNUUICK AUTO PC (A) (A) B. Adjust the zoom. (A) C. Adjust the focus. Fine adjust (A) Quick adjust 5. Perfecting the image using the Quick Menu. Tip: If the image appears distorted, you may need to RESET the image settings. Press MENU. Select "Info", then "Factory Default". Display Item Adjustment Setting You can use the QUICK MENU to optimize the displayed image for your presentation. A. Press the QUICK MENU button on the projector or the "QUICK" button on the Remote Control. Settings can be changed by pressing the right or left Example: Brightness adjustment display Brightness 0- + Display Item Adjustment/Setting Brightness Adjusts the brightness of the image. Brightness decreases in the (-) direction and increases in the (+) direction. Contrast Adjusts the contrast of the image. Contrast becomes less distinct in the (-) direction and more pronounced in the (+) direction. V Keystone Corrects (vertical) keystone distortion of the screen. Adjusts the left and right edges of the screen so that they are parallel. H Keystone Corrects (horizontal) keystone distortion of the screen. Adjusts the top and bottom edges of the screen so that they are parallel. Picture-in-Picture The picture from the VIDEO jack is displayed as a sub-picture on the input screen from the PC connector. This function selects either the size of the sub-picture. Volume This function adjusts the volume of the built-in speaker. The volume decreases in the (-) direction and increases in the (+) direction. Quick Color Adj. Selects a preset color mode or creates a custom color mode. Used to adjust Gamma, Color Temperature, and White Emphasis. 6. When you are finished. A. Press the POWER button for 1 second. B. The Power indicator will blink for 90 seconds. Do not disconnect the power cable at this time. C. When the Power indicator is lit solid amber, you can unplug the projector power. STATUS POWER STATUS POWER STATUS POWER Lit green Power is on POWER (Press button for 1 second) Blinks amber (Approximately 90 seconds) D. Disconnect the video and power cables. Lit amber Standby mode Technical Assistance: Olympus Digital Technical Support (800) 798-2777 toll-free hotline Mon. - Fri., 8 AM to 10 PM Eastern Time E-mail: [email protected] Website: www.olympusamerica.com For supplies and accessories: Olympus Emporium www.olympusamerica.com/store (800) 201-7766 VT818401
-
 1
1
 |
 |