Olympus WS-500M WS-500M Instructions (English, Español, Franç - Page 8
Recording Fig. - charge
 |
View all Olympus WS-500M manuals
Add to My Manuals
Save this manual to your list of manuals |
Page 8 highlights
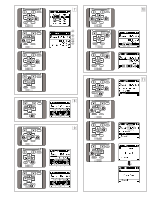
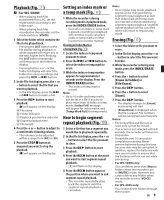
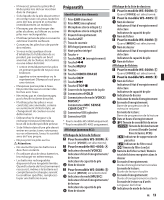
Inserting batteries (Fig. 1) " For WS-500M: • When charging with the recorder, be sure to use the supplied specified Ni-MH rechargeable (BR401) batteries. " For WS-400S: • This recorder cannot charge rechargeable batteries. 1 Lightly press down on the arrow and slide the battery cover open. 2 Insert size-AAA alkaline battery, observing the correct = and - polarities. 3 Close the battery cover completely by pressing to the direction A, then sliding to the direction B. • If the "hour" indicator flashes in the display, see "Setting Time and Date [Time & Date]". Charging by connecting to a computer via USB (Fig. 2) " For WS-500M: 1 Boot the PC. 2 Slide the USB connector slide lever in the direction indicated by the arrow to eject the USB connector out of the recorder. 3 While pressing the STOP4 button, connect to the PC's USB port. Note: • If [Cannot charge] is displayed, it means that a battery that cannot be charged is in the recorder. Replace the batteries with supplied ones at once. Turning on/off the power (Fig. 3) Turning on the power: Slide the HOLD switch in the opposite direction that indicated by the arrow. Turning off the power: While the recorder is during stop mode, slide the HOLD switch in the direction indicated by the arrow. Power save mode: If the recorder is stopped/not used for over 5 minutes after it is turned on, it goes into standby (power-save) mode, and the display shuts off. To exit standby mode and turn on the display, press any button. Setting time and date [Time & Date] (Fig. 4) When you use the recorder for the first time after purchasing it, or when the batteries have been inserted without the device having been used in a long time, the [Set Time & Date] will appear. When the "hour" is flashing, conduct the setup from Step 5. 1 While the recorder is during stop mode, press the MENU button. 2 Press the + or − button to select [Device Menu] tab. • You can change the menu display by moving the settings tab cursor. 3 Press the OK ` or 9 button to move the cursor to the item to set. 4 Press the OK ` or 9 button. • The "hour" will flash on the display, indicating the start of the Time and Date setup process. 5 Press the 9 or 0 button to select the item to set. 6 Press the + or − button to set. • Follow the same steps by pressing the 9 or 0 button to select the next item, and press the + or − button to set. • You can select between 12 and 24 hour display by pressing the LIST button while setting the hour and minute. • You can select the order of the "month", "day" and "year" by pressing the LIST button while setting them. 7 Press the OK ` button to complete the setting. • The clock will start from the set date and time. Press the OK ` button according to the time signal. [VOICE] mode and [MUSIC] mode (Fig. 5) " For WS-500M: [VOICE] mode: Slide the mode switch to [VOICE] position. [MUSIC] mode: Slide the mode switch to [MUSIC] position. Recording (Fig. 6) " For WS-500M: • If the RECs button is pressed while the mode switch is set to [MUSIC], [Music Mode] will flash on the display. Set the mode switch to [VOICE] before recording. 1 Select the recording folder. • Pressing the LIST button at the file display while stopped will return you to the next higher level. Pressing the LIST button repeatedly will bring you to the folder list display. • Pressing button + or − at the folder list display will select the folders for voice recordings. 2 Press the RECs button to start recording. • The recording indicator light glows and [7] will appear on the display. a Recording mode b Remaining memory bar indicator c Remaining recording time d Elapsed recording time e Level meter (change according to the recording level and recording function settings) 3 Press the STOP4 button to stop recording. • [4] will appear on the display. f File length 8 EN
-
 1
1 -
2
-
 3
3 -
 4
4 -
 5
5 -
 6
6 -
 7
7 -
 8
8 -
 9
9 -
 10
10 -
 11
11 -
 12
12 -
 13
13 -
14
-
15
-
16
-
17
-
18
-
19
-
20
-
21
-
22
-
23
-
24
-
25
-
26
-
27
-
28
-
29
-
30
-
31
-
32
 |
 |
