Onkyo HT-R560 Owner Manual
Onkyo HT-R560 Manual
 |
View all Onkyo HT-R560 manuals
Add to My Manuals
Save this manual to your list of manuals |
Onkyo HT-R560 manual content summary:
- Onkyo HT-R560 | Owner Manual - Page 1
Home Theater System HT-S5100 AV Receiver (HT-R560) Speaker Package (HTP-560) Front Speakers (SKF-560F L/R) Center Speaker (SKC-560C) Surround Speakers (SKM-560S L/R) Surround Back Speakers (SKB-560 L/R) Subwoofer (SKW-560) Dock for iPod (DS-A1L) Instruction Manual Thank you for purchasing an Onkyo - Onkyo HT-R560 | Owner Manual - Page 2
the user to the presence of important operating and maintenance (servicing) instructions in the literature accompanying the appliance. Important Safety Instructions 1. Read these instructions. 2. Keep these instructions. 3. Heed all warnings. 4. Follow all instructions. 5. Do not use this - Onkyo HT-R560 | Owner Manual - Page 3
with Wet Hands-Never handle this unit or its power cord while your hands are wet or damp. If water or any other liquid gets inside this unit, have it checked by your Onkyo dealer. 6. Handling Notes • If you need to transport this unit, use the original packaging to pack it how it - Onkyo HT-R560 | Owner Manual - Page 4
in own responsibility, that the ONKYO product described in this instruction manual is in compliance with the corresponding technical standards such as EN60065, EN55013, EN55020 and EN61000-3-2, -3-3. GROEBENZELL, GERMANY K. MIYAGI ONKYO EUROPE ELECTRONICS GmbH 4 Speaker Precautions Placement • The - Onkyo HT-R560 | Owner Manual - Page 5
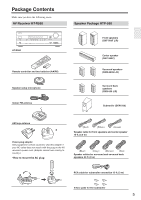
items: AV Receiver HT-R560 HT-R560 Remote controller and two batteries (AA/R6) Speaker setup microphone Indoor FM antenna Speaker Package HTP-560 Front speakers (SKF-560F L/R) Center speaker (SKC-560C) Surround speakers (SKM-560S L/R) Surround back speakers (SKB-560 L/R) Subwoofer (SKW-560) AM - Onkyo HT-R560 | Owner Manual - Page 6
Package Contents-Continued Dock for iPod DS-A1L * In catalogs and on packaging, the letter at the end of the product name indicates the color. Specifications and operation are the same regardless of color. 6 - Onkyo HT-R560 | Owner Manual - Page 7
TUNING MODE CLEAR SETUP MIC MASTER VOLUME or AUX INPUT VIDEO L AUDIO R AV RECEIVER HT-R560 Speaker set A On Off Speaker set B On Off On Off Indicator AB A B Output Set A: 5.1 channels Set B: 2 channels Set A: 7.1 channels Set B: 2 channels No sound Main Room (speaker set A) Front left - Onkyo HT-R560 | Owner Manual - Page 8
impedance • Color-coded speaker terminals and speaker cable SKW-560 Bass Reflex Powered Subwoofer • 25 cm cone woofer • Max. power:290 W Dock DS-A1L • Play your iPod music through your Onkyo audio system and enjoy great sound • Control your iPod with your Onkyo remote controller • Supports all iPod - Onkyo HT-R560 | Owner Manual - Page 9
Onkyo Corporation. *4 HDMI, the HDMI logo and High Definition Multimedia Interface are trademarks or registered trademarks of HDMI Licensing, LLC. *5 ©2005 SIRIUS Satellite Radio Inc. "SIRIUS," SiriusConnect, the SIRIUS dog logo, channel . *7 Theater-Dimensional is a trademark of Onkyo Corporation. - Onkyo HT-R560 | Owner Manual - Page 10
, Surround, Surround Back speakers (SKF-560F, SKC-560C, SKM-560S, SKB-560 17 Remote Controller 18 Controlling the AV Receiver 18 Controlling a Dock DS-A1L 19 Installing the Batteries 20 Using the Remote Controller 20 Connecting Your Speakers 21 Enjoying Home Theater 21 Connecting Speaker Set - Onkyo HT-R560 | Owner Manual - Page 11
Modes 74 Using the Audio Adjust Settings 74 Using the Audio Settings 75 Advanced Setup 77 Speaker Setup 77 Controlling Other Components 82 Preprogrammed Remote Control Codes 82 Entering Remote Control Codes 82 Resetting the Remote Controller 83 Controlling a DVD Player, or DVD Recorder - Onkyo HT-R560 | Owner Manual - Page 12
MODE DISPLAY DIGITAL INPUT DIMMER MEMORY TUNING MODE CLEAR SETUP MIC AUX INPUT VIDEO L AUDIO R AV RECEIVER HT-R560 J K Other models ON/STANDBY STANDBY L MNO PQ RST U V TUNING PRESET ENTER MASTER VOLUME DOCK PHONES MULTI CH A SPEAKERS B DVD TONE VCR/DVR CBL/SAT AUX TAPE TUNER - Onkyo HT-R560 | Owner Manual - Page 13
RDS (Radio Data System). See "Using RDS (European models only)" on page 63. S MEMORY button (54) Used when storing or deleting radio presets. T TUNING MODE button (52) Selects the Auto or Manual tuning mode for AM and FM radio. U SETUP MIC (42) The automatic speaker setup microphone connects here - Onkyo HT-R560 | Owner Manual - Page 14
the front speakers, center, surround, and surround back speakers. K REMOTE CONTROL This (Remote Interactive) jack can be con- nected to the jack on another -capable Onkyo component for remote and system control. To use , you must make an analog audio connection (RCA) between the AV receiver and - Onkyo HT-R560 | Owner Manual - Page 15
input is for connecting a component with a 5.1/7.1-channel analog audio output, such as a DVD player, DVD-Audio or SACD-capable player, or an MPEG decoder. R SUBWOOFER PRE OUT This analog audio output can be connected to a powered subwoofer. S FRONT SPEAKERS B These push terminals are for connecting - Onkyo HT-R560 | Owner Manual - Page 16
no input signal for a while, the SKW-560 automatically enters Standby mode. B OUTPUT LEVEL control (47) This control is used to adjust the volume of the subwoofer. C LINE INPUT (23) This RCA input should be connected to the subwoofer pre out on the AV receiver with supplied RCA cable. Note: The Auto - Onkyo HT-R560 | Owner Manual - Page 17
slots These keyhole slots can be used to wall-mount the speaker. See page 24 for mounting instructions. 2 Speaker terminals These push terminals are for connecting the speaker to the HT-R560 with the supplied speaker cables. The supplied speaker cables are color-coded for easy identification. Simply - Onkyo HT-R560 | Owner Manual - Page 18
Remote Controller Controlling the AV Receiver ■ Controlling the receiver To control the AV receiver, press the [RECEIVER] REMOTE MODE button to select Receiver mode first. You can also use the remote controller to control your DVD player, CD player, and other components. See page 82 for more details - Onkyo HT-R560 | Owner Manual - Page 19
Remote Controller-Continued Controlling a Dock DS-A1L To control your iPod when it's seated in the supplied DS-A1L Dock, which is connected to the HT-R560's DOCK jack, press the [DOCK] REMOTE MODE button. See page 37 for details on connecting the DS-A1L Dock. To control an RI Dock other than the DS - Onkyo HT-R560 | Owner Manual - Page 20
compartment, press the small lever and remove the cover. Using the Remote Controller When using the remote controller, point it toward the AV receiver's remote control sensor, as shown below. STANDBY indicator Remote control sensor AV receiver 2 Insert the two supplied batteries (AA/R6) in - Onkyo HT-R560 | Owner Manual - Page 21
Connecting Your Speakers Enjoying Home Theater Thanks to the AV receiver's superb capabilities, you can enjoy surround sound with a real sense of movement in your own home-just like being in a movie theater or concert hall. You can enjoy DVDs featuring Dolby Digital or DTS. With analog or digital - Onkyo HT-R560 | Owner Manual - Page 22
. No matter how many speakers you use, a powered subwoofer is recommended for a powerful and solid bass. To get the best from your surround-sound system, you must set the speaker settings. You can do this automatically (see page 42) or manually (see page 77). Speaker Connection Precautions Read the - Onkyo HT-R560 | Owner Manual - Page 23
of terminals. If you're using only one surround back speaker, connect it to the left (L) SURR BACK SPEAKERS terminals. Front right speaker Speaker Set A Front left speaker Center speaker IN 3 IN 2 ONENT VIDEO IN 1 OUT DOCK CBL/SAT V VCR/DVR S SIRIUS DVD MONITOR OUT V S SURR BACK - Onkyo HT-R560 | Owner Manual - Page 24
. The pads also provide a stable base for the subwoofer. Surround speaker/ Surround back speaker (SKM-560S/SKB-560) Pad Keyhole slot for wall mounting To mount the center speaker horizontally, use the two keyhole slots shown to hang each speaker on two screws that are securely screwed into the - Onkyo HT-R560 | Owner Manual - Page 25
the best possible reception. Keep the antenna as far away as possible from your AV receiver, TV, speaker cables, and power cords. If you cannot achieve good reception with the supplied indoor AM loop antenna, try using it with a commercially available outdoor AM antenna (see page 26). Caution: Be - Onkyo HT-R560 | Owner Manual - Page 26
outdoor antenna should be situated well away from power lines and other high-voltage equipment. • Using a TV/FM Antenna Splitter It's best not to use the same antenna for both FM and TV reception, as this can cause interference problems. If circumstances demand it, use AV receiver To TV (or VCR) 26 - Onkyo HT-R560 | Owner Manual - Page 27
BACK SUBWOOFER MULTI CH This cable carries multichannel analog audio and is typically used to connect DVD players with a 7.1channel analog audio output. Several standard analog audio cables can be used instead of a multichannel cable. Note: The AV receiver does not support SCART connections. 27 - Onkyo HT-R560 | Owner Manual - Page 28
pages 44 and 46). Audio Signal Flow Chart DVD player, etc. HDMI Multichannel Optical Coaxial Analog AV receiver Audio signals received by the HDMI IN jacks are output only by the HDMI OUT (pass thru). HDMI sources are not output by the speakers connected to the AV receiver. HDMI MD recorder, etc - Onkyo HT-R560 | Owner Manual - Page 29
/DVR) OPTICAL 2 (CD) ASSIGNABLE CR/ PR IN 2 IN 1(DVD) OUT ASSIGNABLE IN OUT IN L REMOTE CONTROL R CD TAPE IN 1 OUT DOCK CBL/SAT V VCR/DVR S IN OUT IN IN OUT IN L SIRIUS SURR BACK SPEAKERS Bi-AMP for FRONT SPEAKERS L AM DVD MONITOR OUT V S C R ANTENNA FM 75 IN FRONT SURR - Onkyo HT-R560 | Owner Manual - Page 30
You must connect the AV receiver to your TV with the same type of connection. Step 2: Audio Connection Choose an audio connection that matches your DVD player ( a , b , or c ), and then make the connection. • To enjoy Dolby Digital and DTS, use connection b or c . • If your DVD player has main left - Onkyo HT-R560 | Owner Manual - Page 31
, see "Using the Audio Adjust Settings" on page 74-75. HDMI ASSIGNABLE IN 3 IN 2 DIGITAL IN 1 (DVD) COAXIAL 2 (CBL/SAT) COMPONENT VIDEO Y CB/ PB 1 (VCR/DVR) OPTICAL 2 (CD) ASSIGNABLE CR/ PR IN 2 IN 1(DVD) OUT ASSIGNABLE IN OUT IN L REMOTE CONTROL R CD TAPE IN 1 OUT DOCK CBL/SAT - Onkyo HT-R560 | Owner Manual - Page 32
IN L IN 1 OUT DOCK CBL/SAT V VCR/DVR S IN OUT IN IN OUT IN L SIRIUS SURR BACK SPEAKERS Bi-AMP for FRONT SPEAKERS L AM DVD MONITOR OUT V C R ANTENNA FM 75 S IN FRONT SURR CENTER SURR BACK B ZONE 2 LINE OUT L L PRE O SUB WOOF R R R R A REMOTE CONTROL CD TAPE CBL/SAT - Onkyo HT-R560 | Owner Manual - Page 33
video input Audio L/R input Picture quality Better Standard HDMI ASSIGNABLE IN 3 IN 2 DIGITAL IN 1 (DVD) COAXIAL 2 (CBL/SAT) COMPONENT VIDEO Y CB/ PB 1 (VCR/DVR) OPTICAL 2 (CD) ASSIGNABLE CR/ PR IN 2 IN 1(DVD) OUT ASSIGNABLE IN OUT IN L REMOTE CONTROL R CD TAPE IN 1 OUT DOCK CBL - Onkyo HT-R560 | Owner Manual - Page 34
Composite video output Analog audio L/R output Digital coaxial output Digital optical output Picture quality Best Better Standard HDMI ASSIGNABLE IN 3 IN 2 DIGITAL IN COMPONENT VIDEO IN 1 OUT SURR BACK SPEAKERS Bi-AMP for FRONT SPEAKERS L 1 (DVD) b COAXIAL Y CB/ PB DOCK CBL/SAT VCR - Onkyo HT-R560 | Owner Manual - Page 35
standard: HT-R560: Pass-thru About Copyright Protection The AV receiver supports HDCP (High-bandwidth Digital Content Protection),*2 a copy-protection system for digital video signals. Other devices connected to the AV receiver via HDMI must also support HDCP. Use a commercially available HDMI cable - Onkyo HT-R560 | Owner Manual - Page 36
receiver or the sound may be cut off. • The HDMI audio signal (sampling rate, bit length, etc.) may be restricted by the connected source component. If the picture is poor or there's no sound from a component connected via HDMI, check its setup. Refer to the connected component's instruction manual - Onkyo HT-R560 | Owner Manual - Page 37
Analog audio L/R output Connecting the Supplied DS-A1L Dock HDMI ASSIGNABLE IN 3 IN 2 DIGITAL IN 1 (DVD) COAXIAL 2 (CBL/SAT) COMPONENT VIDEO Y CB/ PB 1 (VCR/DVR) OPTICAL 2 (CD) ASSIGNABLE CR/ PR IN 2 IN 1(DVD) OUT ASSIGNABLE IN OUT IN L REMOTE CONTROL R CD TAPE IN 1 OUT DOCK CBL - Onkyo HT-R560 | Owner Manual - Page 38
a turntable that doesn't have a phono preamp built-in. HDMI ASSIGNABLE IN 3 IN 2 1 (DVD) COAXIAL 2 (CBL/SAT) 1 (VCR/DVR) OPTICAL 2 (CD) ASSIGNABLE Y CB/ PB CR/ PR IN 2 IN 1(DVD) OUT ASSIGNABLE IN OUT IN L REMOTE CONTROL R CD TAPE IN 1 OUT DOCK CBL/SAT V VCR/DVR S IN OUT IN IN - Onkyo HT-R560 | Owner Manual - Page 39
b COAXIAL 2 (CBL/SAT) c OPTICAL 2 (CD) HDMI ASSIGNABLE IN 3 IN 2 DIGITAL IN 1 (DVD) COAXIAL 2 (CBL/SAT) COMPONENT VIDEO Y CB/ PB 1 (VCR/DVR) OPTICAL 2 (CD) ASSIGNABLE CR/ PR IN 2 IN 1(DVD) OUT ASSIGNABLE IN OUT IN L REMOTE CONTROL R CD TAPE IN 1 OUT DOCK CBL/SAT V VCR/DVR S IN - Onkyo HT-R560 | Owner Manual - Page 40
select Multich to hear all channels (see page 47), as the Direct Change function selects the DVD IN FRONT L/R jacks. Remote Control You can use the AV receiver's remote controller to control your other -capable Onkyo components. You must enter the appropriate remote control code first (see page 83 - Onkyo HT-R560 | Owner Manual - Page 41
B DVD VCR/DVR CBL/SAT AUX TAPE TUNER CD SETUP RETURN TONE MOVIE/TV MUSIC GAME DISPLAY DIGITAL INPUT RT/PTY/TP MEMORY TUNING MODE CLEAR SETUP MIC AUX INPUT VIDEO L AUDIO R AV RECEIVER HT-R560 ON/STANDBY RECEIVER Turning On and Standby AV receiver ON/STANDBY Remote controller - Onkyo HT-R560 | Owner Manual - Page 42
DVD TONE VCR/DVR CBL/SAT AUX TAPE TUNER CD SETUP RETURN MOVIE/TV MUSIC GAME DISPLAY DIGITAL INPUT RT/PTY/TP MEMORY TUNING MODE CLEAR SETUP MIC AUX INPUT VIDEO L AUDIO R AV RECEIVER HT-R560 2, 6 SETUP MIC 1 Turn on the AV receiver. 2 SETUP MIC Put the speaker setup microphone - Onkyo HT-R560 | Owner Manual - Page 43
are connected properly. 6 When the automatic speaker setup is complete, disconnect the speaker setup microphone. Note: • When the automatic speaker setup is complete, the Equalizer Settings (page 81) will be set to "Audyssey." Changing the Speaker Settings Manually If you wish to make changes to - Onkyo HT-R560 | Owner Manual - Page 44
component is connected to HDMI IN 3. No: Select if you're not using the HDMI OUT. Press the [SETUP] button. Setup closes. ENTER SETUP Note: • This procedure can also be performed on the AV receiver by using its [SETUP], [ENTER], and arrow buttons. 1 Press the [RECEIVER] button, followed by the - Onkyo HT-R560 | Owner Manual - Page 45
IN2: Select if the video component is connected to COMPO- NENT VIDEO IN 2. No: Select if you're not using the COMPONENT VIDEO OUT. 4 Press the [SETUP] button. Setup closes. Note: • This procedure can also be performed on the AV receiver by using its [SETUP], [ENTER], and arrow buttons. 45 - Onkyo HT-R560 | Owner Manual - Page 46
PRESET ENTER MASTER VOLUME DOCK PHONES MULTI CH A SPEAKERS B DVD VCR/DVR CBL/SAT AUX TAPE TUNER CD SETUP RETURN TONE MOVIE/TV MUSIC GAME DISPLAY DIGITAL INPUT RT/PTY/TP MEMORY TUNING MODE CLEAR SETUP MIC AUX INPUT VIDEO L AUDIO R AV RECEIVER HT-R560 1 TAPE or Press the - Onkyo HT-R560 | Owner Manual - Page 47
RT/PTY/TP MEMORY TUNING MODE CLEAR SETUP MIC AUX INPUT VIDEO L AUDIO R AV RECEIVER HT-R560 1 3 Subwoofer's rear panel 1 3 4 MIN MAX OUTPUT LEVEL 1 AV receiver DVD VCR/DVR CBL/SAT AUX TAPE TUNER CD Remote controller Use the AV receiver's input selector buttons to select an input - Onkyo HT-R560 | Owner Manual - Page 48
TUNING MODE CLEAR SETUP MIC AUX INPUT VIDEO L AUDIO R AV RECEIVER HT-R560 PHONES DIMMER Setting the Display Brightness You can adjust the brightness of the display. Remote controller Press the [RECEIVER] REMOTE MODE button, and then press the remote controller's [DIMMER] button repeatedly - Onkyo HT-R560 | Owner Manual - Page 49
set to Pure Audio, Mono, Stereo, or Direct, in which case it stays the same. • When the multichannel DVD input is selected, only the front left and front right channels can be heard in the headphones. Note: • This procedure can also be performed on the AV receiver by using its [DISPLAY] button - Onkyo HT-R560 | Owner Manual - Page 50
PRESET ENTER MASTER VOLUME DOCK PHONES MULTI CH A SPEAKERS B DVD TONE VCR/DVR CBL/SAT AUX TAPE TUNER CD SETUP RETURN MOVIE/TV MUSIC GAME DISPLAY DIGITAL INPUT RT/PTY/TP MEMORY TUNING MODE CLEAR SETUP MIC AUX INPUT VIDEO L AUDIO R AV RECEIVER HT-R560 DIGITAL INPUT 1 DIGITAL - Onkyo HT-R560 | Owner Manual - Page 51
this setting is changed, all radio presets are deleted. Note: • This procedure can also be performed on the AV receiver by using its [SETUP], [ENTER], and arrow buttons. 1 Press the [RECEIVER] button, followed by the [SETUP] button. 2 Use the Up and Down [ ]/[ ] buttons to select "0.Hardware - Onkyo HT-R560 | Owner Manual - Page 52
PRESET ENTER MASTER VOLUME DOCK PHONES MULTI CH A SPEAKERS B DVD TONE VCR/DVR CBL/SAT AUX TAPE TUNER CD SETUP RETURN MOVIE/TV MUSIC GAME DISPLAY DIGITAL INPUT RT/PTY/TP MEMORY TUNING MODE CLEAR SETUP MIC AUX INPUT VIDEO L AUDIO R AV RECEIVER HT-R560 TUNING MODE With the - Onkyo HT-R560 | Owner Manual - Page 53
DOCK PHONES MULTI CH A SPEAKERS B DVD VCR/DVR CBL/SAT AUX TAPE TUNER CD SETUP RETURN TONE MOVIE/TV MUSIC GAME DISPLAY DIGITAL INPUT RT/PTY/TP MEMORY TUNING MODE CLEAR SETUP MIC NET/USB AUX INPUT VIDEO L AUDIO R AV RECEIVER HT-R560 2 Within 8 seconds, use the num- ber buttons - Onkyo HT-R560 | Owner Manual - Page 54
B DVD TONE VCR/DVR CBL/SAT AUX TAPE TUNER CD SETUP RETURN MOVIE/TV MUSIC GAME DISPLAY DIGITAL INPUT RT/PTY/TP MEMORY TUNING MODE CLEAR SETUP MIC AUX INPUT VIDEO L AUDIO R AV RECEIVER HT-R560 CH +/- PRESET To select a preset, use the PRESET [ ]/[ ] buttons or the remote controller - Onkyo HT-R560 | Owner Manual - Page 55
SiriusConnect receiver AC power 8-pin mini DIN connector cable SIRIUS SIRIUS antenna jack HDMI ASSIGNABLE IN 3 IN 2 DIGITAL IN 1 (DVD) COMPONENT VIDEO Y COAXIAL CB/ PB 2 (CBL/SAT) 1 (VCR/DVR) OPTICAL 2 (CD) ASSIGNABLE CR/ PR IN 2 IN 1(DVD) OUT ASSIGNABLE IN OUT IN L REMOTE CONTROL - Onkyo HT-R560 | Owner Manual - Page 56
DISPLAY DIGITAL INPUT RT/PTY/TP MEMORY TUNING MODE CLEAR SETUP MIC AUX INPUT VIDEO L AUDIO R AV RECEIVER HT-R560 ENTER /// SETUP TUNER RECEIVER Selecting SIRIUS Satellite Radio 1 TUNER Remote controller On the AV receiver, press the [TUNER] INPUT SELECTOR button repeatedly to select - Onkyo HT-R560 | Owner Manual - Page 57
TUNING MODE CLEAR SETUP MIC AUX INPUT VIDEO L AUDIO R AV RECEIVER HT-R560 TUNER 2 TUNING Use theTUNING [ ]/[ ] buttons, or remote controller's Up and Down [ ]/[ ] buttons to select a channel. Remote controller Channel number Channel name You can also use the remote controller's Left and - Onkyo HT-R560 | Owner Manual - Page 58
DVD TONE VCR/DVR CBL/SAT AUX TAPE TUNER CD SETUP RETURN MOVIE/TV MUSIC GAME DISPLAY DIGITAL INPUT RT/PTY/TP MEMORY TUNING MODE CLEAR SETUP MIC AUX INPUT VIDEO L AUDIO R AV RECEIVER HT-R560 DISPLAY ENTER TUNING MODE MEMORY DISPLAY Notes: • If you select an unavailable channel - Onkyo HT-R560 | Owner Manual - Page 59
the available information. Channel name Channel number & preset number Category Channel number Preset number ■ Selecting Presets AV receiver PRESET To select a preset, use the PRESET [ ]/[ ] buttons, or the remote controller's CH [+/-] button. Remote controller Artist/Composer name Song - Onkyo HT-R560 | Owner Manual - Page 60
of the SIRIUS Satellite Radio signal and adjust the position of the SiriusConnect Home antenna accordingly. 1 Remote controller Press the [RECEIVER] button, followed by the [SETUP] button. 2 Remote controller Use the Up and Down [ ]/[ ] buttons to select "8.ANT Aiming," and then press [ENTER - Onkyo HT-R560 | Owner Manual - Page 61
as shown below, and then press [ENTER]: Parental Lock You can lock out channels that you do not want to receive. 1 Remote controller Press the [RECEIVER] button, followed by the [SETUP] button. 2 Remote controller Use the Up and Down [ ]/[ ] buttons to select "10. Parental Lock," and then press - Onkyo HT-R560 | Owner Manual - Page 62
Listening to SIRIUS Satellite Radio-Continued RECEIVER ENTER /// SETUP Number buttons 3 Remote controller Use the Up and Down [ ]/[ ] buttons to select "Edit Code," and then press [ENTER]. "Enter : " appears on the display. 4 Remote controller Use the number buttons to enter the old PIN - Onkyo HT-R560 | Owner Manual - Page 63
Systems Committee (NRSC) and is available in North America. Many FM stations use it these days. In addition to displaying text information, RDS can also help you find radio stations by type (e.g., news, sport, rock, etc.). The AV receiver supports four types of RDS information: PS (Program Service - Onkyo HT-R560 | Owner Manual - Page 64
DOCK PHONES MULTI CH A SPEAKERS B DVD TONE VCR/DVR CBL/SAT AUX TAPE TUNER CD SETUP RETURN MOVIE/TV MUSIC GAME DISPLAY DIGITAL INPUT RT/PTY/TP MEMORY TUNING MODE CLEAR SETUP MIC AUX INPUT VIDEO L AUDIO R AV RECEIVER HT-R560 23 You can search for radio stations by type. 1 Use - Onkyo HT-R560 | Owner Manual - Page 65
play the music stored on your Apple iPod through the AV receiver and enjoy great sound. You can use the AV receiver's remote controller to operate your iPod. For the latest information on the Dock, see the Onkyo Web site at: www.onkyo.com iPod adapter iPod connector ■ Adjusting the iPod Adapter The - Onkyo HT-R560 | Owner Manual - Page 66
to which your iPod is connected. Notes: • To use this function, your iPod must be in the Dock, and the Dock must be connected to the AV receiver. • When you use this function, be sure to set the AV receiver's volume control to a suitable level. • The AV receiver may take several seconds to star- tup - Onkyo HT-R560 | Owner Manual - Page 67
RT/PTY/TP MEMORY TUNING MODE CLEAR SETUP MIC AUX INPUT VIDEO L AUDIO R AV RECEIVER HT-R560 GAME MOVIE/TV Selecting with the Remote Controller MOVIE/TV MUSIC STEREO GAME ■ [MOVIE/TV] button This button selects the listening modes intended for use with movies and TV. ■ [MUSIC] button This - Onkyo HT-R560 | Owner Manual - Page 68
] AllChStereo FullMono T-D *4 [STEREO] Stereo PCM 32-96kHz*1 CD, TV, radio, Multi channel Analog DVD ✔ *1. 32/44.1/48/88.2/96kHz *2. If there are no surround back speakers, or speaker set B is on, Dolby Pro Logic II is used. *3. Available only when using surround speakers. *4. PCM of 64kHz - Onkyo HT-R560 | Owner Manual - Page 69
] Stereo Multichannel Dolby Digital 2ch Mono/Multiplex DVD, DTV, etc. ✔ ✔ ✔ ✔ ✔ ✔ ✔ ✔ ✔ ✔ ✔ ✔ ✔ ✔ ✔ ✔ ✔ ✔ ✔ ✔ ✔ ✔ ✔ ✔ ✔ ✔ ✔ ✔ ✔ ✔ ✔ ✔ ✔ ✔ ✔ ✔ ✔ ✔ ✔ *1. If there are no surround back speakers, or speaker set B is on, Dolby Pro Logic II is used - Onkyo HT-R560 | Owner Manual - Page 70
FullMono T-D*4 Direct Stereo DTS, DTS DVD, CD, etc. ✔ ✔ ✔*1 1 1 *1. If there are no surround back speakers, or speaker set B is on, DTS is used. *2. If there are no surround back speakers, or speaker set B is on, Dolby Pro Logic II is used. *3. Available only when using surround speakers - Onkyo HT-R560 | Owner Manual - Page 71
Discrete soundtracks, that use a discrete surround back channel for true 6.1/7.1-channel playback. The seven totally separate audio channels provide better spatial imaging and 360degree sound localization, perfect for sounds that pan across the surround channels. Use it with DVDs that bear the DTS - Onkyo HT-R560 | Owner Manual - Page 72
, radio, cassette, TV, VHS, DVD). 5.1-channel source + Neo:6 This mode uses Neo:6 to expand 5.1-channel sources for 6.1/7.1-channel playback. Onkyo Original DSP Modes Mono Movie This mode is suitable for old movies and other mono sources. The center speaker outputs the sound as it is, while reverb - Onkyo HT-R560 | Owner Manual - Page 73
Should I Use?" on page 28 to see which signals AUX TAPE TUNER can be output and recorded. CD Remote controller You can watch the source while recording it. The AV receiver's MASTER VOLUME control has no effect on recording. Recording from Different AV Sources You can overdub audio onto your - Onkyo HT-R560 | Owner Manual - Page 74
With the Audio Adjust functions and settings, you can adjust the sound and listening modes as you like. 1 Press the [RECEIVER] button fol- lowed by the [SETUP] button. Mono ■ Input (Mono) This setting determines which channel is output when the Mono listening mode is used with a stereo source - Onkyo HT-R560 | Owner Manual - Page 75
for the other settings. The Audio Adjust settings are explained below. Tone Control Settings You can adjust the bass and treble for the front speakers, except when the Direct listening mode is selected. ■ Bass You can boost or cut low-frequency sounds output by the front speakers from -10 dB to +10 - Onkyo HT-R560 | Owner Manual - Page 76
dB. Notes: • You cannot use this function while the AV receiver is muted. • Speakers that are set to No or None in the Speaker Configuration cannot be adjusted (see page 77). A/V Sync ■ A/V Sync When using progressive scanning on your DVD player, you may find that the picture and sound are out of sync - Onkyo HT-R560 | Owner Manual - Page 77
manually, which is useful if you change a speaker after performing the automatic speaker setup. Some of the speaker settings are set automatically by the Automatic Speaker Setup function (see page 42). Speaker Press the [RECEIVER] button fol- lowed by the [SETUP] button. 6 2 Use the Up and - Onkyo HT-R560 | Owner Manual - Page 78
is being used. Crossover Frequency This setting is set automatically by the Automatic Speaker Setup function (see page 42). This setting only applies to the speakers that you specified as Small in the "Speaker Configuration" on page 77. To get the best bass performance from your speaker system, you - Onkyo HT-R560 | Owner Manual - Page 79
Speaker Setup function (see page 42). With the Double Bass function, you can boost bass output by feeding bass sounds from the front left, right, and center channels each speaker to the listening position. 2 Press the [RECEIVER] REMOTE MODE button, followed by the [SETUP] button. 3 Use the - Onkyo HT-R560 | Owner Manual - Page 80
function (see page 42). You can set the volume level of each speaker so that all speakers can be heard equally at the listening position. 1 Press the [RECEIVER] REMOTE MODE button, followed by the [SETUP] button. 2 Use the Up and Down [ ]/[ ] buttons to select "Level Cal," and then press - Onkyo HT-R560 | Owner Manual - Page 81
each speaker manually. If you selected Manual, continue with this procedure. If you selected Off or Audyssey, go to step 7. • While the Direct listening mode is selected, the equalizer settings have no effect. • This procedure can also be performed on the AV receiver by using its [SETUP], [ENTER - Onkyo HT-R560 | Owner Manual - Page 82
. Onkyo DVD player (page 84) Onkyo CD player (page 87) Onkyo cassette recorder with (page 88) Entering Remote Control Codes You'll need to enter a code for each component that you want to control. Remote indicator REMOTE MODE DISPLAY RECEIVER 1 Look up the component's remote control code in - Onkyo HT-R560 | Owner Manual - Page 83
at the AV receiver, and operate the component. If you want to control an Onkyo component by pointing the remote controller directly at it, or you want to control an Onkyo component that's not connected via , use the following remote control codes: • [DVD] REMOTE MODE button 30627: Onkyo DVD player - Onkyo HT-R560 | Owner Manual - Page 84
discs on a DVD changer. Selects TV channels on a component with a built-in tuner. O VOL [ ]/[ ] button (47) Adjusts the volume of the AV receiver. P MENU button Displays a DVD's menu. Q RETURN button Exits the DVD player's setup menu or return to the previous menu. R AUDIO button Selects foreign - Onkyo HT-R560 | Owner Manual - Page 85
entered numbers. Note: • If you enter the remote control code for a HD DVD or Blu-ray player that has A, B, C, and AV receiver. L CH +/- button Selects TV channels on the video recorder. M VOL [ ]/[ ] button (47) Adjusts the volume of the AV receiver. N PREV CH button Selects the previous channel - Onkyo HT-R560 | Owner Manual - Page 86
that's been programmed with the remote control code for your satellite receiver, cable receiver, or DVD recorder (DBS/PVR combination or cable/PVR combination), you can control your player with the following buttons. For details on entering a remote control code for a different component, see page - Onkyo HT-R560 | Owner Manual - Page 87
control your player with the following buttons. The [CD] REMOTE MODE button is preprogrammed with the remote control code for controlling an Onkyo CD player. For details on entering a remote control code button Exits the CD player's setup menu. L RANDOM button Used with the random playback function. - Onkyo HT-R560 | Owner Manual - Page 88
your cassette recorder with the following buttons. The [TAPE] REMOTE MODE button is preprogrammed with the remote control code for controlling an Onkyo cassette recorder when used with an connection. For details on entering a remote control code for a different component, see page 82. Press the - Onkyo HT-R560 | Owner Manual - Page 89
a TV By pressing the [TV] REMOTE MODE button that's been programmed with the remote control code for your TV (TV/DVD combination or TV/VCR combination), you can control your TV with the following buttons. For details on entering a remote control code for a different component, see page 82 - Onkyo HT-R560 | Owner Manual - Page 90
to maximum, disconnect the power cord, and contact your Onkyo dealer. Audio There's no sound or it's very quiet • To listen to an audio source that's connected to an HDMI input, make sure that input is assigned to an input selector (page 44). HDMI audio is passed through the AV receiver and can only - Onkyo HT-R560 | Owner Manual - Page 91
AUDIO button on your DVD player's remote controller. Can't get 6.1- or 7.1-channel playback • While speaker set B is on, playback in the main room is reduced to 5.1-channels and the surround back speakers produce no sound (page 7). The volume cannot be set to 79 • After the Automatic Speaker Setup - Onkyo HT-R560 | Owner Manual - Page 92
, and some may not work at all. • To control an Onkyo component that's connected via , point the remote controller at the AV receiver. Be sure to enter the appropriate remote control code first (page 83). • To control an Onkyo component that's not connected via , or another manufacturer's component - Onkyo HT-R560 | Owner Manual - Page 93
Specifications HT-R560 Amplifier Section Rated Output Power North American: 130 watts minimum continuous power per channel, 8 ohm loads, 1 channel driven, with a maximum total harmonic distortion of 1.0% (FTC) European: 7 ch × 130 W at 8 ohms, 1kHz, 1 ch driven (IEC) Dynamic Power 210 W (3Ω, - Onkyo HT-R560 | Owner Manual - Page 94
Specifications-Continued 7.1ch Home Theater Speaker Package ■ Subwoofer (SKW-560) Type: Bass-reflex Input sensitivity/ Impedance: 140 mV/20 kΩ Maximum output power: 290 W Frequency response: 25 Hz-150 Hz Cabinet capacity: 1.34 cubic feet (38 L) Dimensions (W × H × D): 283 × 498 × 399 mm ( - Onkyo HT-R560 | Owner Manual - Page 95
Memo 95 - Onkyo HT-R560 | Owner Manual - Page 96
EUROPE ELECTRONICS GmbH Liegnitzerstrasse 6, 82194 Groebenzell, GERMANY Tel: +49-8142-4401-0 Fax: +49-8142-4401-555 http://www.eu.onkyo.com/ ONKYO EUROPE UK Office Suite 1, Gregories Court, Gregories Road, Beaconsfield, Buckinghamshire, HP9 1HQ UNITED KINGDOM Tel: +44-(0)1494-681515 Fax: +44(0)-1494
-
 1
1 -
 2
2 -
 3
3 -
 4
4 -
 5
5 -
 6
6 -
 7
7 -
8
-
9
-
10
-
11
-
12
-
13
-
14
-
15
-
16
-
17
-
18
-
19
-
20
-
21
-
22
-
23
-
24
-
25
-
26
-
27
-
28
-
29
-
30
-
31
-
32
-
33
-
34
-
35
-
36
-
37
-
38
-
39
-
40
-
41
-
42
-
43
-
44
-
45
-
46
-
47
-
48
-
49
-
50
-
51
-
52
-
53
-
54
-
55
-
56
-
57
-
58
-
59
-
60
-
61
-
62
-
63
-
64
-
65
-
66
-
67
-
68
-
69
-
70
-
71
-
72
-
73
-
74
-
75
-
76
-
77
-
78
-
79
-
80
-
81
-
82
-
83
-
84
-
85
-
86
-
87
-
88
-
89
-
90
-
91
-
92
-
93
-
94
-
95
-
96
 |
 |

E
n
7.1ch Home Theater System
HT-S5100
AV Receiver (HT-R560)
Speaker Package (HTP-560)
Front Speakers (SKF-560F L/R)
Center Speaker (SKC-560C)
Surround Speakers (SKM-560S L/R)
Surround Back Speakers (SKB-560 L/R)
Subwoofer (SKW-560)
Dock for iPod (DS-A1L)
Instruction Manual
Thank you for purchasing an Onkyo 7.1ch Home
Theater System. Please read this manual thoroughly
before making connections and plugging in the unit.
Following the instructions in this manual will enable
you to obtain optimum performance and listening
enjoyment from your new 7.1ch Home Theater Sys-
tem.
Please retain this manual for future reference.
Contents
Introduction
.....................................
2
Connection
....................................
21
Turning On & First Time Setup
.....
41
Basic Operation
Playing your AV components
.......
47
Using the Tuner
............................
51
SIRIUS Satellite Radio
................
55
DS-A1L Dock for the iPod
............
65
Enjoying the Listening Modes
.....
67
Advanced Operation
.....................
74
Troubleshooting
............................
90
Specifications
................................
93