Onkyo TX-RZ710 User Manual
Onkyo TX-RZ710 Manual
 |
View all Onkyo TX-RZ710 manuals
Add to My Manuals
Save this manual to your list of manuals |
Onkyo TX-RZ710 manual content summary:
- Onkyo TX-RZ710 | User Manual - Page 1
23 Others 25 Part Names Front Panel 27 Rear Panel 28 Remote Controller 29 Display 29 This manual includes information needed when starting up and also instructions for frequently used operations. The "Advanced Manual" is available on the internet with details about the playback features - Onkyo TX-RZ710 | User Manual - Page 2
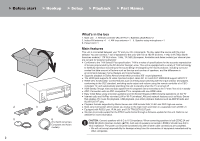
a separate room (ZONE 2) $ Equipped with RS232 port, IR IN jack, and 12V TRIGGER OUT jack $ We plan to provide support for the DTS:X audio format through a firmware update for this unit. Refer to our website for more information. CAUTION: Connect speakers with 6 Ω to 16 Ω impedance. When connecting - Onkyo TX-RZ710 | User Manual - Page 3
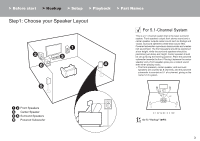
> Before start > Hookup > Setup > Playback > Part Names Step1: Choose your Speaker Layout For 5.1-Channel System This is a 5.1-channel system that is the basic surround system. Front speakers output front stereo sound and a center speaker outputs center sound such as dialogs and vocals. Surround - Onkyo TX-RZ710 | User Manual - Page 4
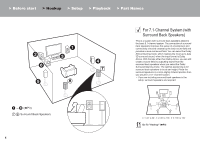
> Before start > Hookup > Setup > Playback > Part Names 1 6 (P3) 7 8 Surround Back Speakers 4 For 7.1-Channel System (with Surround Back Speakers) This is a system with surround back speakers added to the basic 5.1-channel system. The connection of surround back speakers improves the sense of - Onkyo TX-RZ710 | User Manual - Page 5
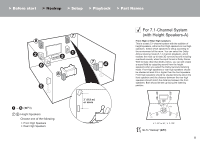
> Before start > Hookup > Setup > Playback > Part Names 1 6 (P3) 7 8 Height Speakers Choose one of the following: $ Front High Speakers $ Rear High Speakers 3´ (0.9 m) or more For 7.1-Channel System (with Height Speakers-A) Front High or Rear High speakers This is a basic 5.1-channel system with - Onkyo TX-RZ710 | User Manual - Page 6
distance between each pair should match the distance between the two front speakers. 0 Dolby Laboratories recommends placing this type of height speakers to obtain the best Dolby Atmos effect. ˎ3 ˎ2 ˎ1 ˎ 1: 30e to 55e, ˎ 2: 65e to 100e, ˎ 3: 125e to 150e Go To "Hookup" (P9 - Onkyo TX-RZ710 | User Manual - Page 7
> Before start > Hookup > Setup > Playback > Part Names 1 6 (P3) 7 8 Height Speakers Choose one of the following: $ Dolby Enabled Speakers (Front) $ Dolby Enabled Speakers (Surround) For 7.1-Channel System (with Height Speakers-C) Dolby enabled speakers This is a basic 5.1-channel system using - Onkyo TX-RZ710 | User Manual - Page 8
Speakers (Bi-Amping) 3 Center Speaker 4 5 Surround Speakers 6 Powered Subwoofer 8 For Bi-Amping the Speakers It is possible to connect front speakers supporting BiAmping to improve quality of the bass and treble. The maximum number of channels available with this connection is 5.1 because Bi-Amping - Onkyo TX-RZ710 | User Manual - Page 9
> Before start > Hookup > Setup > Playback > Part Names Step2: Connect the Speakers 1/2˝ (12 mm) 1 in case of: Pages 3 to 7 Connect 123456 for a 5.1-channel system. For a 7.1-channel system, select either surround back speakers or height speakers, and connect 78. Up to two powered subwoofers can - Onkyo TX-RZ710 | User Manual - Page 10
remove the jumper bar fitted between the woofer jacks and tweeter jacks of the front speakers. In case of Bi-Amping connection, refer to the instruction manual of your speakers. Up to two powered subwoofers can be connected. The same signal is output from each of the SUBWOOFER jacks. Setup 0 Bi - Onkyo TX-RZ710 | User Manual - Page 11
the Initial Setup. 0 Please refer to the TV's operation manual for directions on connections and setup for the TV. 1 HDMI IN (ARC) TV 1 HDMI cable Another TV or projector can be connected to the HDMI OUT SUB jack. This jack does not support ARC. For details about how to output video from the HDMI - Onkyo TX-RZ710 | User Manual - Page 12
displayed on the TV and the audio output from this unit by changing the input selector. This describes the connections for a TV that does not support the ARC (Audio Return Channel) feature. By connecting with both an HDMI cable and a digital optical cable, you can not only output the video input to - Onkyo TX-RZ710 | User Manual - Page 13
example of connection with an AV component that has an HDMI jack. With connection to an AV component that conforms with the CEC (Consumer Electronics Control) standard, you can use features such as the HDMI CEC feature that links with the input selector, and the HDMI Standby Through feature which - Onkyo TX-RZ710 | User Manual - Page 14
also connect to any jack other than BD/DVD. For details, see the Advanced Manual. Setup 0 The COMPONENT VIDEO IN jacks are compatible only with 480i or 576i if there is no option for 480i, etc. If your player does not support 480i or 576i output, use the VIDEO IN jack. 0 To enjoy digital surround - Onkyo TX-RZ710 | User Manual - Page 15
> Before start > Hookup > Setup > Playback > Part Names if you have: Audio Components Example of a connection with an audio component. Connect a CD player using a digital optical cable or analog audio cable. You can also connect a turntable that has an MM-type cartridge to the PHONO jack. 0 If the - Onkyo TX-RZ710 | User Manual - Page 16
> Before start > Hookup > Setup > Playback > Part Names Step5: Multi-zone Connection MAIN ROOM if you connect: ZONE 2 TV You can enjoy content from a Blu-ray Disc player on a TV equipped with an HDMI input jack in the separate room (ZONE 2) by playing a Blu-ray Disc player in the main room (where - Onkyo TX-RZ710 | User Manual - Page 17
> Before start > Hookup > Setup > Playback > Part Names 1 Analog audio cable if you connect : ZONE 2 PRE/LINE OUT You can enjoy 2ch audio in the separate room through speakers connected to a pre-main amplifier or power amplifier by, for example, playing a Blu-ray Disc player in 7.1 ch in the main - Onkyo TX-RZ710 | User Manual - Page 18
> Before start > Hookup > Setup > Playback > Part Names 1 Speaker cable 18 (ZONE 2A for North American models) MAIN ROOM 1 ZONE 2 (ZONE 2A for North American models) ZONE 2B (North American models) if you connect: ZONE 2 SPEAKER You can enjoy 2ch audio in the separate room by, for example, - Onkyo TX-RZ710 | User Manual - Page 19
Move the antenna around while playing the radio to find the position with the best reception. Use a thumb tack or similar to attach the indoor FM antenna to Setup, select the desired setting method and follow the onscreen instructions to configure the connection. Indoor FM antenna (North American - Onkyo TX-RZ710 | User Manual - Page 20
instructions will guide you through some items that you need to check beforehand. Read beforehand so the setup goes smoothly. a b Initial Setup Language Select English Deutsch Français Español Italiano Nederlands Svenska Exit Operation Select the item with the cursors of the remote controller test - Onkyo TX-RZ710 | User Manual - Page 21
"Other..." with the cursor on the remote controller and press ENTER, then follow the onscreen instructions. Keyboard input Wi-Fi Setup SSID abcde f 5. Audio Return Channel If you have connected a TV that supports ARC, select "Yes". This unit's ARC setting turns on and you can listen to the TV's - Onkyo TX-RZ710 | User Manual - Page 22
input selector (a) on the remote controller with the same name as the CEC link function works, the input switches automatically see the Advanced Manual. This support for the DTS Neural:X a firmware update for this unit. You can select Neo:6 Cinema and Neo:6 Music until the update is best for playback - Onkyo TX-RZ710 | User Manual - Page 23
For details, see the Advanced Manual. a b 3. Select the item with the cursors of the remote controller and press ENTER to firmware updates and service providers may cease services, meaning that some network services and content may become unavailable in the future. Furthermore, available services - Onkyo TX-RZ710 | User Manual - Page 24
touch®, or iPad® connected to the same access point as this unit. 0 Update the OS version on your iOS device to the latest version. 1. Connect the amount of power consumed in standby mode, press the button on the remote controller, then in the Setup menu displayed set "5. Hardware" - "Power - Onkyo TX-RZ710 | User Manual - Page 25
while the preset number is flashing. When deleted, the number on the display goes off. Frequency step setting Press the button on the remote controller to select "7. Miscellaneous" - "Tuner" - "AM/FM Frequency Step" or "AM Frequency Step" and select the frequency step for your area. Note that when - Onkyo TX-RZ710 | User Manual - Page 26
't fix the problem, resetting the unit to the status at the time of shipment may solve the problem. If you reset the unit status, your preferences will be reset to the defaults until "Clear" disappears from the display. To reset the remote controller, while holding down MODE, press until the - Onkyo TX-RZ710 | User Manual - Page 27
if the unit enters standby mode when the features are enabled that continue to work when this unit is in standby, such as HDMI Standby Through and Network Standby. 4. Remote control sensor 5. ZONE 2 button: Controls the multi-zone function. (P25) 6. OFF button: Switches the multi-zone function off - Onkyo TX-RZ710 | User Manual - Page 28
a device with 12V trigger input jack to enable link operation between the device and the unit. 17.IR IN jack: Allows you to connect a multiroom remote control kit. 18.RS232 port: For connection to the home - Onkyo TX-RZ710 | User Manual - Page 29
5 12 13.MODE button: Switches tuning to an AM/FM station between automatic tuning and manual tuning. 14.MEMORY button: Used to register AM/FM radio stations. 6 7 30° the volume control by 4dB. 7. Lights when operating the "NET" input selector indicating remote controller cursor operations - Onkyo TX-RZ710 | User Manual - Page 30
pass a rigorous series of quality and performance tests. Only then can a product feature the superb performance for many years to come. THX iPhone or iPad may affect wireless performance. AirPlay works with iPhone, iPad, and iPod touch with iOS Controleer de wetgeving in het land van gebruik. Onkyo - Onkyo TX-RZ710 | User Manual - Page 31
device you are able to link to other services or websites which are not under the control of any company which has designed, manufactured or , exploit, create derivative works, upload, post, transmit, sell or distribute in any manner any information, content or services available through this device, - Onkyo TX-RZ710 | User Manual - Page 32
Please contact an Onkyo distributor referring to Onkyo SUPPORT site. http://www.intl.onkyo.com/support/ 2-3-12 104-0028 The above-mentioned information is subject to change without prior notice. Visit the Onkyo web site for the latest update. (C) Copyright 2016 Onkyo & Pioneer Corporation Japan
-
 1
1 -
 2
2 -
 3
3 -
 4
4 -
 5
5 -
 6
6 -
 7
7 -
8
-
9
-
10
-
11
-
12
-
13
-
14
-
15
-
16
-
17
-
18
-
19
-
20
-
21
-
22
-
23
-
24
-
25
-
26
-
27
-
28
-
29
-
30
-
31
-
32
 |
 |

Basic Manual
Hookup
Step1: Choose your Speaker Layout
.......................................
3
Step2: Connect the Speakers
..................................................
9
Step3: Connect the TV
..........................................................
11
Step4: Connect the AV Components
.....................................
13
Step5: Multi-zone Connection
...............................................
16
Step6: Connect Other Cables
................................................
19
Setup
Step7: Power On & Initial Setup
............................................
20
HDMI Setup
...........................................................................
21
Playback
Basic Playback
......................................................................
22
Network Functions
.................................................................
23
Others
....................................................................................
25
Part Names
Front Panel
............................................................................
27
Rear Panel
............................................................................
28
Remote Controller
.................................................................
29
Display
...................................................................................
29
This manual includes information needed when starting up and also
instructions for frequently used operations. The "Advanced Manual" is
available on the internet with details about the playback features/
listening modes/settings details, specifications, and troubleshooting.
The Advanced Manual is created in a format that makes it easy to read
on a PC or Smartphone.
Advanced Manual found here
AV RECEIVER
TX-RZ710
> Before start
> Hookup
> Setup
> Playback
> Part Names