Optoma HD27e HD27e_User Manual - Page 36
Setup test pattern menu, Setup remote settings menu, Setup 12V trigger menu, Setup options menu
 |
View all Optoma HD27e manuals
Add to My Manuals
Save this manual to your list of manuals |
Page 36 highlights
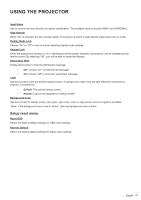
USING THE PROJECTOR Setup test pattern menu Test Pattern Select the test pattern from green grid, magenta grid, white grid, white or disable this function (off). Setup remote settings menu IR Function Set the IR function setting. ‡‡ On: Choose "On", the projector can be operated by the remote control from top IR receiver. ‡‡ Off: Choose "Off", the projector can't be operated by the remote control. By selecting "Off", you will be able to use the Keypad keys. User1/ User2/ User3 Assign the default function for User1, User2, or User3 between HDMI 2, Test Pattern, Brightness, Contrast, Sleep Timer, Color Matching, Color Temperature, Gamma, Projection, Lamp Settings, Zoom, Freeze, and MHL. Setup 12V trigger menu 12V Trigger Use this function to enable or disable the trigger. Reserved IR_IN & detect GND ‡‡ Off: Choose "Off" to disable the trigger. ‡‡ On: Choose "On" to enable the trigger. Setup options menu Language Select the multilingual OSD menu between English, German, French, Italian, Spanish, Portuguese, Polish, Dutch, Swedish, Norwegian/Danish, Finnish, Greek, traditional Chinese, simplified Chinese, Japanese, Korean, Russian, Hungarian, Czechoslovak, Arabic, Thai, Turkish, Farsi, Vietnamese, Indonesian, Romanian, and Slovakian. Menu Settings Set the menu location on the screen and configure menu timer settings. ‡‡ Menu Location: Select the menu location on the display screen. ‡‡ Menu Timer: Set the duration where the OSD menu stays visible on the screen. Auto Source If you set this option "On" and press the button on the projector keypad or button on the remote control then the next available input source is selected automatically. Set "Off" to disable auto source function. Input Source Select the input source between HDMI1 and HDMI2/MHL. 36 English
-
 1
1 -
2
-
3
-
4
-
5
-
6
-
7
-
8
-
9
-
10
-
11
-
12
-
13
-
14
-
15
-
16
-
17
-
18
-
19
-
20
-
21
-
22
-
23
-
24
-
25
-
26
-
27
-
28
-
29
-
30
-
 31
31 -
 32
32 -
 33
33 -
 34
34 -
 35
35 -
 36
36 -
 37
37 -
 38
38 -
 39
39 -
 40
40 -
 41
41 -
42
-
43
-
44
-
45
-
46
-
47
-
48
-
49
-
50
-
51
-
52
-
53
 |
 |