Optoma HD640 User's Manual - Page 44
Lamp Replacement Procedure
 |
View all Optoma HD640 manuals
Add to My Manuals
Save this manual to your list of manuals |
Page 44 highlights
Appendices 1 2 3 4 Lamp Replacement Procedure: 1. Switch off the power to the projector by pressing the "Power" button. 2. Allow the projector to cool down for at least 30 minutes. 3. Disconnect the power cord. 4. Use a screwdriver to unscrew the 2 screws from the cover then push up and remove the cover. 5. Use a screwdriver to unscrew the 2 screws from the lamp module. 6. Pull up the lamp handle carefully. 7. Pull out and remove the lamp module. To replace the lamp module, reverse the previous steps. 8. Turn on the projector and use "Lamp Reset" after the lamp module is replaced. Lamp Reset: (i) Press "Menu" (ii) Select "Options" (iii) Select "Lamp settings" (iv) Select "Lamp Reset (v) Select "Yes". English 44
-
 1
1 -
2
-
3
-
4
-
5
-
6
-
7
-
8
-
9
-
10
-
11
-
12
-
13
-
14
-
15
-
16
-
17
-
18
-
19
-
20
-
21
-
22
-
23
-
24
-
25
-
26
-
27
-
28
-
29
-
30
-
31
-
32
-
33
-
34
-
35
-
36
-
37
-
38
-
 39
39 -
 40
40 -
 41
41 -
 42
42 -
 43
43 -
 44
44 -
 45
45 -
 46
46 -
 47
47 -
 48
48 -
 49
49 -
50
-
51
 |
 |
44
English
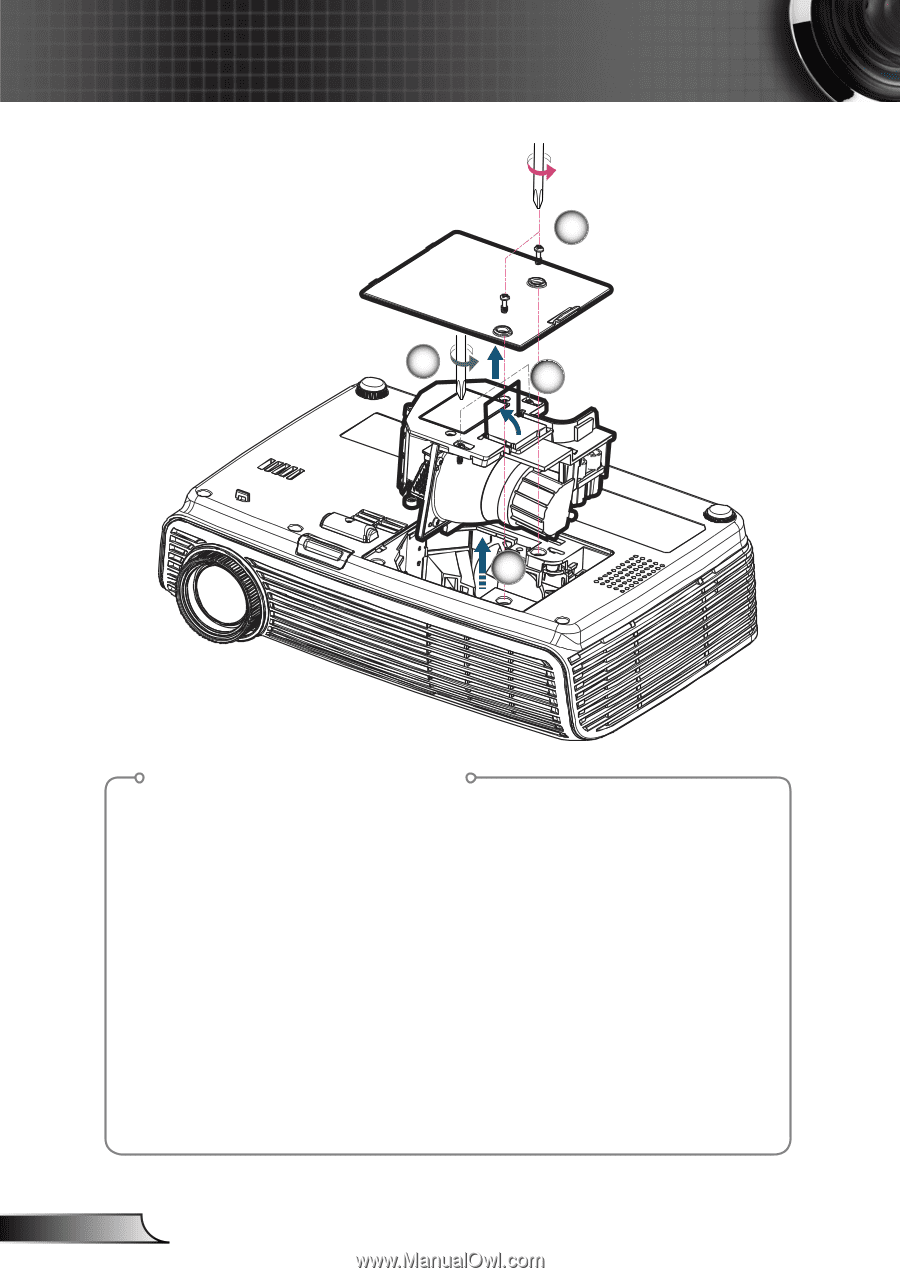
Appendices
Lamp Replacement Procedure:
1. Switch off the power to the projector by pressing the “Power” button.
2. Allow the projector to cool down for at least 30 minutes.
3. Disconnect the power cord.
4. Use a screwdriver to unscrew the 2 screws from the cover then push up
and remove the cover.
5. Use a screwdriver to unscrew the 2 screws from the lamp module.
6. Pull up the lamp handle carefully.
7. Pull out and remove the lamp module.
To replace the lamp module, reverse the previous steps.
8. Turn on the projector and use “Lamp Reset” after the lamp module is
replaced.
Lamp Reset: (i) Press “Menu”
(ii) Select “Options”
(iii) Select
“Lamp settings”
(iv) Select “Lamp Reset
(v) Select “Yes”.
1
2
3
4