Oreck UPRO14T Owners Guide - Page 6
To Clean or Replace Inlet Filter, To Replace Brush, General Information - manual
 |
View all Oreck UPRO14T manuals
Add to My Manuals
Save this manual to your list of manuals |
Page 6 highlights
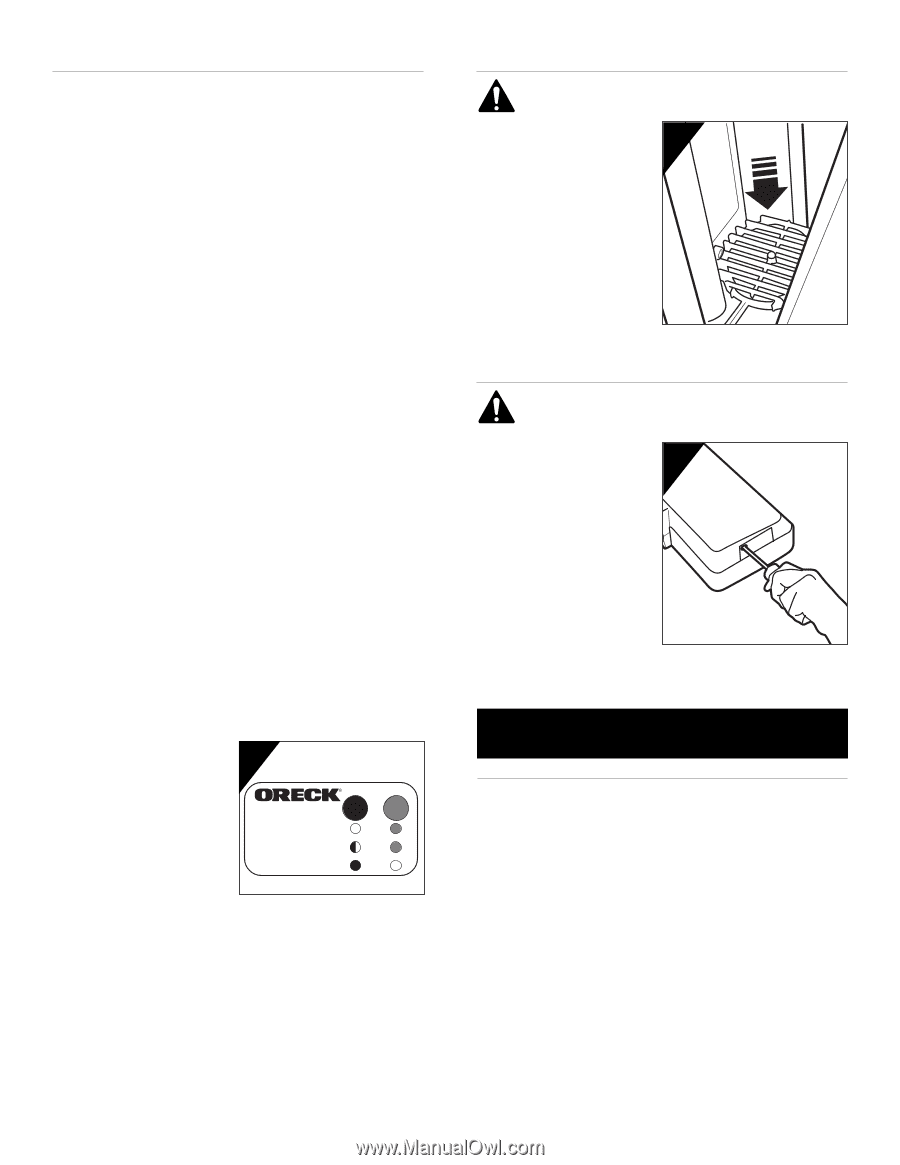
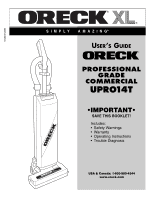
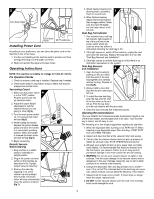
General Information The performance of your new vacuum cleaner greatly depends upon care and maintenance. The instructions in this manual will guide you in performing basic care and maintenance. To obtain the most satisfying years of service read the instructions and keep them handy for future reference. Disposable Paper Filter Dust Bags Disposable paper filter dust bags play a very important role in the efficiency of your ORECK vacuum cleaner. The purpose of the paper bag is to trap dirt, but at the same time it must be porous enough to allow air to pass through. If the paper bag becomes clogged, no air can pass through the cleaner and cleaning cannot take place, regardless of the cleaner's power. Increase the CLEANING POWER of your vacuum cleaner by changing the bag often. To keep your cleaner operating at maximum efficiency, change the dust bag frequently. DO NOT OVER FILL DUST BAG. Be sure the disposable paper filter dust bag is installed properly. All paper dust bags are not the same. Your ORECK recommended disposable dust bags have been designed to be used with the ORECK vacuum cleaner. Using bags other than ORECK recommended disposable bags will affect the cleaning ability of your cleaner and could cause damage to it. Lubrication The vacuum cleaner motor bearings are factory lubricated and sealed. Further lubrication is not required. General Vacuum Cleaner Care At least once a month, check for and remove excessive lint, string or hair from revolving brush. Wipe the outside of the vacuum cleaner with a damp cloth. Also clean the base of cleaner and housing area. A little preventative maintenance will keep your cleaner looking new and will ensure continued cleaning effectiveness. CAUTION-Wood Floors, Soft (Vinyl, Asphalt Tile, etc.) Floor Surfaces and Polished Floor Finishes Use floor and floor finish manufacturer's recommended methods of cleaning. The metal strip on the base of the vacuum cleaner could be damaged if used on concrete or abrasive surfaces, and, therefore, cause damage to wood floors, soft (vinyl, asphalt tile, etc.) floor surfaces and polished floor finishes. The roller brush may also scuff very soft finishes. Electronic Brush Alert The vacuum cleaner is equipped with an electronic power brush 9 alert: two lights - GREEN and RED (fig 9). Green Light - Lower brush unit operating properly. Green Light and Blinking Red Light - Brush drive belt out or broken. OPERATION GUIDE NORMAL OPERATION BELT BROKEN RED BLINKING BRUSH BLOCKED Red Light - Brush rotation obstructed. Refer to Troubleshooting section. AW-535 These lights alert the operator of prIoVbAleCmsOwphiecrhamtiuosnt bGe cuoirdreectuednit immediately. Monitor these lights during operation. Thermal Overload The internal temperature of the vacuum motor is sensed at all times. When the temperature gets too high the sensor shuts off the vacuum motor. Inspect the machine for any air obstruction. The sensor will reset automatically when the sensor and electric motor have cooled sufficiently. The motor can then be restarted. To Clean or Replace Inlet Filter WARNING: Unplug cord from electrical outlet before servicing. 1. Remove the dust bag. 10 2. Snap the filter retainer from its fitting (fig 10). 3. Remove the filter and clean by shaking or vacuuming. Replace the filter if worn or not cleanable. 4. Replace filter in the retainer and snap into place. 5. Replace dust bag. CAUTION: Do not operate the vacuum without the inlet filter in place. To Replace Brush WARNING: Unplug cord from electrical outlet before servicing. 1. Remove the screw holding the brush access plate and 11 remove plate (fig 11). 2. Grasp the brush strip and slide it out of the brush extension. 3. Replace the strip with a new one and slide it into place. 4. Replace the access plate and install the screw. If a previous adjustment has already been made and bristle height does not extend above baseplate, a new brush assembly should be ordered. FOR SERVICE CALL USA & Canada: 1-800-989-4244 Replacement Parts (Sold Separately) ITEM 1. Bag (10 pack) 2. Belt (single) 3. Dusting Brush Nozzle 4. Fabric Brush Nozzle 5. Crevice Tool Nozzle 6. Inlet Filter PART # PK10PRO14DW 40332-01 40333-01 40334-01 40335-01 40336-01 USA & Canada: 1-800-989-4244 6
-
 1
1 -
 2
2 -
 3
3 -
 4
4 -
 5
5 -
 6
6 -
 7
7 -
 8
8
 |
 |