Oreck XL21 Owners Guide - Page 6
Parts List, Assembly, Operating Instructions, General Information
 |
View all Oreck XL21 manuals
Add to My Manuals
Save this manual to your list of manuals |
Page 6 highlights
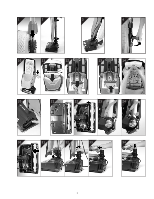
Parts List ENGLISH Operating Instructions To assist you in identifying components of your vacuum, the parts have been numbered as follows: 1 Helping Hand® handle with soft grip 2 On/off switch 3 Cord dump 4 Handle tube 5 Bag stiffener 6 Deflector 7 Bag dock 8 Carry handle 9 Zipper 10 Bag clip 5 11 Headlight cover 6 12 Front light lens 13 Main bumper 14 Edge brush 15 Belt door 33 7 16 Power cord 17 Cord assembly 18 Handle collar 19 Connector assembly 20 Carry handle clamp 21 Collars 22 Lower tube 10 23 Bag clip clamp 11 24 Scent cartridge door 25 Fan housing 12 26 Rear wheels 27 Side light 13 28 Cover 29 Bag spring 30 Bag pocket 31 Outer bag 32 Power nozzle 33 Inner filter bag 34 Duster loop 16 1 2 3 4 8 9 15 14 17 18 19 8 31 20 30 21 22 34 Assembly 23 24 25 26 32 29 28 27 14 fig. 1 Align slot in handle tube with tab in connector. Insert the handle tube into connector. Tighten collar at base of handle tube onto the connector until it locks, "snaps". fig. 2 Snap cord assembly into the cord clip located on the left side of the collar. Leave excess cord at the power head to allow movement. Make sure disposable paper filter dust bag is in place. DO NOT operate the cleaner without a paper filter dust bag. Plug the power cord into an electrical outlet and press the On Low (l) - On High (ll) - OFF(O) switch on handle assembly when ready to operate. Up-Position Lock fig. 3 Place foot on power head and lean handle back gently to release lock for vacuum use. Return handle to the full upright position to engage lock. NOTE: Do not operate the unit while in the upright and locked position. Do not let the unit run while in any one stationary position for any period of time. Keep the unit moving while in operation. Carry Handle fig. 4 Raise the carry handle located on back of the unit for easy lifting, carrying, and stair vacuuming. Lower the handle during use to eliminate obstruction. Duster Loop fig. 5 For convenient use of dusters, a loop has been sewn onto the outer bag. This will allow easy removal and storage of the duster. For Easy Power Cord Storage fig. 6 Raise carrying handle and wrap power cord around carry handle and Helping Hand® handle. fig. 7 To release cord, twist cord dump located on Helping Hand® handle 1/2 turn. Slide cord off handle. (fig. 8) Cleaner Storage Both the Helping Hand® handle and carry handle can be used for convenient, space saving storage of cleaner. Hang cleaner by carry handle on a sturdy fastener or Helping Hand® handle on a closet rod. Operating Recommendations This ORECK XL21 High-Speed Upright is one of the finest, fastest, and strongest units in its class. You'll love the way it cleans, gets under things, and it's SO lightweight and easy to use. The following are a few simple suggestions regarding its operation: 1. When inserting a new disposable paper filter dust bag-FIRST PUFF OUT and OPEN THE BAG. 2. When the disposable filter dust bag is full, REPLACE IT. 3. If at any time the machine does not pick up properly or makes an unusual noise, STOP OPERATION and service. 4. Although your upright will pick up pins, paper clips, and other small objects, it is recommended that these be removed from the floor before you vacuum. Failure to do so may result in permanent damage to the motor suction fan and its housing. 5. WARNING: Do not use your vacuum cleaner on damp or wet surfaces. This will cause damage to the vacuum cleaner and is dangerous to the user. Damage caused by use on wet or damp surfaces is not covered under warranty. 6. REPLACE THE BELT EVERY 6 MONTHS, SCENT CARTRIDGE EVERY MONTH, AND MOTOR FILTER EVERY 2 MONTHS. 7. Change the disposable filter dust bag at least once a month-even if it is not full! The collected dust in the dust bag can cause odor, attract moisture, and can affect the efficiency of the cleaner. 8. DO NOT run the vacuum cleaner over the cord. The revolving brush could damage the cord. 9. Use caution when vacuuming over area rug edges and fringe. General Information The performance of your cleaner greatly depends upon care and maintenance. The instructions in this manual will guide you in performing basic care and maintenance. To obtain the most satisfying years of service read the instructions and keep them handy for future reference. 5
-
 1
1 -
 2
2 -
 3
3 -
 4
4 -
 5
5 -
 6
6 -
 7
7 -
 8
8 -
 9
9 -
 10
10 -
 11
11 -
 12
12 -
13
-
14
-
15
-
16
-
17
-
18
-
19
-
20
 |
 |
