Oregon Scientific BAR806 User Manual - Page 1
Oregon Scientific BAR806 Manual
 |
View all Oregon Scientific BAR806 manuals
Add to My Manuals
Save this manual to your list of manuals |
Page 1 highlights
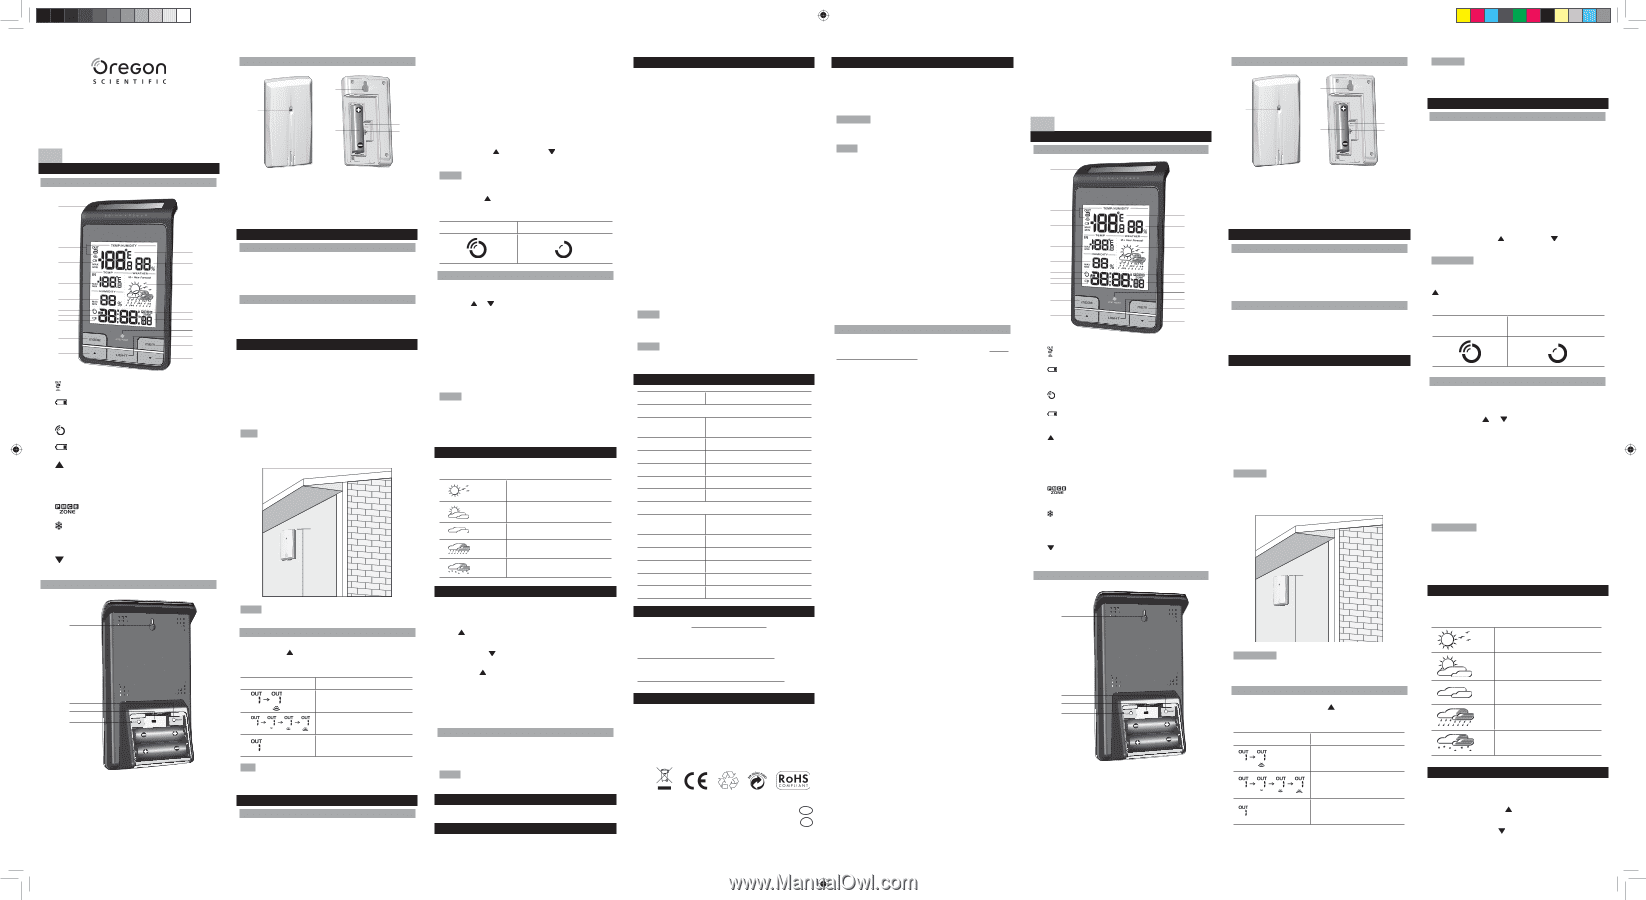
Solar Weather Station with Outdoor Hygrometer Model: BAR806HG / BAR806HGA USER MANUAL EN OVERVIEW FRONT VIEW 1 2 11 3 12 4 13 5 6 7 14 8 15 16 9 17 18 10 19 1. Solar panel 2. : Remote sensor reception indicator and outdoor channel selected 3. : Outdoor remote sensor battery low 4. Indoor temperature (Current / Max / Min) 5. Indoor humidity (Current / Max / Min) 6. : Clock signal reception indicator 7. AM / PM 8. : Main unit batteries low / no battery 9. MODE: Change settings / display 10. : Increase value of the setting; activate clock reception signal; toggle between outdoor channels (1-3) 11. Outdoor temperature (Current / Max / Min) 12. Outdoor humidity (Current / Max / Min) 13. Weather forecast 14. : Time zone offset 15. Calendar / Clock with weekday / second 16. : Ice alert LED indicator 17. LIGHT: Activate backlight 18. MEM: View current, maximum and minimum indoor / outdoor temperature and humidity 19. : Decrease value of the setting; deactivate clock reception signal BACK VIEW 1 2 3 4 EU UK 1. Wall mount hole 2. RESET: Reset unit to default settings 3. EU / UK: Select the nearest radio signal (BAR806HG only) 4. °C / °F: Select temperature unit REMOTE SENSOR 2 1 4 3 5 1. LED status indicator 2. Wall mount hole 3. Battery compartment 4. RESET hole 5. CHANNEL switch GETTING STARTED SOLAR PANEL The solar panel is an energy saving feature, which is an environmentally friendly way to provide additional power to the main unit and prolongs battery life. However, it cannot replace battery power entirely. INSERT BATTERIES 1. Remove the battery compartment. 2. Insert the batteries, matching the polarities. 3. Press RESET after each battery change. REMOTE SENSOR The main unit can collect data from up to 3 sensors. To set up the sensor: 1. Open the battery compartment. 2. Insert the battery, matching the polarities. 3. Select a channel. Press RESET after each battery change. 4. Close the battery door. 5. Place the sensor within 30 m (98 ft) of the main unit using the table stand or wall mount. TIP Ideal placements for the sensor would be in any location on the exterior of the home at a height of not more than 1.5 m (5 ft) and which can shield it from direct sunlight or wet conditions for an accurate reading. 1.5 m (5 ft) NOTE Use alkaline batteries for longer usage and consumer grade lithium batteries in temperatures below freezing. SENSOR DATA TRANSMISSION To search for a sensor: Press and hold + MODE. The sensor reception icon in the remote sensor area shows the status: ICON DESCRIPTION Main unit is searching for sensor(s). A channel has been found. The sensor cannot be found. TIP The transmission range may vary depending on many factors. You may need to experiment with various locations to get the best results. CLOCK CLOCK RECEPTION This product is designed to synchronize its clock automatically with a clock signal. BAR806HG: Slide EU / UK to select the signal received. • EU: DCF-77 signal: within 1500 km (932 miles) of Frankfurt, Germany. • UK: MSF-60 signal: within 1500 km (932 miles) of Anthorn, England. BAR806HGA: • WWVB-60 signal: within 3200km (2000 miles) of Fort Collins Colorado. To enable / disable signal reception: Press and hold reception. to enable or to disable signal NOTE Reception takes 2-10 minutes. If the signal is weak, it can take up to 24 hours to get a valid signal. If signal reception is unsuccessful, place your unit next to a window, press and hold to force another signal search. Clock signal reception indicator: STRONG SIGNAL WEAK / NO SIGNAL MANUALLY SET CLOCK To set the clock manually, disable the signal reception first. 1. Press and hold MODE. 2. Press or to change the settings. 3. Press MODE to confirm. The settings order is: time zone, 12/24 hr format, hour, minute, year, calendar mode (day - month / month - day), month, day and language. BAR806HG: Time zone offset sets the clock +/- 23 hours from the received clock signal time. If you have deactivated the clock signal reception, do not set a value for time zone. BAR806HGA: Select the time zone: (P) Pacific, (E) Eastern, (C) Central or (M) Mountain. NOTE The language options are English (E), German (D), French (F), Italian (I), and Spanish (S), and Russian (R). To select display mode: Press MODE to choose between clock with seconds / weekday / calendar. WEATHER FORECAST This product forecasts the next 12 to 24 hours of weather within a 30-50 km (19-31 mile) radius. Sunny Partially Cloudy Cloudy Rainy Snowy TEMPERATURE AND HUMIDITY To toggle temperature unit: Press °C / °F. To toggle between each outdoor sensor's readings: Press repeatedly. OR Press and hold + MEM for 2 seconds to initiate auto toggle of outdoor channels. To end press . To toggle between current, minimum and maximum records: Press MEM repeatedly. To clear the records: Press and hold MEM. ICE WARNING If the channel 1 sensor falls between 3°C to -2 °C (37°F to 28°F), LED indicator will flash, and will stop flashing once the temperature is out of this range. NOTE As ice alert is only applicable to channel 1, to prevent flashing of LED, select channel 2 or 3 on outdoor sensor. BACKLIGHT Press LIGHT to activate backlight for 5 seconds. RESET Press RESET to return to the default settings. PRECAUTIONS • Do not subject the unit to excessive force, shock, dust, temperature or humidity. • Do not cover the ventilation holes with any items such as newspapers, curtains etc. • Do not immerse the unit in water. If you spill liquid over it, dry it immediately with a soft, lint-free cloth. • Do not clean the unit with abrasive or corrosive materials. • Do not tamper with the unit's internal components. This invalidates the warranty. • Only use fresh batteries. Do not mix new and old batteries. • Images shown in this manual may differ from the actual display. • When disposing of this product, ensure it is collected separately for special treatment, and not as normal household waste. • Placement of this product on certain types of wood may result in damage to its finish for which Oregon Scientific will not be responsible. Consult the furniture manufacturer's care instructions for information. • The contents of this manual may not be reproduced without the permission of the manufacturer. • Do not dispose old batteries as unsorted municipal waste. Collection of such waste separately for special treatment is necessary. • Please note that some units are equipped with a battery safety strip. Remove the strip from the battery compartment before first use. NOTE The technical specifications for this product and the contents of the user manual are subject to change without notice. NOTE Features and accessories will not be available in all countries. For more information, please contact your local retailer. SPECIFICATIONS TYPE DESCRIPTION MAIN UNIT L x W x H 94 x 46 x 160 mm (3.7 x 1.8 x 6.3 in) Weight 222g (7.8 oz) without battery Temperature range -5°C to 50°C (23°F to 122°F) Signal frequency 433 MHz Humidity range 25% - 95% Power 3 x UM-3 (AA) 1.5 V batteries REMOTE UNIT (THGN132N) L x W x H 96 x 50 x 22 mm (3.78 x 1.97 x 0.87 in) Weight 62 g (2.22 ounces) Transmission range 30 m (98 ft) unobstructed Temperature range -20°C to 60°C (-4°F to 140°F) Humidity range 25% - 95% Power 1 x UM-3 (AA) 1.5 V batteries ABOUT OREGON SCIENTIFIC Visit our website (www.oregonscientific.com) to learn more about Oregon Scientific products. If you're in the US and would like to contact our Customer Care department directly, please visit: www2.oregonscientific.com/service/support.asp For international inquiries, please visit: www2.oregonscientific.com/about/international.asp EU-DECLARTION OF CONFORMITY Hereby, Oregon Scientific, declares that this Solar Weather Station with Outdoor Hygrometer (Model: BAR806HG / BAR806HGA) is in compliance with the essential requirements and other relevant provisions of Directive 1999/5/EC. A copy of the signed and dated Declaration of Conformity is available on request via our Oregon Scientific Customer Service. COUNTRIES RTTE APPROVAL COMPLIED All EU countries,Switzerland CH and Norway N FCC STATEMENT This device complies with Part 15 of the FCC Rules. Operation is subject to the following two conditions: (1) This device may not cause harmful interference, and (2) This device must accept any interference received, including interference that may cause undesired operation. WARNING Changes or modifications not expressly approved by the party responsible for compliance could void the user's authority to operate the equipment. NOTE This equipment has been tested and found to comply with the limits for a Class B digital device, pursuant to Part 15 of the FCC Rules. These limits are designed to provide reasonable protection against harmful interference in a residential installation. This equipment generates, uses and can radiate radio frequency energy and, if not installed and used in accordance with the instructions, may cause harmful interference to radio communications. However, there is no guarantee that interference will not occur in a particular installation. If this equipment does cause harmful interference to radio or television reception, which can be determined by turning the equipment off and on, the user is encouraged to try to correct the interference by one or more of the following measures: • Reorient or relocate the receiving antenna. • Increase the separation between the equipment and receiver. • Connect the equipment into an outlet on a circuit different from that to which the receiver is connected. • Consult the dealer or an experienced radio / TV technician for help. DECLARATION OF CONFORMITY The following information is not to be used as contact for support or sales. Please visit our website at www2. oregonscientific.com/service for all enquiries. We Name: Oregon Scientific, Inc. Address: 19861 SW 95th Ave.,Tualatin, Oregon 97062 USA Telephone No.: 1-800-853-8883 declare that the product Product No.: Product Name: BAR806HG / BAR806HGA Solar Weather Station with Outdoor Hygrometer Manufacturer: IDT Technology Limited Address: Block C, 9/F, Kaiser Estate, Phase 1,41 Man Yue St., Hung Hom, Kowloon, Hong Kong is in conformity with Part 15 of the FCC Rules. Operation is subject to the following two conditions: 1) This device may not cause harmful interference. 2) This device must accept any interference received, including interference that may cause undesired operation. Station météorologique solaire à hygromètre extérieur Modèle: BAR806HG / BAR806HGA MANUEL DE L'UTILISATEUR FR VUE D'ENSEMBLE FACE AVANT 1 2 11 3 12 4 13 5 6 7 14 8 15 16 9 17 18 10 19 1. Panneau solaire 2. : Icône de réception de la sonde sans fil et indique que le canal extérieur est sélectionné 3. : La pile de la sonde sans fil est faible 4. Température intérieure (actuelle, Max/Min) 5. Humidité intérieure (actuelle, Max/Min) 6. : Indicateur de réception du signal de l'horloge 7. AM / PM 8. : Les piles de l'appareil principal sont faibles / aucune pile 9. MODE: Modifie les réglages / l'affichage 10. : Augmente la valeur d'un réglage; active le signal de reception de l'horloge; permet d'alterner entre les canaux (1-3) 11. Température extérieure (actuelle, Max/Min) 12. Humidité extérieure (actuelle, Max/Min) 13. Prévision météorologique 14. : Fuseau horaire 15. Calendrier / horloge avec affichage des jours de la semaine / secondes 16. : Indicateur LED d'alerte de gel 17. LIGHT: Permet d'activer le rétro-éclairage 18. MEM: Affichage des temperatures et humidités intérieures / extérieures actuelle/maximum/minimum 19. : Diminue les réglages; désactive le signal de reception de l'horloge FACE ARRIÈRE 1 2 3 4 EU UK 1. Trou de fixation murale 2. REINITIALISER (RESET): Réinitialiser l'appareil aux réglages par défaut 3. EU / UK: Sélectionne le signal radio le plus proche (modèle BAR806HG uniquement) 4. °C / °F: Sélectionne l'unité de mesure de température SONDE SANS FIL 2 1 4 3 5 1. Indicateur d'état LED 2. Trou de fixation murale 3. Compartiment des piles 4. Fente REINITIALISER (reset) 5. Bouton CANAL (channel) POUR COMMENCER PANNEAU SOLAIRE Le panneau solaire est un accessoire permettant d'économiser l'énergie, c'est une façon écologique de fournir de l'électricité supplémentaire à l'appareil principal prolongeant la durée de vie de la pile. Il ne peut cependant remplacer entièrement l'alimentation par piles. INSÉREZ LES PILES 1. Retirez le couvercle du compartiment des piles. 2. Insérez les piles en respectant les polarités. 3. Appuyez sur REINITIALISER (RESET) après chaque changement de piles. SONDE SANS FIL L'appareil principal est à même de collecter les données de 3 sondes maximum. Pour installer le capteur: 1. Ouvrez le couvercle du compartiment des piles. 2. Insérez la pile, en respectant les polarités. 3. Sélectionnez un canal. Appuyez sur RESET après chaque changement de piles. 4. Fermez le couvercle du compartiment des piles. 5. Installez le capteur à 30 m maximum (98 pieds) de l'appareil principal à l'aide du support de table ou de la fixation murale. CONSEIL Les emplacements idéaux pour le capteur sont dans tout endroit extérieur à l'habitat, à une hauteur ne dépassant pas les 1.5m (5 pieds) et permettant de le protéger contre la lumière directe du soleil ou des conditions humides, afin d'obtenir une lecture précise. 1.5m REMARQUE Utilisez des piles alcalines pour un usage prolongé et des piles au lithium pour la consommation lors de basses températures (gel). TRANSMISSION DES DONNEES DU CAPTEUR Pour rechercher un capteur: Appuyez et maintenez la touche + MODE. L'icône de réception du capteur située dans la zone de la sonde à distance, indique l'état : ICONE DESCRIPTION L'appareil principal est à la recherche du/des capteur(s). Un canal a été trouvé. Le capteur est introuvable. CONSEIL La portée de transmission peut varier en fonction de plusieurs facteurs. Vous pouvez essayer plusieurs emplacements, afin d'obtenir les meilleurs résultats possibles. HORLOGE RÉCEPTION DE L'HORLOGE Ce produit est conçu pour synchroniser automatiquement l'horloge avec le signal radio. BAR806HG: Positionnez l'encoche EU / UK pour sélectionner le signal à recevoir. • EU: Signal DCF-77: dans un rayon de 1500 Km (932 miles) depuis Frankfort, Allemagne. • UK: Signal MSF-60: dans un rayon de 1500 Km (932 miles) depuis Anthorn, Angleterre. BAR806HGA: • Signal WWVB-60: dans un rayon de 3200 km (2000 miles) de Fort Collins, Colorado. Pour activer / désactiver le signal de réception: Appuyez et maintenez pour activer ou pour désactiver la réception du signal. REMARQUE La réception prend entre 2 et 10 minutes. Si le signal est faible, 24 heures peuvent être nécessaires pour obtenir un signal valide. Si la réception échoue, positionnez votre appareil à proximité d'une fenêtre, appuyez et maintenez pour forcer la recherche de signal. Indicateur de réception du signal de l'Horloge: SIGNAL FORT SIGNAL FAIBLE / AUCUN SIGNAL RÉGLER MANUELLEMENT L'HORLOGE Pour régler manuellement l'horloge, vous devez, tout d'abord, désactiver la réception du signal. 1. Appuyez et maintenez la touche MODE. 2. Appuyez sur ou pour modifier les réglages. 3. Appuyez sur MODE pour confirmer. Les réglages s'effectuent dans l'ordre suivant : fuseau horaire, format 12/24 heures, heure, minute, année, mode calendrier mois/jour, jour/mois, mois et langue. BAR806HG: La fonction fuseau horaire règle l'horloge à +/- 23 heures de l'heure du signal reçu. Si vous avez désactivé la réception du signal de l'horloge, ne configurez pas de valeur pour le fuseau horaire. BAR806HGA: Sélectionnez le fuseau horaire: Heure Pacifique (P), des Montagnes (M), Centrale (C) ou de la Côte Est (E). REMARQUE Les langues disponibles sont l'anglais (E), l'allemand (D), le français (F), l'italien (I), l'espagnol (S), et le russe (R). Pour sélectionner le mode d'affichage: Appuyez sur MODE pour choisir l'affichage de l'horloge avec les secondes / jours de la semaine / calendrier. PRÉVISION MÉTÉO Ce produit vous permet de savoir les prévisions météorologiques pour les 12 à 24 heures dans un rayon de 30 à 50 Km (19-31 miles). Ensoleillé Partiellement nuageux Nuageux Pluvieux Neige TEMPÉRATURE ET HUMIDITÉ Pour sélectionner l'unité de température: Appuyez sur °C / °F. Pour alterner entre les relevés de chaque sonde sans fil: Appuyez plusieurs fois sur OU Appuyez et maintenez + MEM pendant 2 secondes pour lancer l'alternance automatique des canaux extérieurs. BAR806HGA_US_M_R3.indd 1 2009.4.17 5:29:02 PM
-
 1
1 -
 2
2
 |
 |