Oregon Scientific SL101 User Manual - Page 1
Oregon Scientific SL101 Manual
 |
View all Oregon Scientific SL101 manuals
Add to My Manuals
Save this manual to your list of manuals |
Page 1 highlights
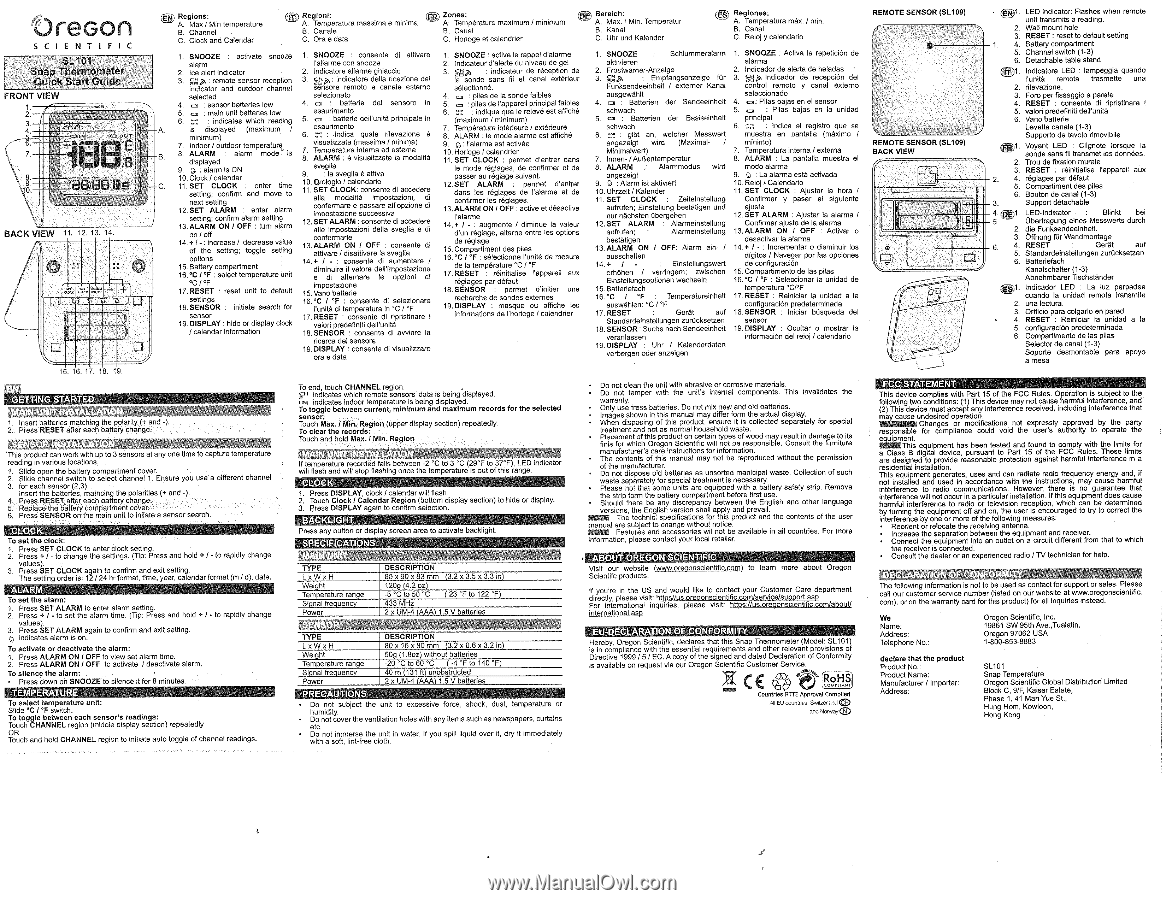
OreGon SC I ENT I F I C SL101 I Snap Thermometer Quick Start Guide FRONT VIEW 2 3. 4. nu sour 28338 BACK V EIN 11. 12. 13. 14. tju) Regions: - A. Max / Min temperature B. Channel C. Clock and Calendar Reglonl: A. Temperature maaslma a minima 8. Canals C. Ora e data 1. SNOOZE : activate snooze 1. SNOOZE consents di attivare alarm lenarme con snooze 2. Ice alert Indicator 2. Indicators ananne ghiacdo 3. .,cgjar : remote sensor reception 3. gyp: Inclicatore della ricezione del indicator and outdoor channel sensors remote a canale Warn° selected selezionabe 4. on : sensor batteries low 4. o : battede del sensors in A. C. 5. o : main unit batteries low 6. = • indicates wNch readka la displayed (maximum / minimum) 7. Indoor / outdoor temperature. 8. ALARM alarm mode is displayed 9. p : alarm is ON 10.Clock / calendar 11. SET CLOCK : enter time setting, confirm and move to next setting 12.SET ALARM : enter alarm riettk19; confirm alarm setting 13. ALARM ON / OFF : turn Warm on/off 14.+I-: Increase! decrease value of the setting; toggle seam options 15.Battery compartment 16.°C : select temperature unit esaurimento 5. o : batter's deffunita principals In assortment° 6. = : •kxlica create rilevazione a visualizzate (massima / minima) 7. Temperature interne ed °sterna 8. ALARM : 6 visualizzata la =dart sveglia 9. : le sveglie 6 attive 10.(trologlo / calendado 11. SET CLOCK: consente dl encoder° ella modalite knpostazioni, dl conformers a pasaare all'opzione dl impostazione successive 12.SET ALARM: consents di accedere ails impostezioN della sveglia e dl conferments 13.ALARM ON I OFF consents dl allows / disattivare la sveglie 14.5 I - : consents di aurnentare / diminuire II velore deillmpostazione e di alternate le °retort dl 17.RESET : reset unit to default settings 18. SENSOR : Initiate search for sensor 19.DISPLAY : hide or display clock / calendar Information knpostazione 15.Vano batter* 16.°C I : consente di selezionare l'unite di temperature in •C /'F 17.RESET : consents dl riprIstinare I valod predeflreti 18.SENSOR : consents di aware la &arca del sensors 19.DISPLAY : consents di vlauallzzare wee data Zones: A. Temperature maximum / minimum B. Canal C. Horloge et caleridder dal Bereich: A. Max.! MM. Temperatur B. Kanal C. Uhr and '
-
 1
1
 |
 |