Oregon Scientific WMR88CA User Manual - Page 3
Wind Sensor, Rain Gauge, Outdoor Temperature / Humidity, Sensor, Getting Started, Set Up Remote Wind
 |
View all Oregon Scientific WMR88CA manuals
Add to My Manuals
Save this manual to your list of manuals |
Page 3 highlights
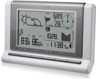
EN 2. Outdoor wind sensor battery is low 3. Wind speed level indicator 4. Wind speed level description 5. Minimum wind chill is displayed 6. Wind direction display C UVI / Barometer / Rainfall Area 1 2 3 1 4 5 6 7 1. UVI / barometer / rainfall reading is displayed 2. Past 24hrs rainfall is displayed 3. Outdoor UV / rain sensor battery is low 4. UVI / barometric pressure (mmHg, inHg or mb) / rainfall readings (in or mm) for the current hour 5. UVI level indicator 6. Maximum UV is displayed 7. UVI / barometric pressure / rainfall historical bar chart display D Clock / Calendar / Moon Phase Area 1 2 34 5 6 1. AM / PM 2. Time zone offset 3. Timestamp is displayed 4. Clock signal reception indicator 5. Time / date / calendar 6. Moon phase WIND SENSOR RAIN GAUGE Base and funnel: 2 1 3 1. Rain gauge 2. Battery compartment 3. RESET button 1 2 1. Funnel 2. Indicator OUTDOOR TEMPERATURE / HUMIDITY SENSOR 5 2 1 3 CF 4 1 2 3 1. Wind direction 2. Wind vane casing 3. Anemometer 4. Solar power socket 1. LED status indicator 2. RESET hole 4 3. °C / °F: Select temperature unit 4. CHANNEL switch 5. Battery compartment GETTING STARTED NOTE Install batteries in the remote sensors before the base station matching the polarities (+ and -). NOTE Use alkaline batteries for longer usage and consumer grade lithium batteries in temperatures below freezing. SET UP REMOTE WIND SENSOR The wind sensor takes wind speed and direction readings. The sensor is battery operated. It is capable of transmitting data to the base station wirelessly within an approximate operating range of 100 meters (328 feet). 3
-
 1
1 -
 2
2 -
 3
3 -
 4
4 -
 5
5 -
 6
6 -
 7
7 -
 8
8 -
 9
9 -
10
-
11
-
12
-
13
-
14
-
15
-
16
-
17
-
18
-
19
-
20
-
21
-
22
-
23
-
24
-
25
-
26
-
27
-
28
-
29
-
30
-
31
-
32
-
33
-
34
-
35
-
36
-
37
-
38
-
39
-
40
-
41
-
42
-
43
-
44
-
45
-
46
-
47
-
48
-
49
-
50
-
51
-
52
-
53
-
54
-
55
-
56
-
57
-
58
-
59
-
60
-
61
-
62
-
63
-
64
-
65
-
66
-
67
-
68
-
69
-
70
-
71
-
72
-
73
-
74
-
75
-
76
-
77
-
78
-
79
-
80
-
81
-
82
-
83
-
84
-
85
 |
 |
