Oster 10" X 20" Griddle English - Page 3
Learning About Your, Electric Griddle, How
 |
View all Oster 10" X 20" Griddle manuals
Add to My Manuals
Save this manual to your list of manuals |
Page 3 highlights
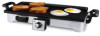
LEARNING ABOUT YOUR ELECTRIC GRIDDLE e a b c O d a Handle b Griddle Plate Latch c Drip Tray d Temperature Control Panel 400˚F 300 250 Warm f g e Removable Griddle Plate f Heating Base g Griddle Base 4 www.oster.com HOW TO: Before rst use Wash the Removable Griddle Plate in warm soapy water or in the dishwasher and dry completely. CAUTION: Do not immerse Heating Base in water or other liquids. 1 Set the griddle on a flat, dry, heat resistant surface. 2 Condition the non-stick cooking surface with vegetable oil, wiping off any excess with a paper towel. 3 Insert the Drip Tray into guides under the front of the griddle. 4 Make sure that the Griddle Plate is sitting securely on the Heating Base. If the Griddle Plate is not secure on the Griddle Plate Latch Drip Tray Heating Base, the product may not function properly. Make sure that the griddle plate is locked securely into the Figure A griddle plate latches located on the base. (See Figure A) NOTE: Position the griddle plate with the taller edge facing forward and the drip hole positioned above the drip tray. 5 Make sure Griddle is in the "OFF" position and drip tray is properly inserted. Plug unit into standard 120 V AC outlet. NOTE: The Power Indicator Light will illuminate, indicating that the griddle is plugged in to a power source. 6 Preheat the Griddle by aligning the Temperature Control Knob indicator with the appropriate temperature setting for approximately 15 minutes prior to use. NOTE: During cooking, the Power Indicator Light will remain on. 7 The Temperature Control also has a "Keep Warm" setting if there is pre-cooked food that you would like to remain warm. NOTE: WARM is recommended for keeping already hot, fully cooked food at the perfect serving temperature. We do not recommend using the WARM setting for more than 4 hours. www.oster.com 5
-
 1
1 -
 2
2 -
 3
3 -
 4
4 -
 5
5 -
 6
6 -
 7
7 -
 8
8 -
 9
9 -
10
 |
 |
