Oster 6058 English - Page 3
Preparing To Use Your Toaster Oven for the First Time, Using Your Toaster Oven - rack
 |
UPC - 034264419544
View all Oster 6058 manuals
Add to My Manuals
Save this manual to your list of manuals |
Page 3 highlights
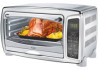
Preparing To Use Your Toaster Oven for the First Time If you are using your toaster oven for the first time, please be sure to: Remove any stickers from the surface of the oven. Open oven door and remove all printed documents and paper from inside the toaster oven. Clean the rack, tray, and pan with hot water, a small amount of dishwashing liquid and a non-abrasive sponge or cleaning pad. DO NOT IMMERSE THE BODY OF THE UNIT IN WATER. Dry the unit thoroughly before using. Select a location for the toaster oven. The location should be in an open area on a flat counter where the plug will reach an outlet. Plug the toaster oven into a 120 Volt AC electrical outlet. Using Your Toaster Oven Setting the Clock Push the Clock button and hold for three seconds. The clock will flash. Use the arrow keys to set the hour. Push the Clock button again. Use the arrow keys to set the minutes. Push the Clock button once more and the time will be set. Preheating the Oven Place oven rack into the desired position before heating the oven. (See "Positioning Rack" Section) Push oven button once. Use arrows to set desired temperature. Push Timer/Temp button, then the down arrow until seven minutes is displayed. Push the Start button. To Use the Bake Function Place oven rack into the desired position before heating the oven. (See "Positioning Rack" Section) Arrange food on the wire rack or in the baking pan. Push the Oven button once. Use the arrow keys to select desired temperature. Push Timer/Temp button. Use the arrow keys to select desired time. Push the Start button. NOTE - Both heating elements will cycle ON and OFF to maintain the desired temperature. When baking is completed, open door fully and remove food carefully. To Use the Convection Fan Bake Function When you select the Fan Bake the convection fan will turn on and circulate air allowing the food to cook evenly and faster. Place oven rack into the desired position before heating the oven. (See "Positioning Rack" Section) Arrange food on the wire rack or in the baking pan. Push the Oven button two times until "Fan Bake" lights up on display. Use the arrow keys to select desired temperature. Push Timer/Temp button. Use the arrow keys to select desired time. Push the Start button. NOTE - Both heating elements will cycle ON and OFF to maintain the desired temperature. When baking is completed, open door fully and remove food carefully. English-3 To Use the Broil Function Place oven rack into the desired position before heating the oven. (See "Positioning Rack" Section) Place broil rack in oven pan to make broiler pan. Arrange food on broiler pan. Place broiler pan on oven rack. Push Oven button three times until the word "Broil" lights up on display. Push Timer/Temp button. Use arrows to select the desired time. Push the Start button. N O T E - The top heating element will cycle ON and OFF to maintain desired temperature. When broiling is completed, open door fully and remove food carefully. WA R N I N G : DO NOT LEAVE TOASTER OVEN UNATTENDED. To Use the Toast Function Place oven rack into the desired position before heating the oven. (See "Positioning Rack" Section) NOTE - Different types of bread require different settings. Lighter breads and waffles require a lighter setting. Darker breads, muffins, and English muffins require a darker setting. Arrange food on the wire rack. Push the Toast button. Use arrows to select Toast Shade. Press the Start button. When toasting is completed, open door fully and remove food carefully. To Use the Pizza Function Place oven rack into the desired position before heating the oven. (See "Positioning Rack" Section) Arrange pizza on the wire rack. Push the Pizza button and 20:00 default time will appear. Use arrow keys to adjust the time as desired. Push the Start button. N O T E - The Pizza function temperature is set at 400°F and cannot be adjusted. If different temperature is desired, cancel Pizza function and use Bake function. Dehydrating Function Push Dehydrate button. Temperature Control is already set to 185°F. Use arrow keys to set desired time. Push the Start button. Defrosting Function When defrosting do not preheat oven. Temperature Control is already set to 150°F. Push the defrost button. Use arrow keys to adjust time. Allow 15 to 20 minutes per side for meats or fish to defrost. Always cook food promptly after thawing. Push the Start button. Positioning Rack To accommodate a wide variety of foods the oven has three rack positions. (See Figure 3) Positioning of the rack will depend on the size of the food and desired browning. Before removing the rack allow the unit to cool. P L E A S E N O T E - For best toast and pizza results, position the rack in the up position on the middle rack guide. English-4 FIGURE 3
-
 1
1 -
 2
2 -
 3
3 -
 4
4 -
 5
5 -
 6
6 -
 7
7 -
 8
8 -
 9
9 -
10
-
11
-
12
-
13
 |
 |
