Panasonic AG-AF100A AVCCAM Sony Vegas Pro 9 White Paper
Panasonic AG-AF100A Manual
 |
View all Panasonic AG-AF100A manuals
Add to My Manuals
Save this manual to your list of manuals |
Panasonic AG-AF100A manual content summary:
- Panasonic AG-AF100A | AVCCAM Sony Vegas Pro 9 White Paper - Page 1
AVCCUAnMdeWrstoarnkdfloinwg Editing AVCHD 9 with sony vegas pro 1 1 1 - Panasonic AG-AF100A | AVCCAM Sony Vegas Pro 9 White Paper - Page 2
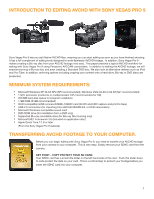
AVCHD Footage to Your Computer 3 Copying AVCHD Footage to a Hard Drive 4 EDITING WITH SONY VEGAS PRO 9 5 Transferring AVCHD Footage Directly From The Panasonic AVCCAM Cameras to Your Computer 8 OUTPUT OPTIONS Output to A Blu-ray Disc ...14 Output to A DVD Disc...16 Output to iPod Or iPhone ...17 - Panasonic AG-AF100A | AVCCAM Sony Vegas Pro 9 White Paper - Page 3
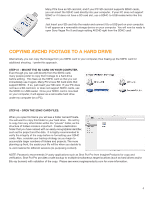
9 using Panasonic AVCCAM camcorders. In addition multiprocessor CPU recommended for HD) • 200 MB camcorders) • Microsoft Windows-compatible sound card • DVD-ROM drive (for installation from a DVD only) • Supported camera to your computer. This is very easy. Simply remove your SDHC card from the camera - Panasonic AG-AF100A | AVCCAM Sony Vegas Pro 9 White Paper - Page 4
use it again. Many PC's have SD Card slots that support SDHC. If so, just insert your SD card. If your PC does not have you decide to re-visit material for different sessions (re-purposing content). NOTE: Panasonic recommends 3rd party applications such as Shot Put Pro from Imagine Products for copy - Panasonic AG-AF100A | AVCCAM Sony Vegas Pro 9 White Paper - Page 5
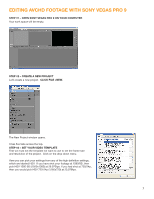
EDITING AVCHD FOOTAGE WITH SONY VEGAS PRO 9 STEP #1 - OPEN SONY VEGAS PRO 9 ON YOUR COMPUTER Your work space will be empty. STEP #2 - CREATE A NEW PROJECT Let's create a new project. CLICK FILE >NEW. The New Project window opens. It has five tabs across the top. STEP #3 - SET YOUR VIDEO TEMPLATE - Panasonic AG-AF100A | AVCCAM Sony Vegas Pro 9 White Paper - Page 6
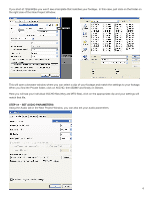
If you shot at 720p/60fps you won't see a template that matches your footage. In this case, just click on the folder on the right side of the New Project Window. This will open a browser window where you can select a clip of your footage and match the settings to your footage. When you find the - Panasonic AG-AF100A | AVCCAM Sony Vegas Pro 9 White Paper - Page 7
STEP #5 - CREATE SUMMARY It is a good idea to open the Summary Tab. Here you can give your project a name and add any comments you like. STEP #6 - SAVE YOUR NEW PROJECT Go to File>Save and save your project and give it a name if you have not already done so. 7 - Panasonic AG-AF100A | AVCCAM Sony Vegas Pro 9 White Paper - Page 8
: It is recommended to connect your camera to an AC power supply, as a low battery could damage your transferring footage. Also, write protect the card as instructed before. STEP #2 - TURN THE CAMERA TO THE PC ON POSITION On the AG-HMC70 shoulder-mount camcorder, this is accomplished by moving the - Panasonic AG-AF100A | AVCCAM Sony Vegas Pro 9 White Paper - Page 9
described earlier, AND make sure you verify the copy. TRANSFER USING DEVICE EXPLORER. Alternatively, you can use Device Explorer to transfer your files from your camera. STEP #1 - CLICK ON VIEW>DEVICE EXPLORER. On the left hand side of the window, click on the device that is your - Panasonic AG-AF100A | AVCCAM Sony Vegas Pro 9 White Paper - Page 10
STEP #2 - SELECT AND IMPORT YOUR CLIPS From here you can select the clips your wish to import. Click on the import Selected Clips icon and the clips will be placed in the Project Media Window. Once your clips are in the Project Media Window, you are now ready to begin editing. 10 - Panasonic AG-AF100A | AVCCAM Sony Vegas Pro 9 White Paper - Page 11
TRANSFER USING IMPORT MEDIA ICON. If you have already copied your footage to a hard drive, or if you have inserted your SDHC card into a card reader and attached it to your computer via USB, there are a couple of different methods for getting the AVCHD footage into Sony Vegas Pro 9. STEP #1 - CLICK - Panasonic AG-AF100A | AVCCAM Sony Vegas Pro 9 White Paper - Page 12
STEP #3 - CLICK ON PRIVATE>AVCHD>BDMV>STREAM This will show your AVCHD files. Click on the ones that you wish to import. Click Open. They will then be placed in your Project Media window. TRANSFER USING DEVICE EXPLORER. Another method for importing is to use the Device Explorer. I actually prefer - Panasonic AG-AF100A | AVCCAM Sony Vegas Pro 9 White Paper - Page 13
Import Select Clips. The import will start and your footage will appear in the Project Media Window. Both of these methods will work from the camera or directly from the SDHC card Once your footage is in the Project Media window you can drag it to the timeline and start editing - Panasonic AG-AF100A | AVCCAM Sony Vegas Pro 9 White Paper - Page 14
and titles. For more info on editing with Sony Vegas Pro 9, please visit the Sony website for detailed tutorials at: http://www. sonycreativesoftware.com/support/trainingvids-stroud.asp OUTPUT OPTIONS When your editing is finished Sony Vegas Pro 9 gives you a host of options to output your project to - Panasonic AG-AF100A | AVCCAM Sony Vegas Pro 9 White Paper - Page 15
This will open the Burn Blu-ray Disc Window. STEP #2 - SET BLU-RAY BURN PARAMETERS Here you will need select the operation of Render Image and Burn. Next, check your selected Video and Audio formats. Choose the location of your Blu-ray drive, then pick the Burn speed and click on Eject when done. - Panasonic AG-AF100A | AVCCAM Sony Vegas Pro 9 White Paper - Page 16
OUTPUT TO STANDARD DEFINITION DVD Even though you have shot your material on high definition and edited it in HD, you still might need to downconvert it to standard definition to show your movie. AVCHD footage will make dazzling standard definition DVDs. Sony - Panasonic AG-AF100A | AVCCAM Sony Vegas Pro 9 White Paper - Page 17
is to display your movie on an iPod or iPhone, you should try to match the size and aspect ratio of the iPOD display as best that you can. In landscape mode, the iPOD touch and iPHONE display is 480 x 320 pixels, so to preseve your movie in a 4:3 aspect ratio 480 - Panasonic AG-AF100A | AVCCAM Sony Vegas Pro 9 White Paper - Page 18
TO UPLOAD YOUR MOVIE. To prepare your movie for YouTube uploading follow these simple steps. For more detailed information on YouTube specifications and instructions on uploading your video, please visit www.youtube.com and click on Help. STEP #1 - RENDER CLICK ON FILE>RENDER AS. The Render As window - Panasonic AG-AF100A | AVCCAM Sony Vegas Pro 9 White Paper - Page 19
Person of the Year and member of the DVD Association Hall of Fame. Bernie is the Panasonic AVCHD Evangelist and a paid consultant to Panasonic. Panasonic provided AVCCAM cameras and Dell Computer for this white paper. Sony Vegas Pro 9 Software was provided by Silver Platter Productions, Inc. 19
-
 1
1 -
 2
2 -
 3
3 -
 4
4 -
 5
5 -
 6
6 -
 7
7 -
8
-
9
-
10
-
11
-
12
-
13
-
14
-
15
-
16
-
17
-
18
-
19
 |
 |
1
Editing
AVCHD
with sony
vegas pro
9
1
1
Understanding
AVCCAM
Workflow