Panasonic AG-HMX100 Operating Instructions - Page 26
Setting the Video Format [VIDEO FORMAT], To select the aspect ratio - av mixer
 |
View all Panasonic AG-HMX100 manuals
Add to My Manuals
Save this manual to your list of manuals |
Page 26 highlights
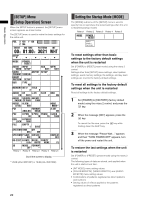
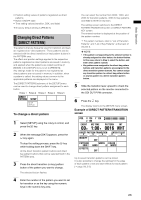
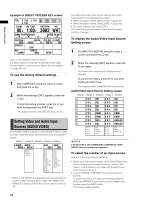
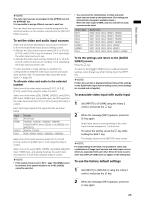
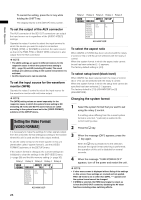
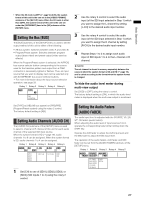
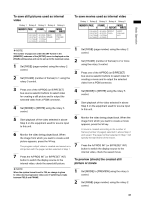
Basic Operation To cancel the setting, press the key while holding the SHIFT key. The display returns to the [SETUP] menu screen. To set the output of the AUX connector The AUX connector of the SDI OUT connectors can output the input source as is regardless of the [AUDIO VIDEO] settings. Operate the rotary 4 control to select the input terminal to which the source you want to output is connected. If [PGM], [PVW], or [M VIEW] is selected, the same source as that of the PGM, PVW, or MULTI VIEW connector is also output from the AUX connector. NOTE • The [AUX] settings are saved in different memory for the respective cases in which the system format setting is SD ( page 19) and HD (including 3D mode). The saved settings are called according to the system format when it is switched. • No DVI-I input source can be selected. To set the input source for the waveform monitor (WFM) Operate the rotary 5 control to select the input source for the waveform monitor with multi-view output. NOTE The [WFM] setting values are saved separately for the respective cases in which the system format setting is HD (including 3D mode) and SD. The saved values are called according to the system format set in the [VIDEO FORMAT] submenu of the [SETUP] menu. Setting the Video Format [VIDEO FORMAT] It is necessary to make the settings for video signals output from the unit (video format setting) according to the location where this unit is used and the video output method. To set the video format for the entire system in this unit (hereinafter called "system format"), use the [VIDEO FORMAT] submenu of the [SETUP] menu. If the system format is changed, the current settings are initialized to clear the settings in the [INT VIDEO] menu ( page 28) and the title memory setting ( page 30). Rotary 1 Rotary 2 Rotary 3 Rotary 4 Rotary 5 VIDEO ASPECT SET UP FORMAT 1080/59i 16:9 7.5 480/59i 4:3 0 576/50i 16:9 7.5 720/50p 720/59p 1080/50i 1080/59i HDMI AG-HMX100P Rotary 1 Rotary 2 Rotary 3 Rotary 4 Rotary 5 VIDEO ASPECT SET UP FORMAT 1080/59i 16:9 0 480/59i 4:3 0 576/50i 16:9 7.5 720/50p 720/59p 1080/50i 1080/59i HDMI AG-HMX100E To select the aspect ratio When 480/59i or 576/50i has been selected with the rotary 2 control, [4:3] or [16:9] can be selected with the rotary 3 control. When the system format in which the aspect ratio cannot be set has been selected, [---] appears. The factory default setting is [4:3]. To select setup level (black level) When 480/59i has been selected with the rotary 2 control, [0] or [7.5] can be selected with the rotary 4 control. When the system format in which the setup level cannot be specified has been selected, [--] appears. The factory default is [7.5] (AG-HMX100P) or [0] (AG‑HMX100E). Changing the system format 1 Select the system format that you want to set using the rotary 2 control. If a setting value differing from the current system format is selected, * (asterisk) is added to the current setting value. 2 Press the key. 3 When the message [OK?] appears, press the key again. When the key is pressed to fix the selection, because the signal format switching is performed, the operation of this unit is disabled for several seconds. 4 When the message "TURN POWER OFF" appears, turn off the power and restart the unit. NOTE • If other menu screen is displayed without fixing of the settings on this screen, those settings are revoked and not applied. When 3D mode is set to other than [OFF], "--" appears and the system format cannot be changed. • If [HDMI] is selected, the HDMI input signal is output as is from the DVI-D OUT connector, disabling the AV mixer functions including video switching effects. 26
-
 1
1 -
2
-
3
-
4
-
5
-
6
-
7
-
8
-
9
-
10
-
11
-
12
-
13
-
14
-
15
-
16
-
17
-
18
-
19
-
20
-
 21
21 -
 22
22 -
 23
23 -
 24
24 -
 25
25 -
 26
26 -
 27
27 -
 28
28 -
 29
29 -
 30
30 -
 31
31 -
32
-
33
-
34
-
35
-
36
-
37
-
38
-
39
-
40
-
41
-
42
-
43
-
44
-
45
-
46
-
47
-
48
 |
 |