Panasonic DC-GX9 Quick Guide for 4K Photos Multi-lingual - Page 1
Panasonic DC-GX9 Manual
 |
View all Panasonic DC-GX9 manuals
Add to My Manuals
Save this manual to your list of manuals |
Page 1 highlights
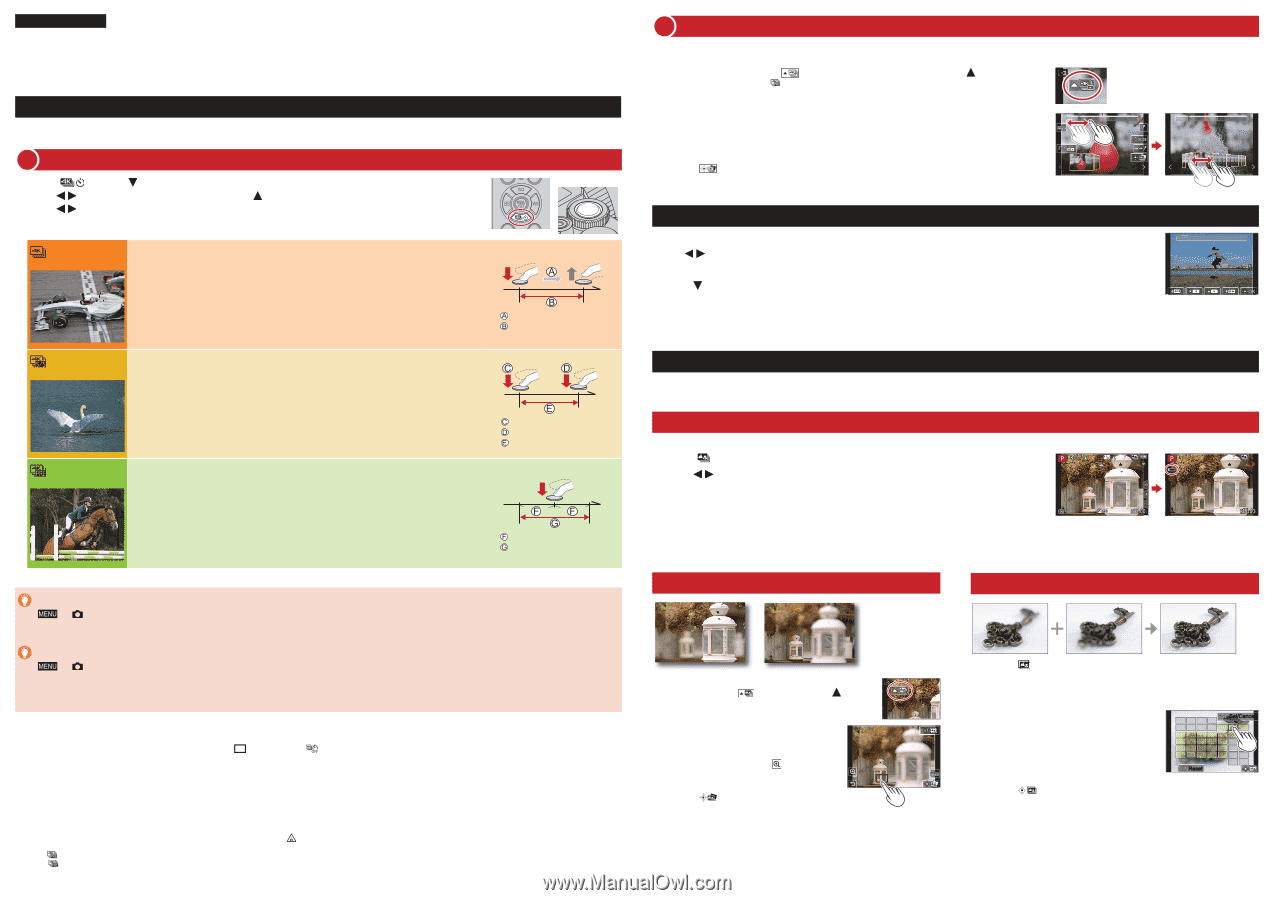
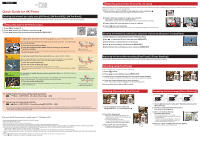
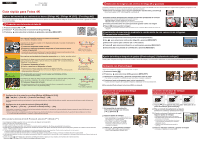
ENGLISH Digital Camera Model No. DC-GX9 DVQW1296ZA Quick Guide for 4K Photo Catching the moment you really want ([4K Burst] / [4K Burst(S/S)] / [4K Pre-Burst]) You can take burst pictures of approximately 8 million pixels with a burst rate of 30 fps. You can select and save a frame from the burst file. 1 Recording with the 4K Photo function 1 Press [ 2 Press 3 Press ] button ( ) to select the 4K photo icon and press to select the recording method and press [MENU/SET] Shutter button [4K Burst] [4K Burst(S/S)] [4K Pre-Burst] For capturing the best shot of a fast-moving subject (e.g., sports, aeroplanes, trains) Burst recording is performed while the shutter button is pressed and held. The shutter sound will be heard repeatedly. 1 Press the shutter button halfway 2 Press and hold the shutter button fully for as long as you want to perform recording ●Recording will start approximately 0.5 seconds after you press the shutter button fully. Therefore, press the button fully slightly in advance. For capturing unpredictable photo opportunities (e.g., plants, animals, children) Burst recording starts when the shutter button is pressed and stops when pressed again. Start and stop tones will be heard. "S/S" is an abbreviation of "Start/Stop". 1 Press the shutter button fully 2 Press the shutter button fully again ●When you press the [Fn1] button while recording, you can add a marker. When selecting and saving pictures from a 4K burst file, you can skip to the positions where you added markers. For recording as needed whenever a photo opportunity arises (e.g., the moment when a ball is thrown) Burst recording is performed for approximately 1 second before and after the moment that the shutter button is pressed. The shutter sound will be heard only once. 1 Press the shutter button fully ●In situations where you want to lock focus and exposure, such as when the subject is not at the center, use [AF/AE Lock]. Press and hold Recording is performed Start (First) Stop (Second) Recording is performed Approximately 1 second Recording is performed Setting Pre-Burst Recording ([4K Burst]/[4K Burst(S/S)]) → [Rec] → [4K PHOTO] → [Pre-Burst Recording] → [ON] The camera starts recording approximately 1 second before the shutter button is pressed fully, so you will not miss a photo opportunity. Setting Loop Recording ([4K Burst(S/S)]) → [Rec] → [4K PHOTO] → [Loop Recording(4K PHOTO)] → [ON] You can perform recording while deleting the oldest recorded data, allowing you to keep on recording while waiting for a photo opportunity without replacing the card. ●Once you start recording, the 4K burst file will be recorded and divided approximately every 2 minutes. Approximately the last 10 minutes (up to approximately 12 minutes) will be saved. The preceding part will be deleted. ■ To cancel the 4K Photo functions: In step 2, select [ ] ([Single]) or [ ]. ●Burst pictures are saved as a single 4K burst file in the MP4 format. ●Use a UHS Speed Class 3 card. ●When recording, the angle of view becomes narrower. ●If you are using Auto Focus, continuous AF will work while recording. Focus will be adjusted continuously. ●You can reduce the blur of the subject by setting a faster shutter speed. Approximate shutter speed for outdoor recording in fine weather conditions: 1/1000 seconds or faster. ●4K burst file will be recorded and played back in separate files in the following cases. (You can continue recording without interruption.) • When using an SDHC memory card: If the file size exceeds 4 GB • When using an SDXC memory card: If the continuous recording time exceeds 3 hours and 4 minutes or if the file size exceeds 96 GB ●If the surrounding temperature is high or 4K photos are recorded continuously, [ ] may be displayed and recording may be stopped halfway through. Wait until the camera cools down. ●When [ ] ([4K Pre-Burst]) or [Pre-Burst Recording] is set, the battery drains faster and the camera temperature rises. Select [ ] ([4K Pre-Burst]) or [Pre-Burst Recording] only when recording. 2 Selecting pictures from 4K burst file and saving Markers have been set by the camera automatically on a scene in which a face or the movement of a subject is detected during recording, for example, at the scene when a vehicle passes by or a person turns around. (Auto Marking) 1 Select a picture with the [ ] on the playback screen, and press ●In the case of recording with [ ] ([4K Pre-Burst]), proceed to the step 3. 2 Drag the slide bar to perform rough scene selection ●You can skip to a marked position by touching the marker. White marker: Manually set marker / Green marker: Marker set by the camera automatically 3 Drag to select the frame you want to save as a picture 4 Touch [ ] to save the picture ●The selected picture will be saved as a new picture in the JPEG format separate from the 4K burst file. Showing movement by combining a sequence of pictures ([Sequence Composition]) 1 Select [Sequence Composition] from the [Playback] menu 2 Use to select the 4K burst files and press [MENU/SET] 3 Select frames to combine (from 3 to 40 frames) 4 Press to select [Save], and then press [MENU/SET] 5 Select [Yes] at the confirmation screen and press [MENU/SET] Adjusting the focus after recording ([Post Focus] / [Focus Stacking]) You can record 4K burst pictures while changing the focus point and then select a focus point after recording. Recording using [Post Focus] ●We recommend using a tripod to perform [Focus Stacking]. 1 Press [ ] button 2 Press to select [ON] and press [MENU/SET] 3 Determine the composition and press the shutter button halfway ●Do not change the composition or the distance to subject before completion of recording. 4 Press the shutter button fully to start recording ●When the recording progress bar disappears, recording automatically ends. ■ To cancel [Post Focus]: Select [OFF] in step 2. Selecting a focus point ([Post Focus]) Increasing the focus range ([Focus Stacking]) 1 On the playback screen, select the image with the [ ] icon and press 2 Touch the focus point ●If there are no pictures with the focus on the selected point, a red frame will be displayed, and pictures cannot be saved. ●To enlarge the display, touch [ ]. You can make fine adjustments to the focus by dragging the slide bar during enlarged display. 3 Touch [ ] to save the picture ●The selected picture will be saved as a new separate file in the JPEG format. 1 Touch [ ] on screen in step 2 of "Selecting a focus point ([Post Focus])" 2 Choose a stacking method and touch it [Auto Merging] / [Range Merging] 3 (When selecting [Range Merging]) Touch the focus point ●Select positions at two or more points. ●Focus points between the selected two positions will be selected. ●Positions that cannot be selected, or that would produce an unnatural result will be grayed out. Reset ●Touch a position again to deselect it. 4 Touch [ ] to combine and save the picture ●The picture will be saved in JPEG format. Set/Cancel
-
 1
1 -
 2
2
 |
 |