Panasonic DVDS54 Dvd Player - Multi Language - Page 15
Changing soundtracks, Transfer mode, Reducing noise in pictures, Skipping about one minute forward
 |
View all Panasonic DVDS54 manuals
Add to My Manuals
Save this manual to your list of manuals |
Page 15 highlights
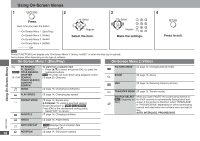
Convenient functions Changing soundtracks DVD-V DivX (with multiple soundtracks) DVD-VR VCD DVD-V DivX e.g. DivX Press [AUDIO] to select the soundtrack. 1: MP3 160kbps 44.1kHz 2ch DVD-VR VCD You can use this button to select "L", "R", "L4R" or "L R". Dialogue enhancer DVD-V (Dolby Digital, DTS, 3-channel or over, with the dialogue recorded in the center channel) DivX (Dolby Digital, 3-channel or over, with the dialogue recorded in the center channel) To make the dialogue in movies easier to hear ON Press [DIALOGUE ENHANCER] to select "ON". To cancel, press [DIALOGUE ENHANCER] to select "OFF". • The settings remain even when the unit is turned off or the disc tray is opened. Skipping about one minute forward DVD-V DVD-VR Convenient when you want to skip commercials etc. During play, press [CM SKIP]. • This may not work depending on the play position. • DVD-VR Does not work: - with still picture part. - when playing a playlist. Reducing noise in pictures Smoothes block noise and reduces the smudging that appears around contrasting sections of the picture. 1 Press [DNR] to select "OFF", "1", "2", or "3". 1: Light effect 2: Medium effect 3: Strong effect OFF: Off Transfer mode (Discs with pictures) With COMPONENT VIDEO OUT connection If you have set "VIDEO OUT (I/P)" to "PROGRESSIVE" AUTO1 ( page 18, "VIDEO" menu). Press [TRANSFER MODE] to select the method of conversion for progressive output to suit the type of material. • When the tray is opened, the setting will return to AUTO1. AUTO1 (normal): Automatically detects the film and video content, and appropriately converts it. AUTO2: In addition to AUTO1, automatically detects film contents with different frame rates and appropriately converts it. VIDEO: Select when using AUTO1 and AUTO2, and the content is distorted. With HDMI AV OUT connection If you have set "VIDEO FORMAT" to "480p", "720p", "1080p", or "1080i" ( page 17, On-Screen Menu 4). Select between AUTO1, AUTO2, and VIDEO for the method of conversion for progressive output. Zoom DVD-V DVD-VR VCD JPEG MPEG4 DivX 1. JPEG Press [h]. 2. Press [ZOOM] to select the zoom ratio. NORMAL AUTO ( DVD-V DVD-VR VCD only ) X 2 X 4 e.g. VCD NORMAL NORMAL: Displayed in the size used for recording. AUTO: Automatically zooms in and adjusts the size of images with upper and lower black bands. X 2: 2X zoom X 4: 4X zoom • Zoom ratio will return to "NORMAL" while stopped, "RESUME STOP", or when the disc tray is opened. RQTC0152 15
-
 1
1 -
2
-
3
-
4
-
5
-
6
-
7
-
8
-
9
-
 10
10 -
 11
11 -
 12
12 -
 13
13 -
 14
14 -
 15
15 -
 16
16 -
 17
17 -
 18
18 -
 19
19 -
 20
20 -
21
-
22
-
23
-
24
-
25
-
26
-
27
-
28
-
29
-
30
-
31
-
32
 |
 |
