Panasonic EY6105 EY6105 User Guide - Page 4
Functional Description, Assembly, Operation - drill
 |
View all Panasonic EY6105 manuals
Add to My Manuals
Save this manual to your list of manuals |
Page 4 highlights
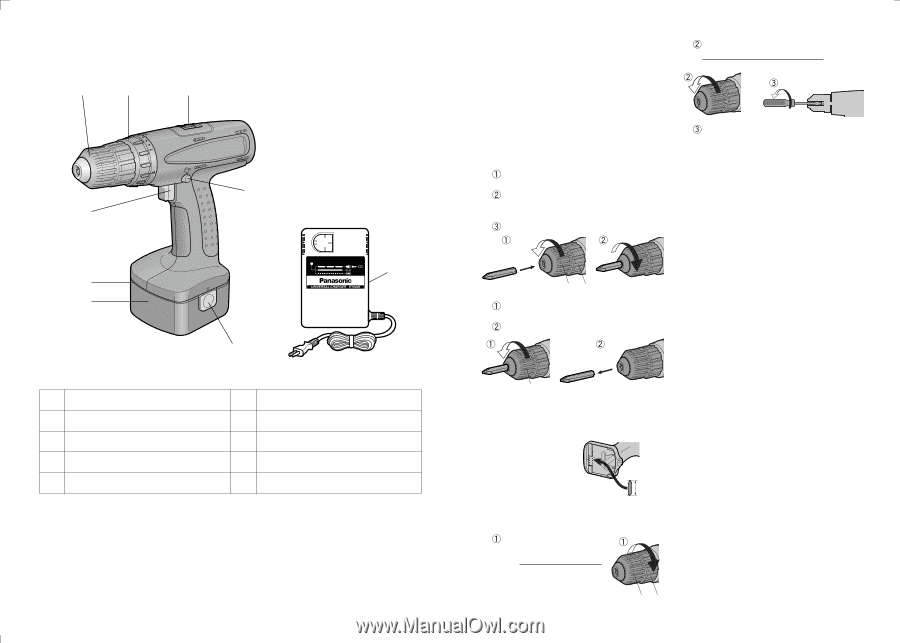
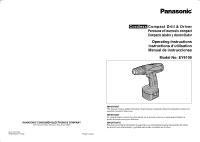
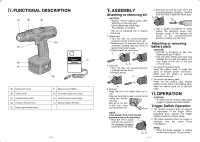
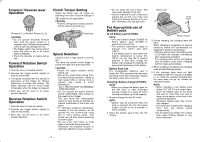
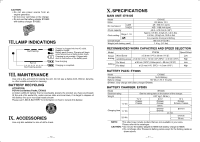
IV.FUNCTIONAL DESCRIPTION (A) (B) (C) (H) (G) (F) (A) Keyless drill chuck (B) Clutch handle (C) Speed selector switch (D) Forward / Reverse lever (E) Battery pack release button (D) (I) (E) (F) Battery pack (EY9005) (G) Bit holder (inside of the body) (H) Variable speed control trigger ( I ) Battery charger (EY0005) - 6 - V. ASSEMBLY Attaching or removing bit CAUTION: • Always remove battery pack when attaching or removing a bit. • Drill bit blade has sharp edge. Pay attention to handle it. This tool is equipped with a keyless drill chuck. 1. Attachment Turn the part (a) counterclockwise (looking from the front) to insert a bit. Hold the part (b) and turn the part (a) clockwise (looking from the front) to tighten firmly until it stops. Check the bit not coming out. 2. Removal (a) (b) Turn the part (a) counterclockwise (looking from the front). Remove the bit. (a) 3. Storage Keep the bit in bit holder when not in use. Remove the battery pack to store the bit inside the handle housing. Bits up to 45 mm (1-3/4 inch) long can be stored here. 45 mm NOTE: If the keyless drill chuck should become loose on its mounting: Hold the drill in place and turn the part (b) in the clockwise direction (looking from the front). (a) (b) Hold part (b) and turn part (a) in the counterclockwise direction (looking from the front) to open the chuck jaws. Use a slotted screwdriver to firmly tighten the fastening screw (lefthanded screw) of the keyless drill chuck in the counterclockwise direction (looking from the front). Attaching or removing battery pack CAUTION: • EY6105 is designed to use only battery pack type EY9005. • Use with other battery pack type may damage the tool and the battery, and may result in the risk of fire and personal injury. 1. To connect the battery pack: Insert the battery pack. It snaps into place to indicate proper connection. Make sure the battery is securely connected to the tool. 2. To remove the battery pack: Press the two battery pack release buttons on the sides of the battery pack. Slide the battery pack out of the tool body. VI.OPERATION CAUTION: • To reduce the risk of injury, wear safety goggles or glasses with side shieldes. Trigger Switch Operation 1. The speed increases with the amount of depression of the trigger. When beginning work, depress the trigger slightly to start the rotation slowly. 2. The brake operates when the trigger is released and the motor stops immediately. NOTE: • When the brake operates, a braking sound may be heard. This is normal. - 7 -
-
 1
1 -
 2
2 -
 3
3 -
 4
4 -
 5
5 -
 6
6 -
 7
7 -
 8
8 -
 9
9 -
 10
10 -
11
-
12
-
13
-
14
-
15
-
16
 |
 |