Panasonic G51 User Manual - Page 68
Scheduler, Entering a Schedule, Viewing / Editing Scheduler
 |
View all Panasonic G51 manuals
Add to My Manuals
Save this manual to your list of manuals |
Page 68 highlights
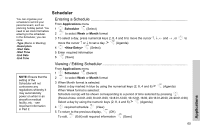
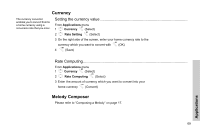
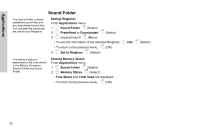
Scheduler You can organize your schedule to remind your personal event, such as planning holiday period. You need to set clock first before entering to the scheduler. In the Scheduler, you can store: -Type (Memo or Meeting) -Description -Start Date -Start Time -End Date -End Time Entering a Schedule From Applications menu 1 4 SchedulerA(Select) 2 @to select Week or Month format 3 To select a day, press numerical keys 2, 8, 4 and 6 to move the cursor and → , or 4 to move the cursor ↑ or ↓ to set a day. >A(Agenda) 4 4 A(Select) 5 Enter required information 6 A(Save) NOTE: Ensure that the setting of the Scheduler will not contravene any regulations whereby it may automatically power on when in an aircraft or medical facility, etc. - see Important Information in Part 2. Viewing / Editing Scheduler From Applications menu 1 4 SchedulerA(Select) 2 @to select Week or Month format 3 When Month format is selected: Select a day marked in blue by using the numerical keys (2, 8, 4 and 6) >A(Agenda) When Week format is selected: Schedule icon(s) will be shown corresponding to a period of time selected by pressing 4. (Period of time: 4=0:01-4:00, 8=4:01-8:00, 12=8:01-12:00, 16=12:01-16:00, 20=16:01-20:00, 24=20:01-0:00) Select a day by using the numeric keys (2, 8, 4 and 6) >A(Agenda) 4 4 required schedule@(View) 5 To return to the previous display,A(OK) To edit,@(Edit) edit required informationA(Save) Applications 65
-
 1
1 -
2
-
3
-
4
-
5
-
6
-
7
-
8
-
9
-
10
-
11
-
12
-
13
-
14
-
15
-
16
-
17
-
18
-
19
-
20
-
21
-
22
-
23
-
24
-
25
-
26
-
27
-
28
-
29
-
30
-
31
-
32
-
33
-
34
-
35
-
36
-
37
-
38
-
39
-
40
-
41
-
42
-
43
-
44
-
45
-
46
-
47
-
48
-
49
-
50
-
51
-
52
-
53
-
54
-
55
-
56
-
57
-
58
-
59
-
60
-
61
-
62
-
 63
63 -
 64
64 -
 65
65 -
 66
66 -
 67
67 -
 68
68 -
 69
69 -
 70
70 -
 71
71 -
 72
72 -
 73
73 -
74
-
75
-
76
-
77
-
78
-
79
-
80
-
81
-
82
-
83
-
84
-
85
-
86
-
87
-
88
-
89
-
90
 |
 |
