Panasonic HCV110 HCV110 User Guide - Page 54
White Balance, To set the White Balance manually
 |
View all Panasonic HCV110 manuals
Add to My Manuals
Save this manual to your list of manuals |
Page 54 highlights
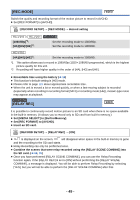
White Balance Automatic White Balance function may not reproduce natural colors depending on the scenes or lighting conditions. If so, you can adjust the White Balance manually. ≥ Press the Intelligent auto/Manual button to switch to Manual Mode. 1 Select [WB] using the cursor button. 2 Press 2/1 to select White Balance Mode. BACK Icon AWB Mode/Recording conditions Auto White Balance adjustment Sunny mode: Outdoors under a clear sky Cloudy mode: Outdoors under cloudy sky Indoor mode 1: Incandescent light, video lights like in the studio, etc. Indoor mode 2: Color fluorescent lamps, sodium lamps in gymnasiums, etc. Manual adjustment mode: ≥ Mercury-vapor lamps, sodium lamps, some fluorescent lights ≥ Lights used for wedding receptions at hotels, stage spotlights in theaters ≥ Sunrise, sunset, etc. ≥ To return to auto setting, select AWB or press the Intelligent auto/Manual button. ∫ To set the White Balance manually 1 Press 2/1 to select , and fill the screen with a white subject. 2 Press 3 to set. ≥ When the screen turns black instantly and the display stops flashing and then lights constantly, the setting is complete. BACK ≥ If the display continues flashing, the White Balance cannot be set. In this case, use other White Balance Modes. ≥ If you turn on the unit with the lens cover closed, the Auto White Balance will not be performed correctly. Always open the lens cover before turning on the unit. ≥ When the display flashes, the Manual White Balance previously adjusted is stored. Whenever recording conditions change, re-set the White Balance. ≥ When setting both the White Balance and the iris/gain, set the White Balance first. ≥ AWB is not displayed on the screen when AWB is being set. - 54 -
-
 1
1 -
2
-
3
-
4
-
5
-
6
-
7
-
8
-
9
-
10
-
11
-
12
-
13
-
14
-
15
-
16
-
17
-
18
-
19
-
20
-
21
-
22
-
23
-
24
-
25
-
26
-
27
-
28
-
29
-
30
-
31
-
32
-
33
-
34
-
35
-
36
-
37
-
38
-
39
-
40
-
41
-
42
-
43
-
44
-
45
-
46
-
47
-
48
-
 49
49 -
 50
50 -
 51
51 -
 52
52 -
 53
53 -
 54
54 -
 55
55 -
 56
56 -
 57
57 -
 58
58 -
 59
59 -
60
-
61
-
62
-
63
-
64
-
65
-
66
-
67
-
68
-
69
-
70
-
71
-
72
-
73
-
74
-
75
-
76
-
77
-
78
-
79
-
80
-
81
-
82
-
83
-
84
-
85
-
86
-
87
-
88
-
89
-
90
-
91
-
92
-
93
-
94
-
95
-
96
-
97
-
98
-
99
-
100
-
101
-
102
-
103
-
104
-
105
-
106
-
107
-
108
-
109
-
110
-
111
-
112
-
113
-
114
-
115
-
116
-
117
-
118
-
119
-
120
 |
 |
