Panasonic HDC-TM41 Owners Manual - Page 80
Copying from Built-in Memory to SD
 |
View all Panasonic HDC-TM41 manuals
Add to My Manuals
Save this manual to your list of manuals |
Page 80 highlights
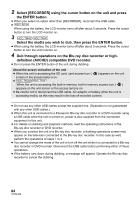
Copy/Dubbing Copying from Built-in Memory to SD card [HDC-TM40/HDC-TM41] Motion pictures or still pictures recorded with this unit can be copied from a built-in memory to an SD card inserted in this unit. ∫ Check the used space of the SD card It is possible to check the used space of the SD card by [MEDIA STATUS] (l 45). ≥ Depending on the media condition, some remaining capacity of the SD card may not be used. ≥ If the remaining capacity on a single SD card is not enough, you can copy to multiple SD cards following the instruction on the screen. In this case, the last scene copied to an SD card is automatically divided to fit the space on the SD card. ≥ If you divide the scenes (l 71), and copy by scene selection, it is possible to copy matching the remaining capacity of the SD card, or only the necessary parts. Copying ≥ If there is not much remaining capacity in the SD card, a confirmation message asking to copy after deleting all data on the SD card is displayed. Be aware that deleted data cannot be restored. 1 Change the mode to . ≥ Use a sufficiently charged battery or the AC adaptor. 2 Select the menu. : [COPY] 3 Following the screen display, select the desired item using the cursor button, and press the ENTER button. ≥ Select and press the ENTER button to return to the previous screen. ≥ (When [SELECT SCENES] is selected) When you press the ENTER button, the scene/still picture is selected and indication appears on the thumbnail. Press the ENTER button again to cancel the operation. ≥ (When [SELECT DATE] is selected) When you press the ENTER button, a date is selected and surrounded by red. Press the ENTER button again to cancel the operation. ≥ Up to 99 scenes/still pictures or 99 dates can be set in succession. ≥ If 2 or more SD cards are necessary to copy, change the card following the instructions on the screen. 4 Press the MENU button when the copy complete message is displayed. ≥ The thumbnail view of the copy destination is indicated. 80 VQT3J95
-
 1
1 -
2
-
3
-
4
-
5
-
6
-
7
-
8
-
9
-
10
-
11
-
12
-
13
-
14
-
15
-
16
-
17
-
18
-
19
-
20
-
21
-
22
-
23
-
24
-
25
-
26
-
27
-
28
-
29
-
30
-
31
-
32
-
33
-
34
-
35
-
36
-
37
-
38
-
39
-
40
-
41
-
42
-
43
-
44
-
45
-
46
-
47
-
48
-
49
-
50
-
51
-
52
-
53
-
54
-
55
-
56
-
57
-
58
-
59
-
60
-
61
-
62
-
63
-
64
-
65
-
66
-
67
-
68
-
69
-
70
-
71
-
72
-
73
-
74
-
 75
75 -
 76
76 -
 77
77 -
 78
78 -
 79
79 -
 80
80 -
 81
81 -
 82
82 -
 83
83 -
 84
84 -
 85
85 -
86
-
87
-
88
-
89
-
90
-
91
-
92
-
93
-
94
-
95
-
96
-
97
-
98
-
99
-
100
-
101
-
102
-
103
-
104
-
105
-
106
-
107
-
108
-
109
-
110
-
111
-
112
-
113
-
114
-
115
-
116
-
117
-
118
-
119
-
120
-
121
-
122
-
123
-
124
-
125
-
126
-
127
-
128
-
129
-
130
-
131
-
132
 |
 |
