Panasonic HL-BD82S Installation Instructions - Page 4
Warning, Caution
 |
View all Panasonic HL-BD82S manuals
Add to My Manuals
Save this manual to your list of manuals |
Page 4 highlights
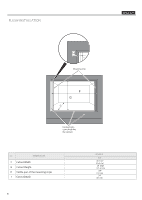
STEPS FOR INSTALLATION The following pages provide the necessary information for proper installation of the oven and are arranged as follows: Technical Data Installation Cutout Dimensions, Required Clearances and Mounting instructions for: - Under counter Installation, Single Oven - Wall Installation, Single Oven ENGLISH Electrical Supply and Wiring Requirements, Programming required if connecting to 120V/208V Circuit. Electrical Connections for 3-wire or 4-wire Branch Circuit. Final Checklist TECHNICAL DATA For cutout dimensions see following section titled: Preparing location SINGLE OVEN HL-BD82S Electrical Ratings and Maximum Connected Load @ 120V/240V 60Hz Amperes kW @ 120V/208V 60Hz Amperes kW 16,9 3,84 17,5 3,54 INSTALLATION NOTES 1. Do not slide oven across floor. Damage to floor covering or floor could result. 2. The oven support surface must be a minimum 3/4" (2cm) thick plywood platform. For single ovens, it must support 202 pounds. The platform must be solid, level and flush with the bottom of the cabinet cut out. 3. Use extreme caution when moving or installing the oven. It is very heavy. DO NOT LIFT THE OVEN BY THE DOOR HANDLE, remove the door for easier handling and installing. See REMOVING THE DOOR in the maintenance section of the Operating Instructions. 4. Be very careful when moving or installing the oven to avoid damage to the oven frame or damage to the cabinets. 5. Be sure to level the oven. An oven that is not level may provide poor or inconsistent baking results. 6. Be careful when placing oven. DO NOT pinch the conduit between the oven back. WARNING Before installing or removing, turn power OFF at the service panel. Lock service panel to prevent power from being turned ON accidentally. Securely fasten oven to cabinet using the screws provided. Failure to do so could result in oven moving or tipping during use and causing damage to the oven or cabinets or personal injury. Know how to disconnect the power to the oven at the circuit breaker or fuse box in case of an emergency. CAUTION Unit is heavy and requires at least two people or proper equipment to move. CAUTION Do not remodel the oven. Ltr. DIMENSION A Cutout Width B Cutout Depth C Cutout Height D Oven Position (distance from floor) E Minimum Spacing SINGLE 30" 28 7/16" (72,2 cm) 24" (61 cm) 27 3/8" (69,5 cm) 34" (86,5 cm) 1/2" (1,3 cm) min 4
-
 1
1 -
 2
2 -
 3
3 -
 4
4 -
 5
5 -
 6
6 -
 7
7 -
 8
8 -
 9
9 -
 10
10 -
11
-
12
-
13
-
14
-
15
-
16
-
17
-
18
-
19
-
20
-
21
-
22
-
23
-
24
 |
 |
