Panasonic KX-TG2422W 2.4g Cdl Tot2hs - Page 38
Other Options
 |
UPC - 037988475162
View all Panasonic KX-TG2422W manuals
Add to My Manuals
Save this manual to your list of manuals |
Page 38 highlights
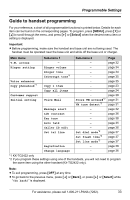
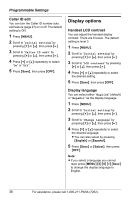
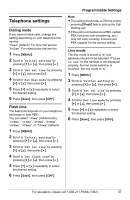
Programmable Settings Other options Handset key tone You can select whether or not key tones are heard when keys are pressed. Includes confirmation tones and error tones. The default setting is ON. 1 Press {MENU}. 2 Scroll to "Initial setting" by pressing {V} or {^}, then press {>}. 3 Scroll to "Key tone" by pressing {V} or {^}, then press {>}. 4 Press {V} or {^} repeatedly to select "On" or "Off". 5 Press {Save}, then press {OFF}. Re-registering the handset If "No link to base. Move closer to base, try again." is displayed even when the handset is near the base unit, you may need to re-register the handset to the base unit. Important: L Make sure the base unit is not being used. L Have the handset and base unit near each other when re-registering the handset. L KX-TG2422 only: Confirm the extension number of the handset which has lost the communication by placing the handset on the base unit or charger. If you re-register the handset using the other handset's extension number [1] or [2], the other handset will not function. 1 Handset: Press {MENU}. 2 Scroll to "Initial setting" by pressing {V} or {^}, then press {>}. 3 Scroll to "Registration" by pressing {V} or {^}, then press {>}. 4 KX-TG2421 base unit: Press and hold {HANDSET LOCATOR} until the CHARGE indicator flashes. KX-TG2422 base unit: Press and hold the locator/handset button that corresponds to the handset you want to re-register ({HANDSET LOCATOR 1} or {HANDSET LOCATOR 2}) until the CHARGE indicator flashes. L After the CHARGE indicator starts flashing, the rest of the procedure must be completed within 1 minute. 5 Handset: Press {OK}, then wait until the handset beeps. L Registration is complete. Customer support The handset can display the Internet address where you can download operating instructions for this product using your computer. 1 Press {MENU}. 2 Scroll to "Customer support" by pressing {V} or {^}, then press {>}. L "www.panasonic.com/support" will be displayed. 3 Press {OFF}. 38 For assistance, please call 1-800-211-PANA (7262).
-
 1
1 -
2
-
3
-
4
-
5
-
6
-
7
-
8
-
9
-
10
-
11
-
12
-
13
-
14
-
15
-
16
-
17
-
18
-
19
-
20
-
21
-
22
-
23
-
24
-
25
-
26
-
27
-
28
-
29
-
30
-
31
-
32
-
 33
33 -
 34
34 -
 35
35 -
 36
36 -
 37
37 -
 38
38 -
 39
39 -
 40
40 -
 41
41 -
 42
42 -
 43
43 -
44
-
45
-
46
-
47
-
48
-
49
-
50
-
51
-
52
-
53
-
54
-
55
-
56
-
57
-
58
-
59
-
60
 |
 |
