Panasonic KX-TGP551T04 Quick Guide - Page 17
Setting up the handset, Note when setting up, Connecting the charger, Battery installation
 |
View all Panasonic KX-TGP551T04 manuals
Add to My Manuals
Save this manual to your list of manuals |
Page 17 highlights
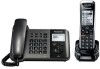
Setting Up Setting up the handset Connecting the charger L Use only the supplied Panasonic AC adaptor PQLV219 or PQLV219 (03). Battery charge Charge for about 6 hours. L When the batteries are fully charged, the charge indicator goes off. Charge indicator Confirm "Charging" is displayed. Hooks (120 V AC, 60 Hz) Battery installation L USE ONLY Ni-MH batteries AAA (R03) size. L Do NOT use Alkaline/Manganese/NiCd batteries. L Confirm correct polarities (S, T). Rechargeable Ni-MH ONLY Note when setting up Note for connections L The AC adaptor must remain connected at all times. (It is normal for the adaptor to feel warm during use.) L The AC adaptor should be connected to a vertically oriented or floormounted AC outlet. Do not connect the AC adaptor to a ceiling-mounted AC outlet, as the weight of the adaptor may cause it to become disconnected. L The unit will not work during a power failure. Note for battery installation L Use the supplied rechargeable batteries. For replacement, we recommend using the Panasonic rechargeable batteries noted on page 3. L Wipe the battery ends (S, T) with a dry cloth. L Avoid touching the battery ends (S, T) or the unit contacts. 17
-
 1
1 -
2
-
3
-
4
-
5
-
6
-
7
-
8
-
9
-
10
-
11
-
 12
12 -
 13
13 -
 14
14 -
 15
15 -
 16
16 -
 17
17 -
 18
18 -
 19
19 -
 20
20 -
 21
21 -
 22
22 -
23
-
24
-
25
-
26
-
27
-
28
-
29
-
30
-
31
 |
 |
