Panasonic KXTG365SK KXTG365SK User Guide - Page 11
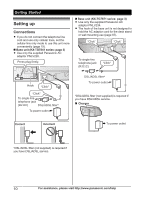
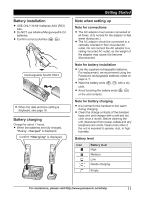
Getting Started, Battery installation, Battery charging, Note when setting up
 |
View all Panasonic KXTG365SK manuals
Add to My Manuals
Save this manual to your list of manuals |
Page 11 highlights
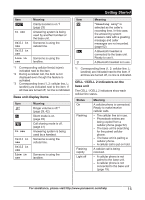
Battery installation R USE ONLY Ni-MH batteries AAA (R03) size. R Do NOT use Alkaline/Manganese/Ni-Cd batteries. R Confirm correct polarities ( , ). Rechargeable Ni-MH ONLY R When the date and time setting is displayed, see page 16. Battery charging Charge for about 7 hours. R When the batteries are fully charged, "Fully charged" is displayed. Confirm "Charging" is displayed. Getting Started Note when setting up Note for connections R The AC adaptor must remain connected at all times. (It is normal for the adaptor to feel warm during use.) R The AC adaptor should be connected to a vertically oriented or floor-mounted AC outlet. Do not connect the AC adaptor to a ceiling-mounted AC outlet, as the weight of the adaptor may cause it to become disconnected. Note for battery installation R Use the supplied rechargeable batteries. For replacement, we recommend using the Panasonic rechargeable batteries noted on page 4, 7. R Wipe the battery ends ( , ) with a dry cloth. R Avoid touching the battery ends ( , ) or the unit contacts. Note for battery charging R It is normal for the handset to feel warm during charging. R Clean the charge contacts of the handset, base unit, and charger with a soft and dry cloth once a month. Before cleaning the unit, disconnect from power outlets and any telephone line cords. Clean more often if the unit is exposed to grease, dust, or high humidity. Battery level Icon Battery level High Medium Low Needs charging. Empty For assistance, please visit http://www.panasonic.com/help 11
-
 1
1 -
2
-
3
-
4
-
5
-
 6
6 -
 7
7 -
 8
8 -
 9
9 -
 10
10 -
 11
11 -
 12
12 -
 13
13 -
 14
14 -
 15
15 -
 16
16 -
17
-
18
-
19
-
20
-
21
-
22
-
23
-
24
-
25
-
26
-
27
-
28
-
29
-
30
-
31
-
32
-
33
-
34
-
35
-
36
-
37
-
38
-
39
-
40
-
41
-
42
-
43
-
44
-
45
-
46
-
47
-
48
-
49
-
50
-
51
-
52
-
53
-
54
-
55
-
56
-
57
-
58
-
59
-
60
-
61
-
62
-
63
-
64
-
65
-
66
-
67
-
68
-
69
-
70
-
71
-
72
-
73
-
74
-
75
-
76
-
77
-
78
-
79
-
80
-
81
-
82
-
83
-
84
-
85
-
86
-
87
-
88
-
89
-
90
-
91
-
92
-
93
-
94
-
95
-
96
 |
 |
