Panasonic LS80 Portable Dvd Player - Page 15
Displaying current playback condition (Quick OSD), Enjoying higher qualityaudio and video, Enjoying
 |
UPC - 037988255139
View all Panasonic LS80 manuals
Add to My Manuals
Save this manual to your list of manuals |
Page 15 highlights
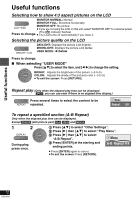
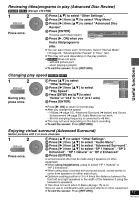
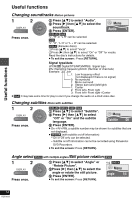
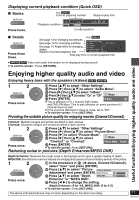
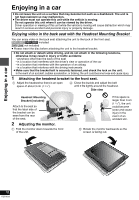
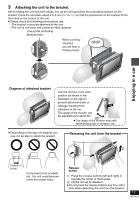
Displaying current playback condition (Quick OSD) ∫ Basics DISPLAY e.g. [DVD-V] Current playback number Elapsed play time 1 Title Playback condition 1 Chapter Time 0 : 00 : 22 Press twice. Current position ∫ Details DISPLAY Press three times. e.g. [DVD-V] See page 14 for changing soundtracks See page 14 for changing subtitles Details-DVD-Video Audio 1 DTS 3/2.1ch See page 14, Angle select for changing angles Aspect of current playback title Subtitle Angle 1/1 Source Aspect 4:3 Title Total Time 0:54:28 Total play time of current playback title ≥ [MPEG4] [DivX] Video and audio information is not displayed during search. ≥ To exit the screen : Press [RETURN]. Useful functions/Enjoying higher quality audio and video Enjoying higher quality audio and video Enjoying heavy bass with the speakers (H.Bass) [DVD-V] [DVD-VR] 1 2 DISPLAY ENTER Press once. 1 Press [34] to select "Other Settings". 2 Press [1] then [34] to select "Audio Menu". 3 Press [1] then [34] to select "H.Bass". 4 Press [1] then [34] to select "On" or "Off". Menu 5 Press [ENTER]. H.Bass Off ≥ This is effective on 5.1 channel DVD-Video and DVD-VR discs. This is also effective on some portions of 2 channel discs as well. ≥ If the sound is distorted or there is noise, set to "Off". ≥ To exit the screen: Press [RETURN]. Providing the suitable picture quality for enjoying movies (Cinema1/Cinema2) Cinema1: Mellows images and enhances detail in dark scenes. Cinema2: Sharpens images and enhances detail in dark scenes. 1 2 1 Press [34] to select "Other Settings". 2 Press [1] then [34] to select "Picture Menu". DISPLAY 3 Press [1] to select "Picture Mode". ENTER 4 Press [1] then [34] to select Menu "Cinema1" or "Cinema2". Picture Mode Press once. 5 Press [ENTER]. ≥ To exit the screen: Press [RETURN]. Reducing noise in pictures (Depth Enhancer/MPEG DNR) Cinema1 Depth Enhancer: Reduces the rough noise in the background to give a greater feeling of depth. MPEG DNR: Smooths block noise and reduces the smudging that appears around contrasting sections of the picture. 1 2 DISPLAY ENTER 1 In the procedure 2s4 (➜ above, Cinema1/Cinema2), select "User" and press [ENTER]. 2 Press [34] to select "Picture Picture Adjustment Adjustment"and press [ENTER]. Depth Enhancer 0 3 Press [34] to select "Depth MDePpEthGEDnhNaRncer 0 Press once. Enhancer" or "MPEG DNR". 4 Press [2 1] to change the setting. (Depth Enhancer: 0 to i4, MPEG DNR: 0 to i3) ≥ To exit the screen: Press [RETURN]. The above indicated features may not work depending on the disc's recording. 15 RQT8912
-
 1
1 -
2
-
3
-
4
-
5
-
6
-
7
-
8
-
9
-
 10
10 -
 11
11 -
 12
12 -
 13
13 -
 14
14 -
 15
15 -
 16
16 -
 17
17 -
 18
18 -
 19
19 -
 20
20 -
21
-
22
-
23
-
24
-
25
-
26
-
27
-
28
-
29
-
30
-
31
-
32
-
33
-
34
-
35
-
36
 |
 |
