Panasonic MCUG471 MCUG471 User Guide - Page 12
Assembly, Attaching Handle - vacuum cleaner
 |
UPC - 037988690787
View all Panasonic MCUG471 manuals
Add to My Manuals
Save this manual to your list of manuals |
Page 12 highlights
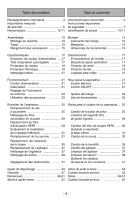
Handle Screw Vis du manche Tornillo de mango Handle Manche Mango Handle Screw Hole Trou de vis du manche Hole de tornillo del mango Handle Screw Vis du manche Tornillo de mango Handle Screw Vis du manche Tornillo de mango ASSEMBLY Attaching Handle ➢ DO NOT plug in until assembly is complete. ➢ Remove handle screw. ➢ Slide handle into the opening at the top of the vacuum cleaner. ➢ Insert handle screw so that it passes through the handle and into the vacuum cleaner. ➢ Begin to tighten the handle screw with fingers. It may be necessary to adjust the handle slightly. ➢ Using a screwdriver, tighten the handle screw. ➢ DO NOT overtighten. Overtightening could strip the screw hole. ➢ DO NOT operate the vacuum cleaner without handle screw in place. - 12 -
-
 1
1 -
2
-
3
-
4
-
5
-
6
-
 7
7 -
 8
8 -
 9
9 -
 10
10 -
 11
11 -
 12
12 -
 13
13 -
 14
14 -
 15
15 -
 16
16 -
 17
17 -
18
-
19
-
20
-
21
-
22
-
23
-
24
-
25
-
26
-
27
-
28
-
29
-
30
-
31
-
32
-
33
-
34
-
35
-
36
-
37
-
38
-
39
-
40
-
41
-
42
-
43
-
44
-
45
-
46
-
47
-
48
-
49
-
50
-
51
-
52
 |
 |
