Panasonic NN-SA651S-RF NN-SA651S-RF Owner's Manual (English) - Page 14
Selecting POwer, & COOk Time, Quick Min Feature
 |
View all Panasonic NN-SA651S-RF manuals
Add to My Manuals
Save this manual to your list of manuals |
Page 14 highlights
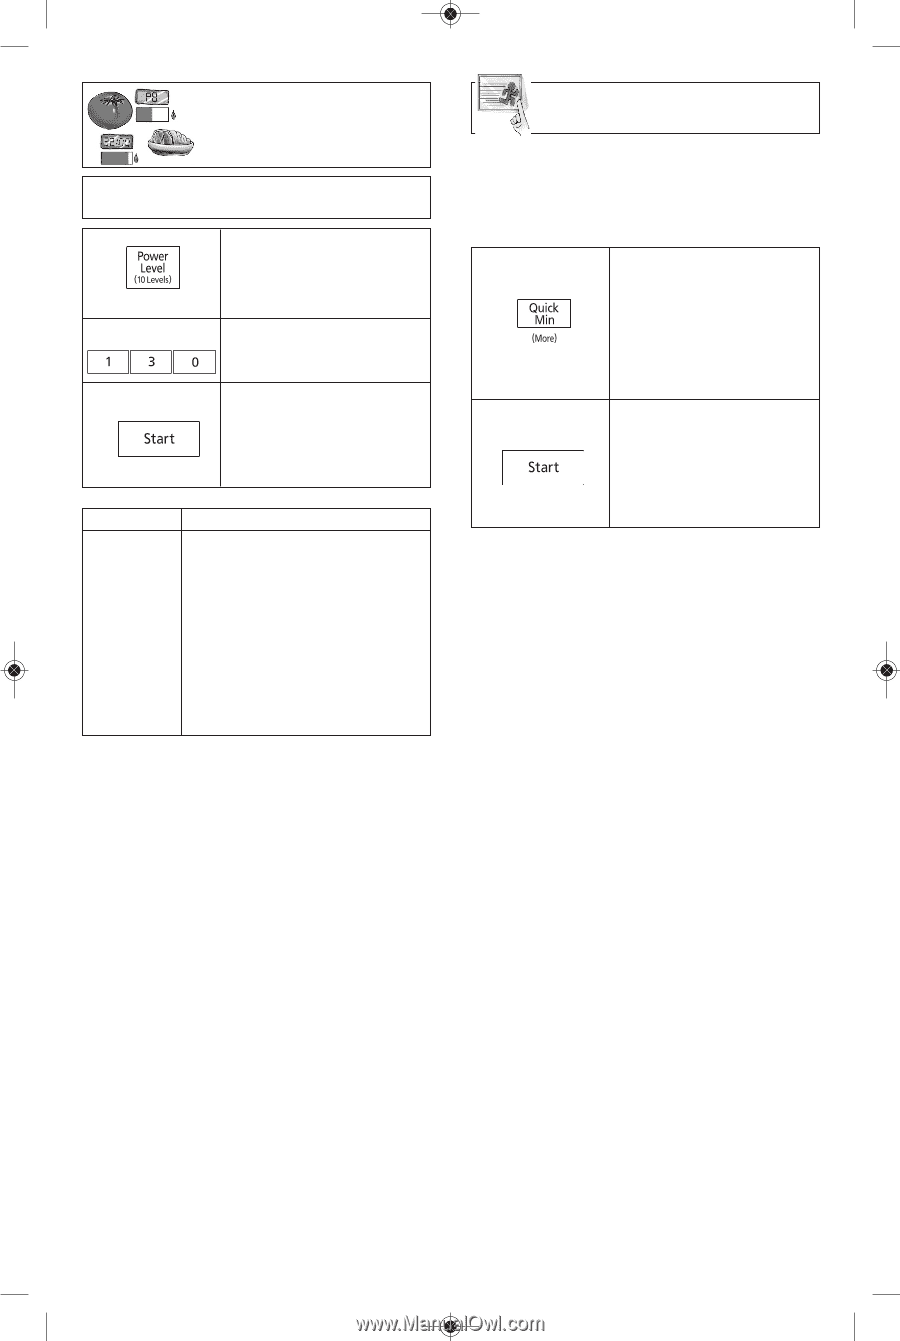
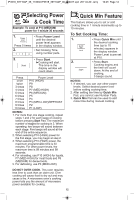
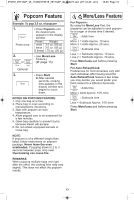
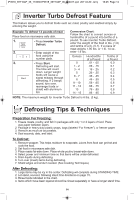
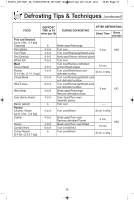
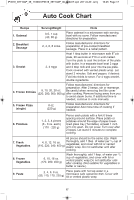
IP3518_39Y10AP_36_110630:IP3518_39Y10AP_00_110317.qxd 2011-6-30 Jerry 上上16:45 Page 12 selecting Power & cook time example: to cook at P 6 (MediuM) power for 1 minute 30 seconds 1. Press 5 times 2. • Press Power level until the desired power level appears in the display window. • Set Cooking Time using number pads. 3. • Press start. Cooking will start. The time in the display window will count down. Press once twice 3 times 4 times 5 times 6 times 7 times 8 times 9 times 10 times Power Level P10 (hIGh) P9 P8 P7 (MED-hIGh) P6 (MEDIUM) P5 P4 P3 (MED-LOW)/DEFROST P2 P1 (LOW) notes: 1. For more than one stage cooking, repeat steps 1 and 2 for each stage of cooking before pressing start Pad. The maximum number of stages for cooking is 3. When operating, two beeps will sound between each stage. Five beeps will sound at the end of the entire sequence. 2. When selecting P10 (hIGh) power for the first stage, you may begin at step 2. 3. When selecting P10 (hIGh) power, the maximum programmable time is 30 minutes. For other power levels, the maximum time is 99 minutes and 99 seconds. 4. For reheating, use P10 (hIGh) for liquids, P7 (MED-hIGh) for most foods and P6 (MEDIUM) for dense foods. 5. For defrosting, use P3 (MED-LOW). quick Min feature This feature allows you to set or add cooking time in 1 minute increments up to 10 minutes. to set cooking time: 1. • Press quick Min until the desired cooking time (up to 10 minutes) appears in the display window. Power Level is pre-set at P10. 2. • Press start. Cooking begins and the time will count down. At the end of cooking, 5 beeps sound. notes: 1. If desired, you can use other power levels. Select desired power level before setting cooking time. 2. After setting the time by quick Min Pad, you cannot use Number Pads. 3. quick Min Pad can be used to add more time during manual cooking. do not over cooK. This oven requires less time to cook than an older unit. Over cooking will cause food to dry out and may cause a fire. A microwave oven's cooking power tells you the amount of microwave power available for cooking. 12
-
 1
1 -
2
-
3
-
4
-
5
-
6
-
7
-
8
-
 9
9 -
 10
10 -
 11
11 -
 12
12 -
 13
13 -
 14
14 -
 15
15 -
 16
16 -
 17
17 -
 18
18 -
 19
19 -
20
-
21
-
22
-
23
-
24
-
25
-
26
-
27
-
28
-
29
-
30
-
31
-
32
-
33
-
34
-
35
-
36
-
37
-
38
-
39
-
40
-
41
-
42
-
43
-
44
-
45
-
46
-
47
-
48
-
49
-
50
-
51
-
52
-
53
-
54
-
55
-
56
-
57
-
58
-
59
-
60
 |
 |