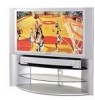
Panasonic PT-50LC14 Multi Media Display - Page 21
Audio signal PCM, Compatible formats, Notes, Procedure - remote control
 |
View all Panasonic PT-50LC14 manuals
Add to My Manuals
Save this manual to your list of manuals |
Page 21 highlights
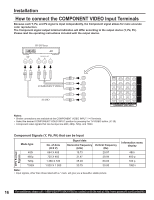
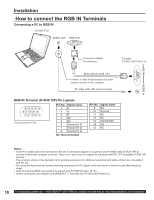
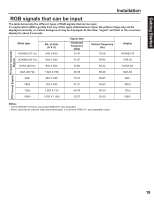
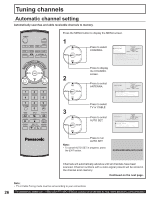
Getting Started Installation Procedure 1 Connect the HDMI output from the set top box or a DVD player to the HDMI input on the back of the unit. • If you cannot display the picture because your Digital Set Top Box does not have a Digital Out terminal setting, use the Component Video Input (or the S-Video Input or Video Input). In this case, the picture will be displayed as an analog signal. 2 Press TV/VIDEO on the Remote Control to select HDMI input. By inputting a High-bandwidth Digital Content Protection high-definition picture source to the HDMI IN terminal of this Device Display, high-definition pictures can be displayed on the screen in their digital form. (This terminal is for use in the future when High-bandwidth Digital Content Protection DVD players and D-VHS are put on the market.) Notes: • Select the HDMI input position by pressing the TV/VIDEO button. (P. 35) • The HDMI IN terminal can only be used with 1080i, 720p and 480p picture signals. • If there is no audio, check if the source equipment has PCM output. If not, please use analog connections. • Be sure HDMI is securely connected. If not, picture noise and/or incorrect picture display may result. Compatible formats Video Signal: The Device display is compatible with following formats. Please set the connecting device to following format. Display mode No. of dots Vertical scanning frequency (Hz) 1080i 1920 x 1080i 59.94 / 60 720p 480p 1280 x 720p 720 x 480p 640 x 480p 59.94 / 60 59.94 / 60 59.94 / 60 Audio signal (PCM) Please see "AUDIO SELECT" on page 43. 21
-
 1
1 -
2
-
3
-
4
-
5
-
6
-
7
-
8
-
9
-
10
-
11
-
12
-
13
-
14
-
15
-
 16
16 -
 17
17 -
 18
18 -
 19
19 -
 20
20 -
 21
21 -
 22
22 -
 23
23 -
 24
24 -
 25
25 -
 26
26 -
27
-
28
-
29
-
30
-
31
-
32
-
33
-
34
-
35
-
36
-
37
-
38
-
39
-
40
-
41
-
42
-
43
-
44
-
45
-
46
-
47
-
48
-
49
-
50
-
51
-
52
-
53
-
54
-
55
-
56
-
57
-
58
-
59
-
60
-
61
-
62
-
63
-
64
-
65
-
66
-
67
-
68
-
69
-
70
-
71
-
72
-
73
-
74
-
75
-
76
-
77
-
78
-
79
-
80
-
81
-
82
-
83
-
84
-
85
-
86
-
87
-
88
 |
 |
