Panasonic PT-D6000ULK Operating Instructions - Page 12
About Your Projector, Projector body
 |
UPC - 791871111871
View all Panasonic PT-D6000ULK manuals
Add to My Manuals
Save this manual to your list of manuals |
Page 12 highlights
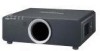
Preparation About Your Projector Projector body J Top, front and bottom view Indicators Power indicator Lamp1 (LAMP1) indicator (page 28) Lamp2 (LAMP2) indicator (page 28) Temperature (TEMP) indicator (page 28) Filter (FILTER) indicator (page 29) STANDBY(RED)/ ON(GREEN) LAMP TEMP FILTER Lamp unit compartment (page 30) Air exhaust port STANDBY(RED)/ ON(GREEN) LAMP TEMP FILTER Projection lens Focus ring Remote control signal receptor (page 21) Front leg adjusters Screw up/down to adjust the projection angle. POWER ON button Starts the projection while in the standby mode. (page 20) POWER STANDBY button Returns to the standby mode. (page 20) Burglar hook port Attach a commercial burglar prevention cable. Input select buttons These buttons select the RGB1, RGB2, DVI-D, VIDEO, S-VIDEO and SDI (PT-DZ6710U only) terminals. (page 19) MENU button Displays and clears the main menu, and returns to the previous menu when the menu is displayed. (page 27) LENS button This button is used together with F G I H to adjust focus, zoom and shift by the projection lens. (page 19) Navigation and ENTER buttons Navigate through the menu items with F G I H, and activate them with the ENTER button. (page 27) AUTO SETUP button Pressing this button while projecting an image automatically corrects the picture positioning on the screen. While the auto setup feature is active, a message "PROGRESS" appears on the screen. (page 21) Remote control signal receptor (page 21) SHUTTER button Pressing this button toggles the projector's internal mechanical shutter to black out the projector. (page 22) NOTE: • Do not cover the ventilation openings or place anything within 50 cm (20") of them as this may cause damage or injury. • While the projector is not in use, keep the projector lens cover attached to protect the lens. ENGLISH - 12
-
 1
1 -
2
-
3
-
4
-
5
-
6
-
 7
7 -
 8
8 -
 9
9 -
 10
10 -
 11
11 -
 12
12 -
 13
13 -
 14
14 -
 15
15 -
 16
16 -
 17
17 -
18
-
19
-
20
-
21
-
22
-
23
-
24
-
25
-
26
-
27
-
28
-
29
-
30
-
31
-
32
-
33
-
34
-
35
-
36
-
37
-
38
-
39
-
40
-
41
-
42
-
43
-
44
-
45
-
46
-
47
-
48
-
49
-
50
 |
 |
