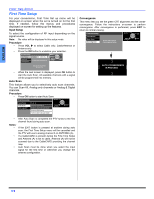
Panasonic PT47XD64J PT47XD64 User Guide - Page 9
Front And Rear View Of The High Definition Projection Television - cameras
 |
View all Panasonic PT47XD64J manuals
Add to My Manuals
Save this manual to your list of manuals |
Page 9 highlights
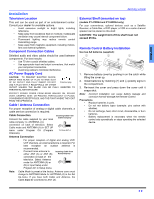
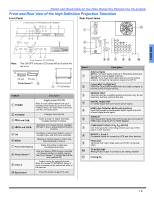
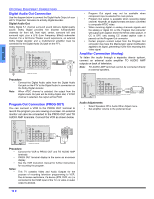
ENGLISH FRONT AND REAR VIEW OF THE HIGH DEFINITION PROJECTION TELEVISION Front and Rear View of the High Definition Projection Television Front Panel Rear Panel Jacks Front Panel for PT-47XD64 and PT-53XD64 3 567 8 9 POWER TV/VIDEO CH OK VOL VOL CH MENU AUTO CONV. SD CARD ON/OFF INDICATOR 1 5 &7 2 4 3 S-VIDEO VIDEO 4 L- AUDIO -R 8 POWER VOL CH OK / AUTO CONV. VOL TV / VIDEO MENU CH Note: 1 5 2 6 Front Panel for PT-53TWD64 The ON/OFF indicator LED (red) will be lit when the set is on. ANT A Cable In 11 1 ANT B CableCARDTM INTERFACE HDMI SERVICE VIDEO Y 2 ONLY A/V IN PB S-VIDEO PR VIDEO 3 L AUDIO IN L R R 4 1 2 AUDIO COMPONENT INPUT INPUT INPUT PROG TO DIGITAL AUDIO OUT VIDEO INPUT 1 2 3 OUT AUDIO AMP 56 7 89 10 Item # Description SD CARD SD slot PC slot Photo Viewer™ 10 POWER VOL CH OK CH VOL TV / VIDEO MENU 9 PT-53TWD64 Antenna Inputs ANT A - Connect Cable Antenna or Terrestrial Antenna to 1 this input to receive Digital channels. ANT B - If you have both Cable antenna and Terrestrial antenna, connect the Terrestrial antenna to ANT B. CableCARD™ INTERFACE 2 Insert the CableCARD module from the Cable company to receive premium digital service. Feature Description 1 POWER Toggles power OFF/ON Note: In case of front panel lock-up or remote control hang-up, press and hold POWER button for more than 5 seconds until the unit resets itself. 2 TV/VIDEO Changes Input source 3 CH and CH Tunes to lower or higher channels, navigate up/down in menus. 4 VOL and VOL Decrease or increase volume, navigate left/right in menu, adjust selected feature in menu. 5 OK Completes channel specification, press to accepts menu and sub-menu selection. 6 MENU Display or remove menu or return one step backward in menus. 7 Auto Convergence Press this button to start auto convergence process. 8 Photo Viewer™ Lets you display JPEG images recorded on memory cards by a digital camera. The Photo Viewer™ is located behind the door marked SD. 9 Video 4 Analog inputs for external devices Note: For model PT-53TWD64, Video 4 input is located on the bottom left pillar of the cabinet. SERVICE ONLY 3 Card slot used by a certified service technician only. Do not insert any memory card into this slot. 4 DIGITAL AUDIO OUT 5.1 Dolby Digital surround sound optical output. HDMI (High Definition Multimedia Interface) 5 Input that accepts uncompressed digital signal and multi channel digital audio signal. AUDIO IN 6 Use these audio inputs when DVI devices are connected to HDMI input using the DVI to HDMI adaptor. COMPONENT VIDEO (Y-PB-PR) INPUTS 7 Use these jacks for connecting devices such as a DVD player or Set Top Box. 8 INPUTS 1, 2 and 3 Composite inputs for connecting VCR and other devices. PROG OUT 9 Terminals that output fixed audio and NTSC composite video. 10 TO AUDIO AMP Analog Audio Output to connect to an analog amplifier 11 Cooling fan 10 Eject button Push this button to eject PC card. 7 z
-
 1
1 -
2
-
3
-
 4
4 -
 5
5 -
 6
6 -
 7
7 -
 8
8 -
 9
9 -
 10
10 -
 11
11 -
 12
12 -
 13
13 -
 14
14 -
15
-
16
-
17
-
18
-
19
-
20
-
21
-
22
-
23
-
24
-
25
-
26
-
27
-
28
-
29
-
30
-
31
-
32
-
33
-
34
-
35
-
36
-
37
-
38
-
39
-
40
-
41
-
42
-
43
-
44
-
45
-
46
-
47
-
48
-
49
-
50
-
51
-
52
-
53
-
54
-
55
-
56
-
57
-
58
-
59
-
60
-
61
-
62
-
63
-
64
-
65
-
66
-
67
-
68
-
69
-
70
-
71
-
72
-
73
-
74
-
75
-
76
-
77
-
78
-
79
-
80
-
81
-
82
-
83
-
84
-
85
-
86
-
87
-
88
 |
 |
