Panasonic PT56LCX7 Lifi Hdtv - Page 52

Setup Features continued, Digital settings, CC Reset

Page 52 highlights

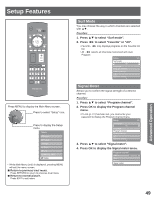
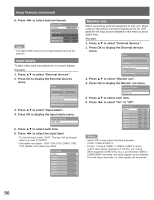
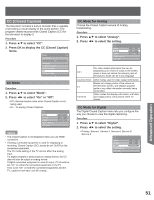
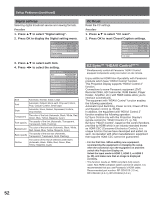
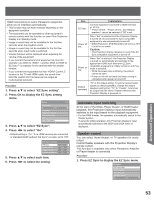
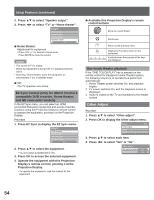
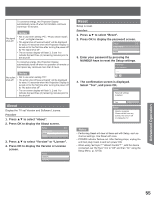
Setup Features (continued) Digital settings Selecting digital broadcast service and viewing formats. Procedure 1. Press ▲▼ to select "Digital setting". 2. Press OK to display the Digital setting menu. CC Mode Analog Digital Digital setting CC reset On CC1 Primary 3. Press ▲▼ to select each item. 4. Press ◄► to select the setting. Digital setting Size Font Style Foreground Fore opacity Background Back opacity Outline Automatic Automatic Automatic Automatic Automatic Automatic Automatic Automatic Size Automatic, Normal, Small, Large Font Automatic, Default, Mono-serif, Prop-serif, Mono, Prop, Casual, Cursive, Small caps Style Automatic, None, Raised, Depressed, Uniform, Drop shadow Foreground The color of the font (Automatic, Black, White, Red, Green, Blue, Yellow, Magenta, Cyan) Fore opacity The opacity of the font (Automatic, Transparent, Translucent, Solid, Flashing) Background The color of the text box (Automatic, Black, White, Red, Green, Blue, Yellow, Magenta, Cyan) Back opacity The opacity of the text box (Automatic, Transparent, Translucent, Solid, Flashing) Outline The outline of the text (if selected under style) (Automatic, Black, White, Red, Green, Blue, Yellow, Magenta, Cyan) CC Reset Reset the CC settings. Procedure 1. Press ▲▼ to select "CC reset". 2. Press OK to reset Closed Caption settings. CC Mode Analog Digital Digital setting CC reset On CC1 Primary EZ Sync™ "HDAVI Control™"* * Simultaneously control all Panasonic "HDAVI Control" equipped components using one button on one remote. Enjoy additional HDMI Inter-Operability with Panasonic products which have "HDAVI Control" function. This Projection Display supports "HDAVI Control 2" function. Connections to some Panasonic equipment (DVD Recorder DIGA, HD Camcorder, RAM theater, Player theater, Amplifier, etc.) with HDMI cables allow you to interface automatically. The equipment with "HDAVI Control" function enables the following operations: Automatic Input Switching, Power on link, Power off link and Speaker control (p. 53-54) In addition, the equipment with "HDAVI Control 2" function enables the following operation: EZ Sync Control only with this Projection Display's remote control (for "HDAVI Control 2"). (p. 54) EZ Sync "HDAVI Control", based on the control functions provided by HDMI which is an industry standard known as HDMI CEC (Consumer Electronics Control), is a unique function that we have developed and added. As such, its operation with other manufacturers' equipment that supports HDMI CEC cannot be guaranteed. • For the first time / When adding new equipment, reconnecting the equipment or changing the setup. After the connection turn the equipment on and then switch this Projection Display on. Select the input mode to HDMI 1, HDMI 2, or HDMI 3 (p. 29), and make sure that an image is displayed correctly. • This function needs an HDMI compliant (fully wired) cable. Non-HDMI-compliant cables cannot be utilized. It is recommended that you use Panasonic's HDMI cable. Recommended part number: RP-CDHG15 (1.5 m), RP-CDHG30 (3.0 m), RP-CDHG50 (5.0 m) 52

  • 1
  • 2
  • 3
  • 4
  • 5
  • 6
  • 7
  • 8
  • 9
  • 10
  • 11
  • 12
  • 13
  • 14
  • 15
  • 16
  • 17
  • 18
  • 19
  • 20
  • 21
  • 22
  • 23
  • 24
  • 25
  • 26
  • 27
  • 28
  • 29
  • 30
  • 31
  • 32
  • 33
  • 34
  • 35
  • 36
  • 37
  • 38
  • 39
  • 40
  • 41
  • 42
  • 43
  • 44
  • 45
  • 46
  • 47
  • 48
  • 49
  • 50
  • 51
  • 52
  • 53
  • 54
  • 55
  • 56
  • 57
  • 58
  • 59
  • 60
  • 61
  • 62
  • 63
  • 64

52
Digital settings
Selecting digital broadcast service and viewing formats.
Procedure
1. Press
▲▼
to select “Digital setting”.
2. Press OK to display the Digital setting menu.
3. Press
▲▼
to select each item.
4. Press
◄►
to select the setting.
Mode
Analog
Digital
Digital setting
CC reset
On
CC1
Primary
CC
Size
Font
Style
Foreground
Fore opacity
Background
Back opacity
Outline
Automatic
Automatic
Automatic
Automatic
Automatic
Automatic
Automatic
Automatic
Digital setting
Size
Automatic, Normal, Small, Large
Font
Automatic, Default, Mono-serif, Prop-serif, Mono,
Prop, Casual, Cursive, Small caps
Style
Automatic, None, Raised, Depressed, Uniform,
Drop shadow
Foreground
The color of the font (Automatic, Black, White, Red,
Green, Blue, Yellow, Magenta, Cyan)
Fore opacity
The opacity of the font (Automatic, Transparent,
Translucent, Solid, Flashing)
Background
The color of the text box (Automatic, Black, White,
Red, Green, Blue, Yellow, Magenta, Cyan)
Back opacity
The opacity of the text box (Automatic,
Transparent, Translucent, Solid, Flashing)
Outline
The outline of the text (if selected under style)
(Automatic, Black, White, Red, Green, Blue,
Yellow, Magenta, Cyan)
Setup Features (continued)
CC Reset
Reset the CC settings.
Procedure
1. Press
▲▼
to select “CC reset”.
2. Press OK to reset Closed Caption settings.
EZ Sync™ “HDAVI Control™”*
* Simultaneously control all Panasonic “HDAVI Control”
equipped components using one button on one remote.
Enjoy additional HDMI Inter-Operability with Panasonic
products which have “HDAVI Control” function.
This Projection Display supports “HDAVI Control 2”
function.
Connections to some Panasonic equipment (DVD
Recorder DIGA, HD Camcorder, RAM theater, Player
theater, Amplifier, etc.) with HDMI cables allow you to
interface automatically.
The equipment with “HDAVI Control” function enables
the following operations:
Automatic Input Switching, Power on link, Power off link
and Speaker control (p. 53-54)
In addition, the equipment with “HDAVI Control 2”
function enables the following operation:
EZ Sync Control only with this Projection Display’s
remote control (for “HDAVI Control 2”). (p. 54)
EZ Sync “HDAVI Control”, based on the control functions
provided by HDMI which is an industry standard known
as HDMI CEC (Consumer Electronics Control), is a
unique function that we have developed and added. As
such, its operation with other manufacturers’ equipment
that supports HDMI CEC cannot be guaranteed.
For the first time / When adding new equipment,
reconnecting the equipment or changing the setup.
After the connection turn the equipment on and then
switch this Projection Display on.
Select the input mode to HDMI 1, HDMI 2, or HDMI 3
(p. 29), and make sure that an image is displayed
correctly.
This function needs an HDMI compliant (fully wired)
cable. Non-HDMI-compliant cables cannot be utilized. It is
recommended that you use Panasonic’s HDMI cable.
Recommended part number: RP-CDHG15 (1.5 m),
RP-CDHG30 (3.0 m), RP-CDHG50 (5.0 m)
Mode
Analog
Digital
Digital setting
CC reset
On
CC1
Primary
CC