Panasonic PT60DL54 PT50DL54 User Guide - Page 11
Optional Equipment Connections, Rgb Input Connection, Analog Rgb Signals That Can Be Input - manuals
 |
View all Panasonic PT60DL54 manuals
Add to My Manuals
Save this manual to your list of manuals |
Page 11 highlights
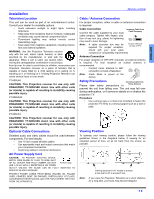
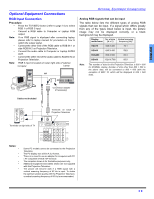
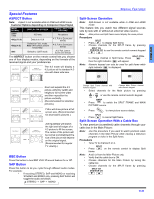
ENGLISH Optional Equipment Connections RGB Input Connection Procedure • Press the TV/VIDEO button (refer to page 14) to select RGB 1 or RGB 2 input. • Connect a RGB cable to Computer or Laptop RGB output. Note: • • • If no RGB signal is displayed after connecting laptop, please refer to laptop manual for procedure on how to switch the output signal. Connect the other end of the RGB cable to RGB IN 1 or side RGB IN 2 on Projection Television. Connect the audio cable to Computer or Laptop AUDIO OUT. Connect the other end of the audio cable to AUDIO IN on Projection Television. Note: RGB 2 input is located on lower right side of cabinet. Computer Laptop or OPTIONAL EQUIPMENT CONNECTIONS Analog RGB signals that can be input The table below lists the different types of analog RGB signals that can be input. If a signal which differs greatly from any of the types listed below is input, the picture image may not be displayed correctly, or a black background may be displayed. Display No. of dots Vertical scanning mode name (H x V) frequency (Hz) VGA70 640 X 400 70.1 VGA60 640 X 480 59.9 SVGA60 800 X 600 60.3 XGA60 1024 X 768 60.0 Note: The number of dots for this Projection Television is 800 × 600 for NORMAL display. Number of dots other than 800 × 600 in the above data, will be converted to 800 × 600 (with the exception of MAC 16, which will be displayed in 832 × 624 dots). Tower box Cables not Included Conversion adapter (if necessary) RGB2 IN AUDIO IN T S-VIDEO VIDEO Terminals on back of Projection Television L AUDIO R INPUT3 Terminals on right side of TV ANT AUDIO IN RGB 1 IN R-AUDIO IN-L HDMI AV IN IN 1 IN 2 OUT IN 1 IN 2 IN 3 T T S-VIDEO Y Y Y PB PB PB VIDEO VIDEO PR PR PR L AUDIO R L L L L AUDIO R R R R COMPONENT VIDEO INPUT Notes: • • • • • • Some PC models cannot be connected to the Projection Television. The PC display size will be 4:2:2 format. There is no need to use an adapter for computers with PC / AT compatible D-SUB 15P terminal. The computer shown is for illustrative purposes only. Additional equipment and cables shown are not supplied with this Projection Television. The picture will become dark if a RGB signal with a vertical scanning frequency of 62 Hz is input. To obtain the optimum picture quality with the Projection Television, a vertical scanning frequency of 60 Hz is recommended. 9z
-
 1
1 -
2
-
3
-
4
-
5
-
 6
6 -
 7
7 -
 8
8 -
 9
9 -
 10
10 -
 11
11 -
 12
12 -
 13
13 -
 14
14 -
 15
15 -
 16
16 -
17
-
18
-
19
-
20
-
21
-
22
-
23
-
24
-
25
-
26
-
27
-
28
-
29
-
30
-
31
-
32
-
33
-
34
-
35
-
36
-
37
-
38
-
39
-
40
-
41
-
42
-
43
-
44
-
45
-
46
-
47
-
48
-
49
-
50
-
51
-
52
-
53
-
54
-
55
-
56
-
57
-
58
-
59
-
60
-
61
-
62
-
63
-
64
-
65
-
66
-
67
-
68
-
69
-
70
-
71
-
72
-
73
-
74
-
75
-
76
-
77
-
78
-
79
-
80
-
81
-
82
-
83
-
84
-
85
-
86
-
87
-
88
-
89
-
90
-
91
-
92
-
93
-
94
-
95
-
96
-
97
-
98
-
99
-
100
-
101
-
102
-
103
-
104
-
105
-
106
-
107
-
108
-
109
-
110
-
111
-
112
 |
 |
