Panasonic PV-9662 PVV4603S User Guide - Page 3
Connections / Initial Setup (Ready to Play), Record Playback / Record on a Tape - vcr
 |
View all Panasonic PV-9662 manuals
Add to My Manuals
Save this manual to your list of manuals |
Page 3 highlights
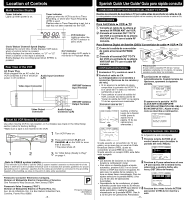
• Connections • Initial Setup • Clock Set • Select Channel • Playback • Record • Auto Operation Connections / Initial Setup (Ready to Play) Playback / Record on a Tape Please make all cable or antenna connections before plugging into the AC outlet. Plugging the VCR Power Cord into an AC wall outlet starts auto channel and clock set. Connecting For ANT./Cable ➛ VCR ➛ TV 1 Connect cable from TV Antenna/Cable to VCR's IN FROM ANT. jack. VCR IN FROM ANT. 1 IN from ANT./CABLE 2 Connect VCR's OUT TO TV jack to TV's ANT. IN jack with included RF Cable accessory. VHF/UHF OUT TO TV 2 For DSS/Cable Box ➛ VCR ➛ TV 1 Connect your cable box's TV OUT jack to the VCR's IN FROM ANT. jack with an RF cable. 2 Connect VCR's OUT TO TV jack to TV's ANT. IN jack with included RF Cable accessory. Initial Setup (Ready to Play) VCR IN FROM ANT. Cable TV Converter Box VHF/UHF OUT TO TV 2 IN from ANT./CABLE 1 WARNING Over tightening "Nut type" RF coaxial cables may damage jacks. Finger tighten only. 1 Turn TV on and tune to channel 3. 2 Plug VCR Power Cord into AC wall outlet. VCR comes on and auto channel and clock set starts. • If screen below does not appear, check VCR - TV connection and, if TV is tuned to channel 3, try switching it to channel 4. • To change VCR's output channel, please refer to "VCR's Output Channel" in Advanced Operations book (p. 12). 3 Settings are made automatically. When setup is done, this screen appears. VCR CLOCK CHANNEL 6/08/ 2003 SUN 2:20PM DST : ON SETT I NG : CH 10 AUTO CLOCK SET COMPLETED If " AUTO CLOCK SET IS INCOMPLETE" appears, manually set clock. See below. VCR CLOCK CHANNEL AUTO CLOCK SET IS INCOMPLETE PLEASE SET CLOCK BY PRESSING ACTION KEY Plugging the AC Power Plug into an AC outlet VCR CLOCK CHANNEL Manual Clock Set CH AUTO SET PROCEEDING CANCEL : STOP If Auto Clock Set was incomplete. 1 Press ACTION* on remote to display CLOCK menu. VCR CLOCK CHANNEL AUTO CLOCK SET PROCEEDING CANCEL : STOP If you use a cable box, turn it on and set it to the Public Broadcasting Station (PBS) channel in your time zone. If you use a DSS receiver, it must be turned off. VCR CLOCK CHANNEL 1/ / : DST:ON SELECT MONTH SELECT : SET : EXIT : ACT I ON 2 Press to select the month and to set. In the same manner, select and set the date, year, time, and DST (Daylight Saving Time). Notes VCR CLOCK CHANNEL • Function buttons are inoperative during Initial Setup. 6/08/ 2003 SUN 2:20PM DST:ON • To remove a cassette during Auto Set, press SET COMPLETED EJECT on the remote or STOP twice on the VCR. In this case, settings must be made SET : START : ACT I ON 3 manually. (See p. 12 of Advanced Operations book.) Press ACTION to start clock and exit. • Depending on conditions, Auto Clock Set may take longer than 30 minutes. If so, press STOP to stop setup and perform settings manually. (See p. 12 of Advanced Operations book.) - 4 - Playback a Tape Record on a Tape 1 Insert a tape. 1 Insert a tape with a record tab (p. 3). • Loose or peeling labels • VCR power comes on. " VCR" lights may cause tape jam. on Multi Function Display. • VCR power comes on. " VCR" lights If Auto VCR/TV (see p. 10 of on Multi Function Display. Advanced Operations book) is set to If Auto VCR/TV (see p. 10 of " OFF," press VCR/TV until " VCR" Advanced Operations book) is set to lights on the Multi Function Display. " OFF," press VCR/TV until " VCR" lights on the Multi Function Display. 2 Press CH or NUMBER keys to select the channel. 2 Press PLAY to play tape. • If tape has no rec. tab (p. 3), auto play begins. • For "LINE" input, see p. 9 of "Advanced Operations" book. • If recording from a channel over 100, first Special Features During Play press 100 key then the other 2 digits. Forward/Reverse Scene Search ➛ Press FF or REW. ➛ Press PLAY to release. After search has begun, each additional press of FF or REW changes speed as shown below. [SLP] : Approx. 21X ↔ Approx. 9X [LP] : Approx. 9X ↔ Approx. 7X [SP] : Approx. 7X ↔ Approx. 3X If at 21X, 9X, or 7X speed the picture is interrupted, change speed to 9X, 7X, or 3X. 3 Press SPEED to select record speed (p. 3). 4 Press REC to start recording. • To edit, press PAUSE/SLOW to pause, and again to resume recording. 5 Press STOP to stop recording. Notes • Picture interruption may occur with some TVs. • FF and REW search speed may vary depending on current tape position. Still (Freeze) Picture ➛ Press PAUSE/SLOW. ➛ Press PLAY to release. Frame by Frame Picture ➛ Press PAUSE/SLOW in Still mode. ➛ Press PLAY to release. Slow Motion Picture ➛ Hold down PAUSE/SLOW in Still mode. ➛ Press PLAY to release. One Touch Recording (recording in progress) Press REC repeatedly to set length as follows: 30 min. ➛ 1 hr. ➛ 1:30 ➛ 2:00 ➛ 3:00 ➛ 4:00 ➛ exit. The VCR shuts off at the length set. Record one station, watch another Press VCR/TV ("VCR" goes out on Multi Function Display), ➛ select channels on TV (recording continues). Select channels on VCR (in STOP or PAUSE mode) Press VCR/TV ("VCR" lights up on Multi Function Display), ➛ select channels on VCR. Notes • These features work best in SP or SLP mode. • The sound will be muted. • To reduce picture noise, see "Manual Tracking Control" on p. 3. • After VCR is in Still or Slow mode 3 minutes, it auto switches to Stop mode to protect the tape and the video heads. Notes • Watching one channel and recording another is not possible when using Cable Box or DSS Receiver. • After 5 minutes in Pause mode, VCR stops to protect the tape and the video heads. 3 Press STOP to stop tape. Press REW or FF in Stop mode to Rewind or Fast Forward tape. Press EJECT on remote, or STOP/EJECT on VCR to eject tape. This video recorder, equipped with HQ (High Quality) system, is compatible with existing VHS equipment. Only use tapes with the mark. Only tapes tested and inspected for use in 2, 4, 6, and 8 hour machines are recommended. Auto Operation Functions Auto Play Insert a tape ➛ Power comes on ➛ Play starts if there is no record tab (see p. 3). Auto Rewind Play Fast Forward ➛ Tape end ➛ Rewind Play Auto Eject (Repeat Play must be off) Play ➛ Tape end ➛ Rewind ➛ Tape ejects if there is no record tab *Important: If a remote control button does not work when pressed, press the VCR button on the remote and try the button again. - 5 -
-
 1
1 -
 2
2 -
 3
3 -
 4
4 -
 5
5 -
 6
6 -
 7
7 -
 8
8 -
 9
9 -
10
-
11
-
12
 |
 |
