Panasonic PVL354 Vhs-c Camcorder - Page 18
Basic Operation, Camera Recording (basic, Stand-by, Programmed Recording
 |
View all Panasonic PVL354 manuals
Add to My Manuals
Save this manual to your list of manuals |
Page 18 highlights
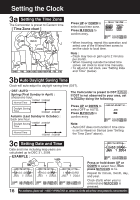
Camera Recording Recording via EVF or LCD Monitor View recording scene on EVF (Electronic Viewer Finder) or LCD (Liquid Crystal Display) monitor. Before you begin... • Connect Camcorder to power source. • Insert cassette with record tab (page 12). 1 Press LCD-OPEN to unlock the LCD monitor. Swing LCD monitor fully open and adjust viewing angle. 1 2 Set POWER to CAMERA. CAUTION Rotating partially open LCD monitor may block cassette door and damage Camcorder body. 4, A, B • Be sure POWER is fully turned to EVF or LCD Monitor CAMERA position. (Record/Pause mode) • EVF or LCD monitor turns on/off by the POWER switch. • Both EVF and LCD monitor turn on when LCD is at 180° (see above left). This allows both you and the subject to view the recording. Built-in Microphone 3 LCD : Adjust LCD monitor brightness level. See "To adjust LCD BRIGHT" below. EVF : Look into EVF and adjust VISION ADJUSTMENT to your preference. 2 6 4 , Set REC MODE to "SP" or "SLP" in 5 the CAMERA MODE Menu (page 14). 5 Press RECORD/PAUSE to start or 3 VISION ADJUSTMENT To adjust LCD BRIGHT pause recording. 6 Set POWER to OFF when finished. A Press MENU for • To remove the cassette, slide the MENU mode. TAPE EJECT switch (page 12). Press UP or DOWN to select Note: LCD BRIGHT . • When Camcorder is aimed at excessively B Press M.FOCUS for bright objects, or bright lights, a vertical bar may appear in the picture. This is LCD BRIGHT normal for the CCD pick-up. Try to avoid SETTING menu. Press UP or DOWN to adjust LCD monitor brightness level. this when possible. • Using LCD monitor reduces battery operation time. Return LCD monitor to locked position when not in use. 18 For assistance, please call : 1-800-211-PANA(7262) or, contact us via the web at:http://www.panasonic.com/contactinfo
-
 1
1 -
2
-
3
-
4
-
5
-
6
-
7
-
8
-
9
-
10
-
11
-
12
-
 13
13 -
 14
14 -
 15
15 -
 16
16 -
 17
17 -
 18
18 -
 19
19 -
 20
20 -
 21
21 -
 22
22 -
 23
23 -
24
-
25
-
26
-
27
-
28
-
29
-
30
-
31
-
32
-
33
-
34
-
35
-
36
-
37
-
38
-
39
-
40
-
41
-
42
-
43
-
44
-
45
-
46
-
47
-
48
-
49
-
50
-
51
-
52
-
53
-
54
-
55
-
56
-
57
-
58
-
59
-
60
-
61
-
62
-
63
-
64
-
65
-
66
-
67
-
68
-
69
-
70
-
71
-
72
-
73
-
74
-
75
-
76
-
77
-
78
-
79
-
80
-
81
-
82
-
83
-
84
-
85
-
86
-
87
-
88
 |
 |
