Panasonic RXD12 RXD12 User Guide - Page 3
Listening to radio broadcasts, Normal tuning, Preset tuning
 |
View all Panasonic RXD12 manuals
Add to My Manuals
Save this manual to your list of manuals |
Page 3 highlights
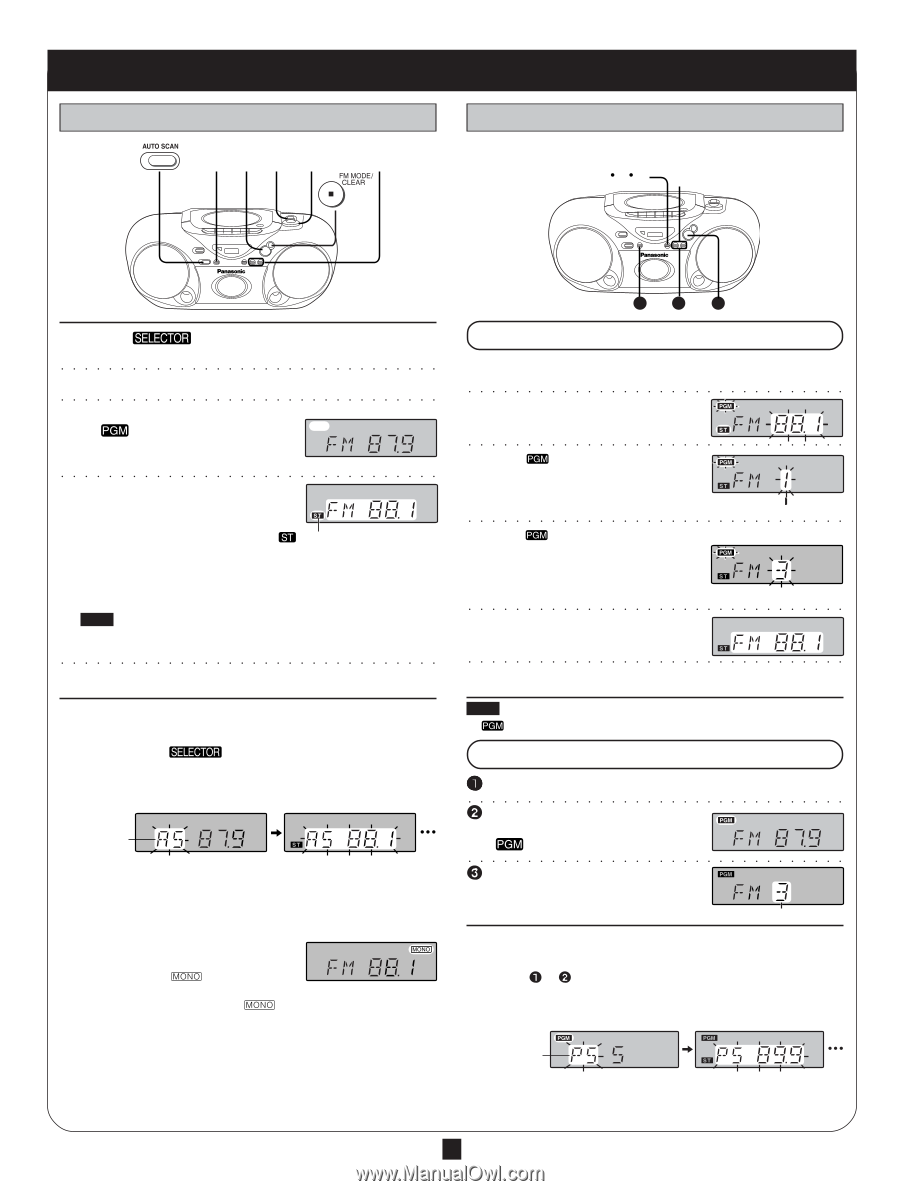
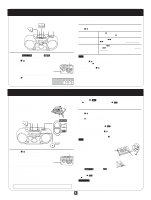
Listening to radio broadcasts Normal tuning 321 5 4 Preset tuning Preset the stations (twelve FM and twelve AM) to make tuning simpler. 235 4 1 Switch [ ] to "TUNER". (Power comes on.) ○ ○ ○ ○ ○ ○ ○ ○ ○ ○ ○ ○ ○ ○ ○ ○ ○ ○ ○ ○ ○ ○ ○ ○ ○ ○ ○ ○ ○ ○ ○ ○ 2 Press [BAND] to select "FM" or "AM". ○ ○ ○ ○ ○ ○ ○ ○ ○ ○ ○ ○ ○ ○ ○ ○ ○ ○ ○ ○ ○ ○ ○ ○ ○ ○ ○ ○ ○ ○ ○ ○ 3 (Omit this step if using the remote control) If " " is on the display, press [TUNE MODE] to clear it off . ○ ○ ○ ○ ○ ○ ○ ○ ○ ○ ○ ○ ○ ○ ○ ○ ○ ○ ○ ○ ○ ○ ○ ○ ○ ○ ○ ○ ○ ○ ○ ○ 4 Press [-/g] or [f/+] to tune to the desired station. The frequency changes one step each time a button is pressed. " " lights when an FM stereo Automatic tuning broadcast is being received. Keep [-/g] or [f/+] depressed and release when the frequency display starts to change. A station with good reception is automati- cally selected and the process stops. To stop automatic tuning, press [-/g] or [f/+] again. Note Automatic tuning may stop on a frequency where there is no station if there is interference. Press [-/g] and [f/+] to tune if this occurs. ○ ○ ○ ○ ○ ○ ○ ○ ○ ○ ○ ○ ○ ○ ○ ○ ○ ○ ○ ○ ○ ○ ○ ○ ○ ○ ○ ○ ○ ○ ○ ○ 5 Adjust the volume. To use auto scan You can search for a station by listening to all tuned-in stations for 8 seconds each. Preparation: Switch [ ] to "TUNER". 1. Press [BAND] to select "FM" or "AM". 2. Press [AUTO SCAN]. Auto scan starts. Indicates auto scan 3. Press [AUTO SCAN] when you find the desired station. Auto scan ends when it reaches the original frequency again. To stop during the process, press [AUTO SCAN]. To improve reception FM: Extend the whip antenna and adjust its direction. AM: Adjust facing of the unit. If noise is excessive in the FM stereo mode Press [FM MODE]. (" " lights up.) Sound will be produced in monaural, but this also reduces noise. Press the button again to cancel. (" " goes out.) To receive FM broadcasts allocated in 0.1 MHz (Only from the main unit) First press [BAND] to select "AM". Now, press and hold [BAND]. The display changes in a few seconds to show the current lowest FM frequency. Continue to hold down the button. The minimum frequency changes and the step is changed at the same time. Changing the step erases all preset stations. Repeat the above to change the step back. 2 3 1 How to preset 1 Tune to the desired station. Do steps 1-4 on the left. ○ ○ ○ ○ ○ ○ ○ ○ ○ ○ ○ ○ ○ ○ ○ ○ ○ ○ ○ ○ ○ ○ ○ ○ ○ ○ ○ ○ ○ ○ ○ ○ 2 Press [MEMORY]. ○ ○ ○ ○ ○ ○ ○ ○ ○ ○ ○ ○ ○ ○ ○ ○ ○ ○ ○ ○ ○ ○ ○ ○ ○ ○ ○ ○ ○ ○ ○ ○ 3 While " " and the frequency are flashing Press [MEMORY]. Preset channel ○ ○ ○ ○ ○ ○ ○ ○ ○ ○ ○ ○ ○ ○ ○ ○ ○ ○ ○ ○ ○ ○ ○ ○ ○ ○ ○ ○ ○ ○ ○ ○ 4 While " " and the preset channel are flashing Press [-/g] or [f/+] to select the desired channel. (Remote control: [4] or [3]) ○ ○ ○ ○ ○ ○ ○ ○ ○ ○ ○ ○ ○ ○ ○ ○ ○ ○ ○ ○ ○ ○ ○ ○ ○ ○ ○ ○ ○ ○ ○ ○ 5 Press [MEMORY]. (This completes presetting.) ○ ○ ○ ○ ○ ○ ○ ○ ○ ○ ○ ○ ○ ○ ○ ○ ○ ○ ○ ○ ○ ○ ○ ○ ○ ○ ○ ○ ○ ○ ○ ○ 6 Repeat steps 1-5 to preset other stations. Note If " " goes off during presetting, return to step 2. To listen to preset channels 1 Press [BAND] to select "FM" or "AM". 2○ ○ ○ ○ ○ ○ ○ ○ ○ ○ ○ ○ ○ ○ ○ ○ ○ ○ ○ ○ ○ (Omit this step if using the remote control) ○ ○ ○ ○ ○ ○ ○ ○ ○ ○ ○ Press [TUNE MODE] to display " ". 3○ ○ ○ ○ ○ ○ ○ ○ ○ ○ ○ ○ ○ ○ ○ ○ ○ ○ ○ ○ Press [-/g] or [f/+] to select ○ ○ ○ ○ ○ ○ ○ ○ ○ ○ ○ ○ the desired channel (1-12). (Remote control: [4] or [3]) Preset channel To use preset scan You can search for a station by listening to all preset channels for 8 1 2 seconds each. 1. Do steps to above. For remote control, replace [-/g] or [f/+] described below with [4] or [3]. 2. Press and hold [-/g] or [f/+] until "PS" appears on the display. Indicates preset scan 3. Press [-/g] or [f/+] when you find the desired channel. Preset scan ends after searching through each preset channel once. To stop during the process, press [-/g] or [f/+]. 3 RQT5685
-
 1
1 -
 2
2 -
 3
3 -
 4
4 -
 5
5 -
 6
6 -
 7
7 -
 8
8
 |
 |