Panasonic SA-XR70S SAXR70 User Guide - Page 7
Having fun with DVDs, using HDMI connections, Antennas, Changing the HDMI inp, ut settings
 |
View all Panasonic SA-XR70S manuals
Add to My Manuals
Save this manual to your list of manuals |
Page 7 highlights
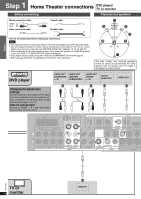
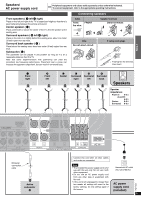
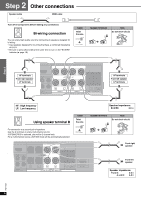
Peripheral equipment and cables sold separately unless otherwise indicated. To connect equipment, refer to the appropriate operating instructions. Having fun with DVDs using HDMI connections "HDMI" (High Definition Multimedia Interface) is a standard that enables high-quality video and audio signals to be transmitted using a single cable. You can have lots of fun with this unit by means of simple connections for high-quality video, PCM, Dolby Digital, DTS and DVD-Audio signals. When signal transmission is commenced, the "HDMI" indicator on the unit lights. DIGITAL (TV) IN (DVR) IN (DVD) IN (CD) IN OUT (DVD) IN OPTICAL1 OPTICAL2 COAXIAL1 COAXIAL2 DVR/VCR1 DVD TV MONITOR OUT TV IN Y PB PR Y PB PR DVD player or DVD recorder This unit Path of HDMI signal Audio and Video Audio Video Speakers TV Class 2 Wiring HF BI-WIRE LF TV HDMI (AV IN) DVD HDMI (AV OUT) OUT IN IN OUT MONITOR OUT IN SUBWOOFER TV VIDEO MONITOR OUT TV IN IN DVD S VIDEO IN Y DVR/VCR1 PB PR DVD IN COMPONENT VIDEO Changing the HDMI input settings You can change the input setting for the HDMI R L R terminLal (á pagesR12 oLr 1BA4C)K. AC IN∼ FRONT A FRONT B CENTER SPEAKERS (6∼8Ω) HAUT-PARLEURS SURROUND Note • To digitally record audio from a HDMI input source, connect the recording equipment to this unit's DIGITAL OPTICAL OUT terminal as shown on page 10. (For details on how to record, refer to page 25.) • If the connected DVD player or DVD recorder cannot digitally output audio from DVD-Audio discs (it may be a HDMI Ver. 1.0 unit), connect it through the DVD/DVD 6CH analog terminals. (á page 4). • The DVD unit's video and audio signals are not transmitted directly to the TV when you turn the unit to standby. To play a DVD on a TV only, directly connect the DVD player or DVD recorder to the TV. (Refer to the operating instructions of the connected equipment for further details.) Step 2 Antennas FM indoor antenna (included) Fix the other end of the antenna where reception is best. Adhesive tape AM loop antenna (included) Keep the antenna cord away from tape decks, DVD players, and other cords. 1 2 LOOP ANT GND 3 75Ω GND LOOP EXT LOOP ANT GND DIGITAL Black Red CENTER SUBWOOFER FM ANT AM ANT SECOND AUDIO OUT L 2 OUT OPTICAL (TV) IN OPTICAL1 (DVR) IN (DVD) IN (CD) IN OPTICAL2 COAXIAL1 COAXIAL2 DVR/VCR1 DVD Y OUT HDMI TV MONITOR OUT PB PRWhite Y OUT IN IN (DVD) IN TV IN PB PR R IN CD 1 REC(OUT) PLAY(IN) IN TAPE TV SURROUND FRONT DVD/DVD 6CH AUDIO OUT IN DVR/VCR1 OUT MONITOR OUT IN SUBWOOFER TV VIDEO MONITOR OUT TV IN IN DVD S VIDEO IN Y DVR/VCR1 PB PR DVD IN COMPONENT VIDEO R FRONT A FM outdoor antenna • Disconnect the FM indoor antenna. • The antenna should be installed by a competent technician. • Twist the coaxial cable's shield braid firmly and connect it to the GND terminal. FM outdoor antenna 75Ω coaxial cable 20 mm (25/32") 75Ω GND 2 Shield braid RQT7523 1 FM ANT LOOP Core wire 7 10 mm (3/8")
-
 1
1 -
 2
2 -
 3
3 -
 4
4 -
 5
5 -
 6
6 -
 7
7 -
 8
8 -
 9
9 -
 10
10 -
 11
11 -
 12
12 -
13
-
14
-
15
-
16
-
17
-
18
-
19
-
20
-
21
-
22
-
23
-
24
-
25
-
26
-
27
-
28
 |
 |
