Panasonic SAHT40 SAHT40 User Guide - Page 13
Making A Recording, The Reset Function, Digital, Input, 2ch Mix, C.focus
 |
View all Panasonic SAHT40 manuals
Add to My Manuals
Save this manual to your list of manuals |
Page 13 highlights
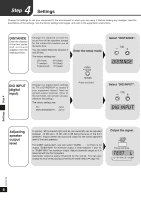
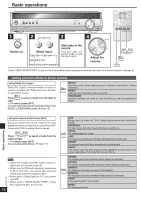
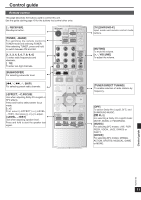
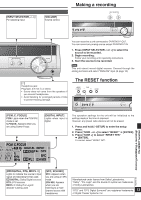
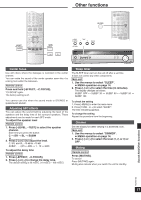
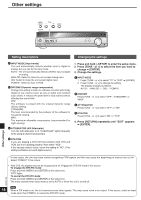
[INPUT SELECTOR, ] For selecting input. [VOLUME] Volume control. Making a recording INPUT SELECTOR POWER MENU TUNE SETUP RETURN MUSIC PORT SURROUND ENTER MUSIC INPUT SELECTOR VOLUME INPUT SELECTOR You can record to a unit connected to DVR/DVD-P OUT. You can record any analog source except DVR/DVD-P IN. 1. Press [INPUT SELECTOR < or >] to select the source to be recorded. 2. Begin recording. VOLUME Follow your recording unit's operating instructions. 3. Start the source to be recorded. Note This unit cannot record digital sources. Connect through the analog terminals and select "ANALOG" input (➡ page 18). [ ] Headphone jack Plug type: 3.5 mm (1/8") stereo • Sound does not come from the speakers if you connect headphones. • Avoid listening for prolonged periods of time to prevent hearing damage. The RESET function MENU TUNE SETUP RETURN ENTER POWER MENU TUNE SETUP RETURN MUSIC PORT SURROUND ENTER MUSIC INPUT SELECTOR VOLUME [PCM, C. FOCUS] PCM: Lights when the PCM FIX mode is set C.FOCUS: Appears when you are using Center Focus [DIGITAL INPUT] Lights when input is digital. PCM C.FOCUS W M DIGITAL INPUT ft kHz DIGITAL DTS SFC MHz PL 2CH MIX The operation settings for the unit will be initialized to the settings made at the time of shipment. However, any preset radio stations will not be erased. 1. Press and hold [―SETUP] to enter the setup menu. 2. Press [TUNE - or +] to select "RESET" ➡ [ENTER]. 3. Press [TUNE +] to select "RESET YES" ➡ [ENTER]. To cancel, select "RESET NO". Control guide/Making a recording/ The RESET function [% DIGITAL, DTS, % PL ΙΙ] Lights to indicate the source's input signal and decoding format used. % DIGITAL: Dolby Digital sources DTS: DTS sources % PL ΙΙ: Dolby Pro LogicΙΙ decoder is being used [SFC, 2CH MIX] SFC: Appears when you are using an SFC mode 2CH MIX: Appears when you are listening to a multichannel source with headphones Manufactured under license from Dolby Laboratories. "Dolby", "Pro Logic" and the double-D symbol are trademarks of Dolby Laboratories. "DTS" and "DTS Digital Surround" are registered trademarks 13 of Digital Theater Systems, Inc. RQTV0105
-
 1
1 -
2
-
3
-
4
-
5
-
6
-
7
-
 8
8 -
 9
9 -
 10
10 -
 11
11 -
 12
12 -
 13
13 -
 14
14 -
 15
15 -
 16
16 -
 17
17 -
 18
18 -
19
-
20
-
21
-
22
-
23
-
24
 |
 |
