Panasonic SC-BT100P-K Operating Instructions - Page 9
Setting up the unit
 |
View all Panasonic SC-BT100P-K manuals
Add to My Manuals
Save this manual to your list of manuals |
Page 9 highlights
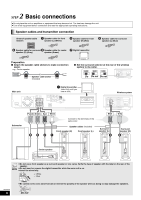
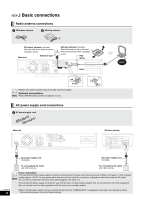
Getting started Quick Start Guide STEP 3 Setting up the unit Turn on the main unit and wireless system Turn on the power of the main unit and the wireless system after all connections are complete. AUTO OPERATION ON/OFF indicator Preparation Turn on the TV and select the appropriate video input on the TV. VIDEO1 POWER AUTO OPERATION ON/OFF Standby/on indicator (Í) 1 Press [POWER C I, B Í] on the wireless system. ≥AUTO OPERATION ON/OFF indicator lights red when the wireless system is turned on and lights green when the wireless link is activated. 2 Press [POWER Í/I] on the main unit. ≥Standby/on indicator (Í) goes out when the unit is turned on. ≥When the link between the main unit and the wireless system is activated, "[W2S]" or "[W4S]" is illuminated in the main unit's display. e.g., "[W2S]" SD SL W2S ≥If "[W2S]" or "[W4S]" is flashing in the main unit's display, check that the digital transmitter at the back of the main unit is inserted correctly. Easy Setting When the system is switched on for the first time, a screen for the basic settings is displayed automatically. Follow the on-screen prompts to make basic settings for the system. 1 Press [Í]. Setup screen appears. [Í] ≥If this unit is connected to a Panasonic TV (VIERA) supporting HDAVI Control 2 or HDAVI Control 3 via an HDMI cable, then the "On-screen Language" and "TV Aspect" setting information on the TV are captured from the TV. 2 Follow the on-screen instructions and make the settings with [3, 4] and [OK]. "On-screen Language" (> 33) and "TV Aspect" (> 33) are set. ≥You can perform this setup anytime by selecting "Easy Setting" in the Setup menu. (> 32) ≥You can also change these settings individually. (> 33) [OK] [3, 4] Presetting the radio stations automatically [FM/AM] Up to 30 stations can be set in each band, FM and AM. 1 Press [FM/AM] to select "FM" or "AM". 2 Press [6, 5] to select the lowest frequency (FM: 87.9 or 87.5, AM: 520). 3 Press and hold [OK]. Release the button when "M" begins to flash. [6, 5] DISC iPod SD W2S W4S M 96/24 D EX D+ PL x HD NEO:6 [OK] The tuner tunes to the lowest frequency and starts to preset all the stations it can receive into the channels in ascending order. ≥"SET OK" is displayed when the stations are set, and the radio tunes to the last preset station. ≥"ERROR" is displayed when automatic presetting is unsuccessful. Preset the channels manually (> 18). RQT9129 9
-
 1
1 -
2
-
3
-
 4
4 -
 5
5 -
 6
6 -
 7
7 -
 8
8 -
 9
9 -
 10
10 -
 11
11 -
 12
12 -
 13
13 -
 14
14 -
15
-
16
-
17
-
18
-
19
-
20
-
21
-
22
-
23
-
24
-
25
-
26
-
27
-
28
-
29
-
30
-
31
-
32
-
33
-
34
-
35
-
36
-
37
-
38
-
39
-
40
-
41
-
42
-
43
-
44
-
45
-
46
-
47
-
48
 |
 |