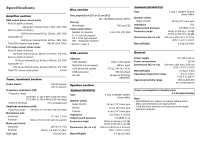
Panasonic SCAKX73 SCAKX73 User Guide - Page 12
Clock and timers, Press [CLOCK/TIMER] to select CLOCK.
 |
View all Panasonic SCAKX73 manuals
Add to My Manuals
Save this manual to your list of manuals |
Page 12 highlights
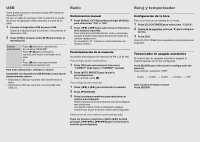
Clock and timers Setting the clock This is a 12-hour clock. 1 Press [CLOCK/TIMER] to select "CLOCK". 2 Within 10 seconds, press [R, T] to set the time. 3 Press [OK]. Press [CLOCK/TIMER] to show the clock for a few seconds. Note: Reset the clock regularly to maintain accuracy. Sleep timer The sleep timer switches off the system after the set time. Press [SLEEP] to select the setting (in minutes). To cancel, select "OFF". 30MIN → 60MIN → 90MIN → 120MIN → OFF Play timer You can set the timer to come on at a certain time to wake you up. Preparation Set the clock. 1 Press [CLOCK/TIMER] to select "#PLAY". 2 Within 10 seconds, press [R, T] to set the start time. 3 Press [OK]. 4 Do steps 2 and 3 again to set the end time. To start the timer 1 Prepare the audio source you want to listen to (disc, radio, USB, music port or AUX) and set the volume. 2 Press [#, PLAY]. "#PLAY" is shown. To cancel, press [#, PLAY] again. The system must be switched off for the timer to operate. Using a microphone Preparation Decrease the volume of the system to its minimum before you connect or disconnect a microphone. 1 Connect a microphone (not supplied) to the microphone jack. Plug type: Ø 3.5 mm (⅛″) monaural 2 Turn [MIC VOL, MIN/MAX] on the main unit to adjust the volume of the microphone. If you want to use the microphone with background music. 3 Play the music source and adjust the volume of the system. Note: • If a strange noise (howling) is emitted, move the microphone away from the speakers, or decrease the volume of the microphone. • When you do not use the microphone, disconnect it from the microphone jack, and decrease the volume of the microphone level to "MIN". To show the remaining time Press [SLEEP]. Note: • The sleep timer can be used together with the play timer. • The sleep timer always comes first. Be sure not to set an overlap of timers. To check the settings Press [CLOCK/TIMER] to select "#PLAY". Note: • The timer starts at a low volume and increases gradually to the preset level. • The timer comes on at the set time every day if the timer is on. • If you switch off the system and switch on again while a timer is in operation, the timer will not stop at the end time.
-
 1
1 -
2
-
3
-
4
-
5
-
6
-
 7
7 -
 8
8 -
 9
9 -
 10
10 -
 11
11 -
 12
12 -
 13
13 -
 14
14 -
 15
15 -
 16
16
 |
 |