Panasonic SCHT790V SAHT790V User Guide - Page 38
TIMER RECORDING, Select ON
 |
View all Panasonic SCHT790V manuals
Add to My Manuals
Save this manual to your list of manuals |
Page 38 highlights
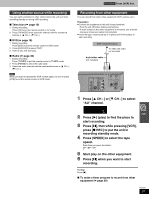
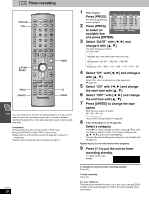
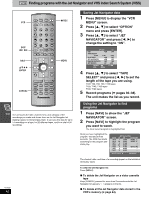
VCR Timer recording DVD/VCR VCR DVD/VCR FM/AM REC DVD VCR TV TUNER RESET TV/VIDEO PAGE GROUP PICTURE MODE/ SETUP REPEAT PLAY MODE 1 4 7 100 SKIP 2 3 5 6 8 9 S10/ENTER 0 SLOW/SEARCH TV VOLj TV VOLi JET REW OPEN/CLOSE/EJECT 342 1 ENTER PROG CANCEL TOP MENU NAVI DIRECT NAVIGATOR CH MENU PLAY LIST ENTER OSD/DISPLAY RETURN CH VOLUME D.RE-MASTER C.S.M C.FOCUS S.POSITION SUBWOOFER SFC SUPER SRND MUTING POSITION MEMORY PROG [SHIFT] SUBTITLE CANCEL SLEEP ÎPL ZOOM QUICK REPLAY SPEED AUDIO TEST MIX 2CH CH SELECT MENU F SPEED You can create up to 16 timer recording programs. You can set the timer to record an individual program up to a month in advance, record at the same time on the same day every week, or at the same time daily. Preparation ≥Press [VCR] to put the remote control in VCR mode. ≥Press [DVD/VCR] to select "VCR" as the source. ≥Make sure the unit's clock is correct (➡ page 42 to adjust it if necessary). ≥Insert a tape, ensuring its tab is in place (➡ page 5). RQT6951 38 1 While stopped Press [PROG]. The timer-programming screen appears. 2 Press [PROG] to select an DATE CH ON OFF 1/2 1 27WE 2 8:02PM 9:30PM SP 2 SU-SA 125 10:30AM 11:00AM A 3 SU 14 3:00PM 4:00PM EP 4 19TU 5 28TH 6 30SA 7 ---- 5 10:15PM 11:30PM VP AV 8:02PM 9:30PM SP 4 7:10PM 7:55PM VP 8 PROG.:ENTER END:MENU available line and press [ENTER]. 3 Select "DATE" with [2, 1] and change it with [3, 4]. The date changes as follows: A.Current date l ;: l Next day up to one month later minus one day l ;: l Weekly timer: SU-SA > MO-SA > MO-FR l ;: a.Daily timer: SU > MO > TU > WE > TH > FR > SA 4 Select "CH" with [2, 1] and change it with [3, 4]. Select "AU" when recording from other equipment (➡ page 37). 5 Select "ON" with [2, 1] and change the start time with [3, 4]. 6 Select "OFF" with [2, 1] and change the end time with [3, 4]. 7 Press [SPEED] to change the tape speed. Each time you press the button: SP>EP>VP>A b §Auto SP/EP change function ➡ page 39 8 If the Jet Navigator is on (➡ page 40), Select a category. Press [1] to select a category column. Press [3, 4] to enter the category selection menu. Then select a category with [3, 4, 2, 1], and confirm with [MENU]. You can also set and change the category in the navigator list (➡ page 41). Repeat steps 2 to 8 to make further timer programs. 9 Press [F] to put the unit on timer recording standby. "F" lights on the unit's display. To release the unit from timer recording standby Press [F]. To stop recording Press [F]. For your reference The timer works whether the unit is on or not, so you can play DVDs or listen to the radio (➡ page 37). Switch the unit to standby if you are finished.
-
 1
1 -
2
-
3
-
4
-
5
-
6
-
7
-
8
-
9
-
10
-
11
-
12
-
13
-
14
-
15
-
16
-
17
-
18
-
19
-
20
-
21
-
22
-
23
-
24
-
25
-
26
-
27
-
28
-
29
-
30
-
31
-
32
-
 33
33 -
 34
34 -
 35
35 -
 36
36 -
 37
37 -
 38
38 -
 39
39 -
 40
40 -
 41
41 -
 42
42 -
 43
43 -
44
-
45
-
46
-
47
-
48
-
49
-
50
-
51
-
52
-
53
-
54
-
55
-
56
-
57
-
58
-
59
-
60
-
61
-
62
-
63
-
64
 |
 |
