Panasonic SDRH85 SDRH85 User Guide - Page 16
Before using
 |
View all Panasonic SDRH85 manuals
Add to My Manuals
Save this manual to your list of manuals |
Page 16 highlights
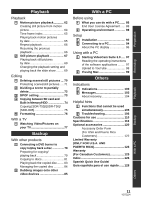
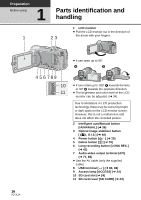
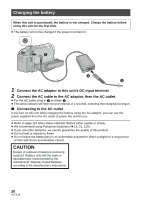
Preparation Before using 1 Parts identification and handling 1 LCD monitor ≥ Pull the LCD monitor out in the direction of 1 23 the arrow with your fingers. 16 VQT2L14 ≥ It can open up to 90o. 4 56 789 10 11 ≥ It can rotate up to 180o A towards the lens or 90o B towards the opposite direction. ≥ The brightness and color level of the LCD monitor can be adjusted. (l 34) Due to limitations in LCD production technology, there may be some tiny bright or dark spots on the LCD monitor screen. However, this is not a malfunction and does not affect the recorded picture. 2 Intelligent auto/Manual button [iA/MANUAL] (l 36) 3 Optical image stabilizer button [ , O.I.S.] (l 48) 4 Power button [ ] (l 25) 5 Delete button [ ] (l 70) 6 Long recording button [LONG REC.] (l 41) 7 Audio-video output terminal [A/V] (l 77, 85) ≥ Use the AV cable (only the supplied cable). 8 USB terminal [ ] (l 80, 94) 9 Access lamp [ACCESS] (l 24) 10 SD card slot (l 24) 11 SD card cover [SD CARD] (l 24)
-
 1
1 -
2
-
3
-
4
-
5
-
6
-
7
-
8
-
9
-
10
-
 11
11 -
 12
12 -
 13
13 -
 14
14 -
 15
15 -
 16
16 -
 17
17 -
 18
18 -
 19
19 -
 20
20 -
 21
21 -
22
-
23
-
24
-
25
-
26
-
27
-
28
-
29
-
30
-
31
-
32
-
33
-
34
-
35
-
36
-
37
-
38
-
39
-
40
-
41
-
42
-
43
-
44
-
45
-
46
-
47
-
48
-
49
-
50
-
51
-
52
-
53
-
54
-
55
-
56
-
57
-
58
-
59
-
60
-
61
-
62
-
63
-
64
-
65
-
66
-
67
-
68
-
69
-
70
-
71
-
72
-
73
-
74
-
75
-
76
-
77
-
78
-
79
-
80
-
81
-
82
-
83
-
84
-
85
-
86
-
87
-
88
-
89
-
90
-
91
-
92
-
93
-
94
-
95
-
96
-
97
-
98
-
99
-
100
-
101
-
102
-
103
-
104
-
105
-
106
-
107
-
108
-
109
-
110
-
111
-
112
-
113
-
114
-
115
-
116
-
117
-
118
-
119
-
120
-
121
-
122
-
123
-
124
-
125
-
126
-
127
-
128
-
129
-
130
-
131
-
132
 |
 |
