Panasonic TC-50A400 Owners Manual - Page 9
Wall mounting the TV optional
 |
View all Panasonic TC-50A400 manuals
Add to My Manuals
Save this manual to your list of manuals |
Page 9 highlights
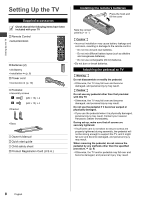
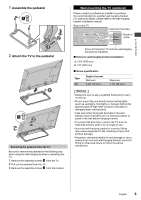
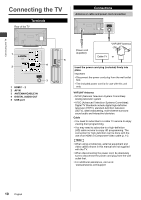
Setting Up the TV 1 Assemble the pedestal 2 1 2 Attach the TV to the pedestal 1 2 Removing the pedestal from the TV Be sure to remove the pedestal in the following way when using the wall-hanging bracket or repacking the TV. 1 Remove the assembly screws from the TV. 2 Pull out the pedestal from the TV. 3 Remove the assembly screws from the bracket. Wall mounting the TV (optional) Please contact a professional installer to purchase the recommended UL qualified wall-hanging bracket. For additional details, please refer to the wall-hanging bracket installation manual. Rear of the TV a b (View from the side) Depth of screw Screw for fixing the TV onto the wall-hanging bracket (not supplied) ■ Holes for wall-hanging bracket installation a: 15.8" (400 mm) b: 7.9" (200 mm) ■ Screw specification Type M6 Depth of screw Minimum 0.40" (10 mm) Maximum 1.10" (28 mm) Warning ●Always be sure to ask a qualified technician to carry out set-up. ●Do not mount the unit directly below ceiling lights (such as spotlights, floodlights or halogen lights) that typically give off high heat. Doing so may warp or damage plastic cabinet parts. ●Take care when fixing wall brackets to the wall. Always ensure that there are no electrical cables or pipes in the wall before hanging bracket. ●To prevent fall and injury, remove the TV from its fixed wall position when it is no longer in use. ●Incorrect wall-hanging bracket or incorrect fitting may cause equipment to fall, resulting in injury and product damage. ●Panasonic disclaims liability for any damage or injury arising from incorrect wall-hanging bracket, incorrect fitting or otherwise failure to follow the above instructions. English 9
-
 1
1 -
2
-
3
-
 4
4 -
 5
5 -
 6
6 -
 7
7 -
 8
8 -
 9
9 -
 10
10 -
 11
11 -
 12
12 -
 13
13 -
 14
14 -
15
-
16
-
17
-
18
-
19
-
20
-
21
-
22
-
23
-
24
-
25
-
26
-
27
-
28
-
29
-
30
-
31
-
32
-
33
-
34
-
35
-
36
-
37
-
38
-
39
-
40
-
41
-
42
-
43
-
44
-
45
-
46
-
47
-
48
-
49
-
50
-
51
-
52
-
53
-
54
-
55
-
56
-
57
-
58
-
59
-
60
-
61
-
62
-
63
-
64
 |
 |
