Panasonic TC P50G10 46" Plasma Tv - Page 17
Network setting, VIERA CAST setting
 |
UPC - 037988242450
View all Panasonic TC P50G10 manuals
Add to My Manuals
Save this manual to your list of manuals |
Page 17 highlights
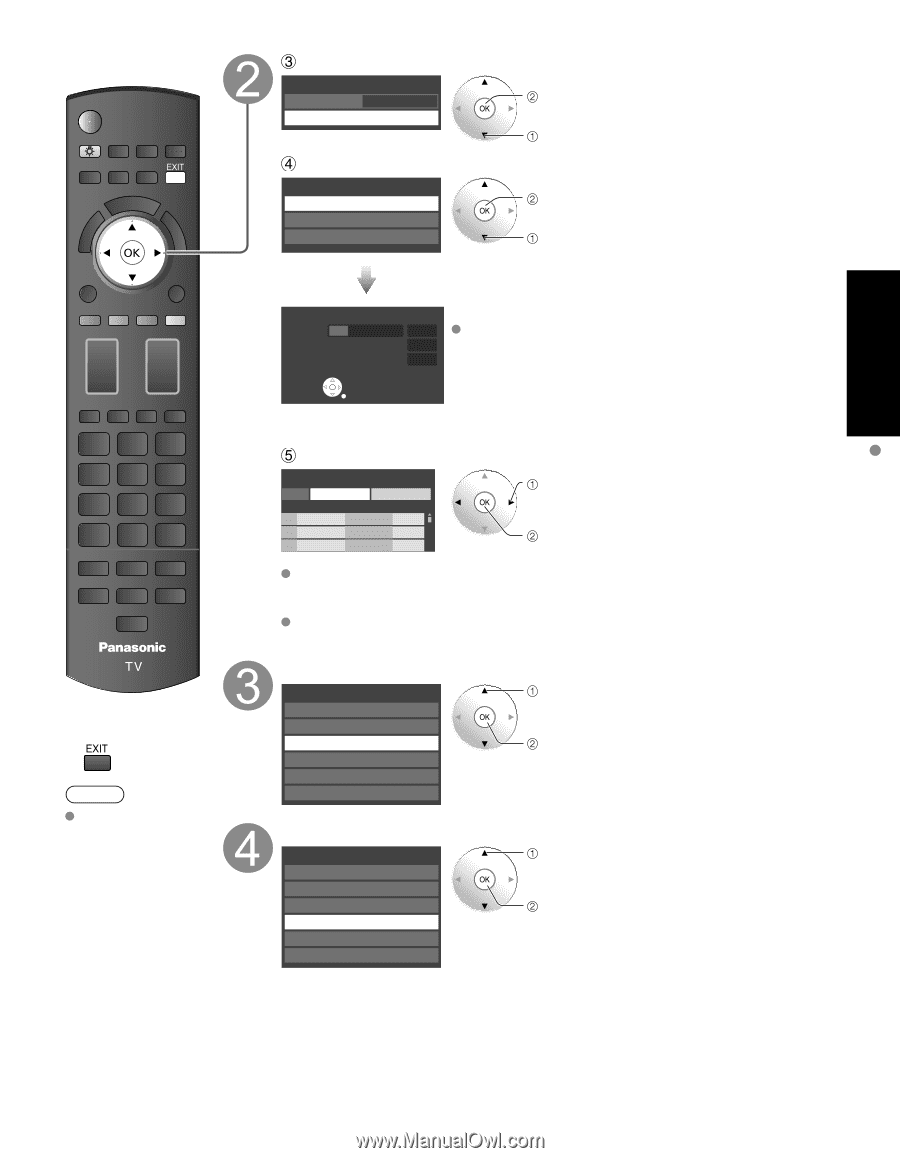
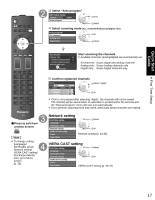
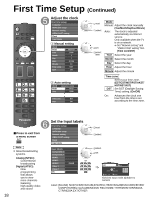
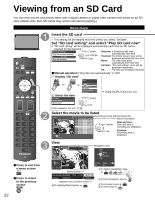
Quick Start Guide First Time Setup ■Press to exit from a menu screen Note To change setting (Language/ ANT/Cable setup/ Network setting/ VIERA CAST setting/ Clock/Input labels) later, go to Menu screen (p. 36) Select "Auto program" ANT/Cable setup ANT in Cable Auto program next select Select scanning mode (ALL channels/Analog only/Digital only) Auto program All channels Analog only Digital only Sl OK ok select Auto program Progress 8% Number of analog channels 10 Number of digital channels 0 Press RETURN to quit. RETURN Start scanning the channels Available channels (analog/digital) are automatically set. All channels: Scans digital and analog channels Analog only: Scans Analog channels only Digital only: Scans Digital channels only Confirm registered channels program Apply l Caption ... ... ... Cancel Favorite Add ... Yes ... Yes ... Yes select "Apply" ok If OK is not pressed after selecting "Apply", the channels will not be saved. The channel will be saved when no operation is performed for 60 seconds and the "Manual program" menu will also exit automatically. If you perform scanning more than twice, previously saved channels are erased. Network setting First time setup Language ANT/Cable setup Network setting VIERA CAST setting Clock Input labels select ok Network setting (p. 44-45) VIERA CAST setting First time setup select Language ANT/Cable setup Network setting ok VIERA CAST setting Clock Input labels VIERA CAST setting (p. 46-47) 17
-
 1
1 -
2
-
3
-
4
-
5
-
6
-
7
-
8
-
9
-
10
-
11
-
 12
12 -
 13
13 -
 14
14 -
 15
15 -
 16
16 -
 17
17 -
 18
18 -
 19
19 -
 20
20 -
 21
21 -
 22
22 -
23
-
24
-
25
-
26
-
27
-
28
-
29
-
30
-
31
-
32
-
33
-
34
-
35
-
36
-
37
-
38
-
39
-
40
-
41
-
42
-
43
-
44
-
45
-
46
-
47
-
48
-
49
-
50
-
51
-
52
-
53
-
54
-
55
-
56
-
57
-
58
-
59
-
60
-
61
-
62
-
63
-
64
-
65
-
66
-
67
-
68
-
69
-
70
-
71
-
72
-
73
-
74
-
75
-
76
-
77
-
78
-
79
-
80
-
81
-
82
-
83
-
84
-
85
-
86
-
87
-
88
-
89
-
90
-
91
-
92
-
93
-
94
-
95
-
96
-
97
-
98
-
99
-
100
-
101
-
102
-
103
-
104
-
105
-
106
-
107
-
108
-
109
-
110
-
111
-
112
-
113
-
114
-
115
-
116
-
117
-
118
-
119
-
120
-
121
-
122
-
123
-
124
-
125
-
126
-
127
-
128
-
129
-
130
-
131
-
132
-
133
-
134
-
135
-
136
-
137
-
138
-
139
-
140
-
141
-
142
-
143
-
144
-
145
-
146
 |
 |