Panasonic TC-P54G10 46" Plasma Tv - Page 30
Network Camera - model
 |
UPC - 037988242443
View all Panasonic TC-P54G10 manuals
Add to My Manuals
Save this manual to your list of manuals |
Page 30 highlights
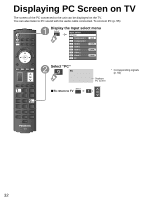
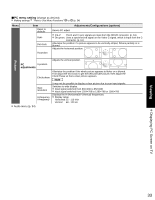
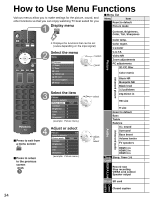
Network Camera You can operate the Network camera from TV's remote and also check the images from Network camera on your TV Basic operation for Network camera Preparations Internet connections (p. 29) Example of Network Camera connection (p. 31) Network setting (p. 44) Before connecting the Network camera to TV, please complete the "IP setting" and run "Connection test"(p. 44) Note This feature is only available with Panasonic-made network cameras released after summer 2009. (Preliminary model numbers: BL-C210A and BL-C230A) A number of VIERA-compatible network cameras can be founded at the following sites: http://www.panasonic.com/ http://panasonic.net/pcc/products/netwkcam/ With all connected equipment turned on Start up Network camera If there is no registered camera displayed, please set it in "Network Camera" settings. (p. 31) Select "Network Camera" in "VIERA Link" Using VIERA TOOLS (p. 21) Record now Stop recording VIERA Link control Network Camera Speaker output TV select ok There is also an option to start with sensor detection. View Multi screen (Still image) Without Default camera (Default camera setting (p. 31)) 4 split screen 9 split screen Multi screen (1/4) Camera name Camera 1 Model BL-C210A Multi screen (1/9) Camera name Camera 1 Model BL-C210A Select OK RETURN R 4 cam / 8 cam Select OK 1 - 9 RETURN R 4 cam / 8 cam select ■Press to exit from a menu screen ■Press to return to the previous screen ok Single screen With Default camera (Default camera setting (p.32)) Single screen Camera name Camera 1 Model BL-C210A Pan Tilt RETURN 1 - 9 Preset position 0 Home position For more details on setting and operation of the Network camera, please also read the operating manuals for the Network camera. 30
-
 1
1 -
2
-
3
-
4
-
5
-
6
-
7
-
8
-
9
-
10
-
11
-
12
-
13
-
14
-
15
-
16
-
17
-
18
-
19
-
20
-
21
-
22
-
23
-
24
-
 25
25 -
 26
26 -
 27
27 -
 28
28 -
 29
29 -
 30
30 -
 31
31 -
 32
32 -
 33
33 -
 34
34 -
 35
35 -
36
-
37
-
38
-
39
-
40
-
41
-
42
-
43
-
44
-
45
-
46
-
47
-
48
-
49
-
50
-
51
-
52
-
53
-
54
-
55
-
56
-
57
-
58
-
59
-
60
-
61
-
62
-
63
-
64
-
65
-
66
-
67
-
68
-
69
-
70
-
71
-
72
-
73
-
74
-
75
-
76
-
77
-
78
-
79
-
80
-
81
-
82
-
83
-
84
-
85
-
86
-
87
-
88
-
89
-
90
-
91
-
92
-
93
-
94
-
95
-
96
-
97
-
98
-
99
-
100
-
101
-
102
-
103
-
104
-
105
-
106
-
107
-
108
-
109
-
110
-
111
-
112
-
113
-
114
-
115
-
116
-
117
-
118
-
119
-
120
-
121
-
122
-
123
-
124
-
125
-
126
-
127
-
128
-
129
-
130
-
131
-
132
-
133
-
134
-
135
-
136
-
137
-
138
-
139
-
140
-
141
-
142
-
143
-
144
-
145
-
146
 |
 |